Maintain Business License
Navigate:Business
Revenue > Business Maintenance
> Search for a Business
> Maintain a Business [Locations
panel License active text] > [View
License Summary] > Maintain Business License
OR
> > > Maintain a Business [Locations panel EDIT buttons] >
Maintain Business Location
> [Locations panel License active text] > [View
License Summary] > Maintain Business License
OR
Business Revenue > Business License
> License Renewal > Enter
Licenses to Renew > Maintain Business License
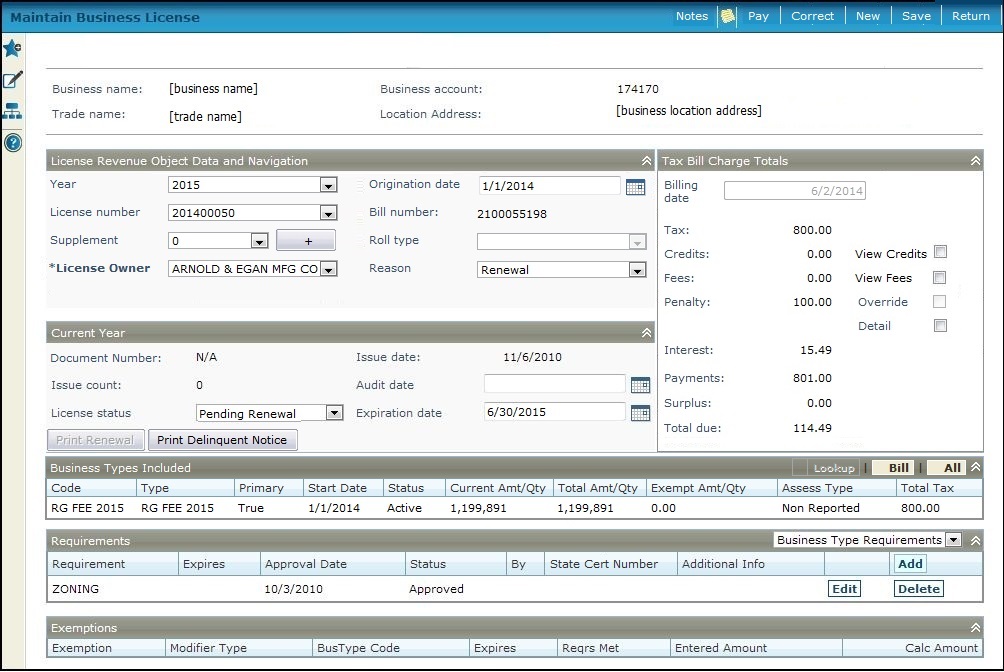
Description
Work with a business license from one of two access points:
-
Business Maintenance: Issue or maintain a business license or license supplement for particular business activities performed at a business location.
-
License Renewal: Scan renewal barcodes or enter license numbers to retrieve the license information on this screen.
The license activities are identified by business type, and you can issue a single license for many different business types. You can filter the list of business types to see a single type and the totals for that type.
A number of fields are display only and may be filled automatically when a process occurs, such as issuing the license. See Tips for more information about these fields.
On this screen you can:
-
Manage Business Types, Requirements, Exemptions, Credits, and Fees
-
Use button actions to post, print the bill, collect payment, and print the license certificate, after all conditions are met.
-
Use common actions to perform other tasks related to business licenses.
NOTES: The dates in operation and out of operation of the business location determine whether the location is active or not. A license cannot be active unless the business location is also active.
IMPORTANT: Security is also available for the Notes button on this screen. This is set via Configuration > Security & User Maintenance > Roles > Maintain a Role > Edit Role Details > Edit Non-Menu Item Role Details.
SETUP: See Business Revenue, Business Setup, and Business Maintenance for any applicable prerequisites, dependencies and setup information for this task.
![]() Jurisdiction
Specific Information
Jurisdiction
Specific Information
Renew a License
Steps for Renewing a License
When you click Next from the Enter Licenses to Renew screen, after scanning barcodes or entering license numbers, the list of licenses is loaded into this screen. The first license is displayed and the others are available from the License number dropdown list.
-
Manage the license information as required and described below to renew the license. When finished, click the Print Renewal button to print the renewal.
Add a New License
Steps for Adding a New License
NOTE: The License number is automatically assigned when you save the new license information.
-
Select the license Year, if different than the default. A business license is for the current business tax year, as set up for the business calendar.
-
Enter the Origination date when the license was first issued. This is only for a license that has never been issued for this location previously. Even if the license is inactivated and then reactivated, the origination date stays the same.
-
Select the Reason for the license, for example Audit or New License. This is a required field.
-
Select the License owner, if applicable. For example, for a doctor’s office owned by two doctors, three licenses are required, one for the business itself, and one for each of the two doctors.
NOTE: This may not apply to your jurisdiction.
-
Check in the Current Year panel that the License status is Pending for the new license. When all requirements are met and the license is paid, the status becomes active.
NOTE: The Print Renewal button behaves according to whether the license is new or requires renewal. If in the current tax year or when selecting the first year the license existed, the Print Renewal button is not visible. If renewing an existing license and selecting subsequent tax years, the button is then available. -
If you selected Audit as the Reason, enter the Audit date or select it from the date picker .
-
Set the Expiration date when the license expires. This is commonly the end of the year, but some licenses, such as a seasonal license, might have a different expiration date.
-
Add at least one business type to the Business Types Included grid.
-
Click Add to add a row to the grid and enter the code, if you know it. The code is validated when you leave the field.
OR
Click Look Up to look up the code on the Search for Business Type screen. Once you have found and selected the correct code, it is returned here.
The Type description is automatically displayed when you enter or select a code. -
Enter the Start date, Status, Current amount/quantity, and Assessment type.
-
Click Apply to store your changes.
The Total tax is calculated, and any fees and requirements associated with the business type are displayed in the panels below.
-
Maintain Tax Bill Charge Totals
-
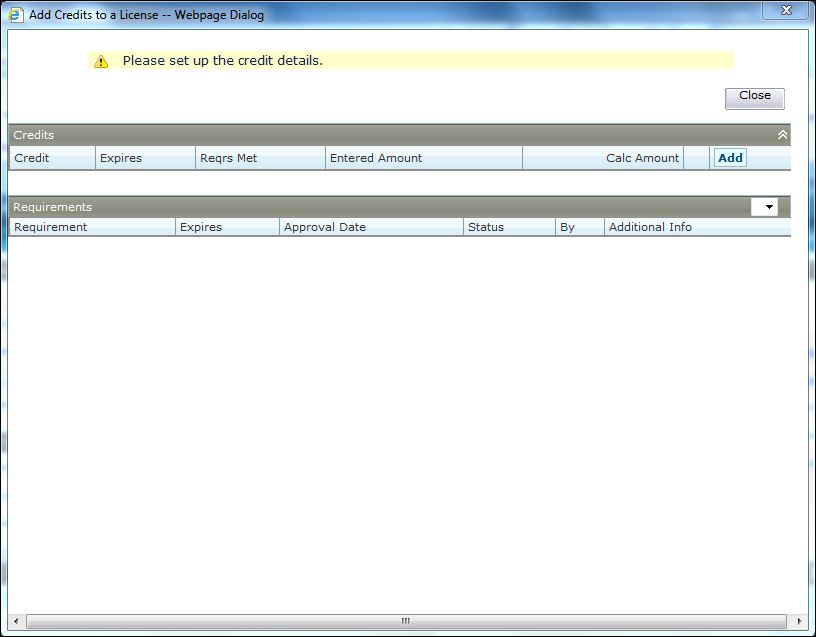
Click the View Credits checkbox in the Tax Bill Charge Totals panel to view or add additional credits in the Add Credits to a License popup. Credits associated with a business type can be modified. Credits appear on the bill. Credits are applied when the license is issued.
-
-
-
Click Add to add a row to the grid.
-
Define the Requirements..
-
Click Apply to save the credit. The amounts of fees and total charges update automatically in the Tax Bill Charge Totals panel as fees are added
-
-
-
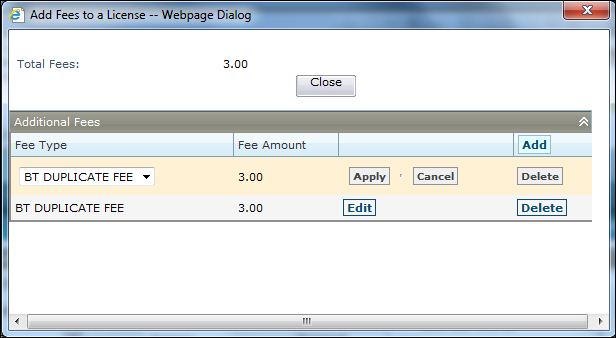
Click the View Fees checkbox in the Tax Bill Charge Totals panel to view or add additional fees in the Add Fees to a License popup; for example, trade name fees. Fees which are associated with a business type can be modified. Fees appear on the bill. All fees must be paid before the license can be issued.
-
-
Click Add to add a row to the grid.
-
Select a Fee type from the list of fees that were previously set up.
-
Enter the Fee amount.
-
Click Apply to save the fee. The amounts of fees and total charges update automatically in the Tax Bill Charge Totals panel as fees are added.
-
-
Click the Override checkbox to override any values in the panel.
-
Click the Detail checkbox to view details about the tax bill charge.
Add Requirements and Exemptions
-
Add additional requirements, if any, in the Requirements grid. All requirements must be met before the license can be issued.
-
Click Add to add a new requirement in the grid.
-
Select the Requirement from the dropdown list. Enter or change the date the requirement expires.
-
Enter the Approval date, Status, and any Additional information as applicable.
When you select a status of Approved, your user id will automatically be displayed in the by column when the requirement is saved. -
Click Apply to save the requirement. The system automatically validates the approval date.
-
- Add an exemption, if necessary, in the Exemptions panel. A license may be exempt from all or a portion of the license tax based on exemptions set up for the business types.
-
Click Add to add a new exemption row to the grid.
-
Select the Description from the list of business license exemptions.
-
Enter the Amount or Percentage of exemption.
-
Click Apply to save the exemption. The system automatically checks for any duplicate exemptions.
Add a Supplement
Steps for Adding a Supplement
A supplement is an augmentation to the license. As such, the supplement is never issued nor does it expire; it just changes the license amount or the type on the license.
A supplement adds to an existing license for the calendar year. Its life span is the same as the license, but each supplement has its own bill. For example, a supplement might result from an audit of the location's current licenses or any additional activity that requires licensing or fees.
-
Click the (plus) button, located next to the Supplement dropdown list in the License Revenue Object Data and Navigation panel. The sequential number of the supplement displays automatically.
-
Select the Reason for adding the supplement, such as audit, increase, regular.
-
Click Save.
Edit and View License and Supplements
Steps for Editing and Viewing License and Supplements
Some information can be changed for a license or supplement. For example, you can change the status, see projected interest and penalties for a future date, or add an audit date.
Some information cannot be changed. For example, you may need to inactivate a supplement and add a new one if the supplement information is incorrect.
Many of the dates and amounts are automatically updated upon completion of an action; see examples in the Tips section below.
-
Choose the License number to work with from those available for this business.
-
Click Correct.
NOTE: The task buttons at the top of the screen change to include Discard Changes and Post, and certain fields become available for editing.
IMPORTANT: If you are not set up as an auditor and you do not have access to this systype, this button is not available. The Trust Tax Assessment Type systype category controls this Correct button so that only individuals set up as auditors are allowed to choose Audit as an Assessment Type on the Process Trust Tax Returns screen, and the Correct button is also not available on this screen. To set this up, go to Configuration > Systypes > Select or Add a Systype. Set the effective date and select the systype category of Trust Tax Assessment Type. Click on Audit to navigate to the Edit a Systype screen. Uncheck the Selectable checkbox and click Save to make the Audit assessment type for business licenses and trust tax returns unavailable to non-auditors. -
Select a Correction Reason.
-
Add an Audit date if the license was audited.
-
View or change the License status. The default status of a new license is Pending; when all requirements are met and the license is paid for, the status becomes active. You can use any statuses that your jurisdiction has added also, but there are no actions associated with those statuses.
NOTE: -
View the Tax Bill Charge Totals in the right panel which pertain to the bill number displayed.
-
Change the Billing date if desired, to see the penalty amount, interest, and total due as of that date. The actual calculation is done when posting takes place.
NOTE: You can set security for maintaining the billing date by date ranges on the Set Up Global Business Revenue screen. -
Total Tax charges and Fees are displayed.
-
Penalty and Interest amounts are displayed. Mark the Override checkbox, if you are authorized, to enter a different amount for penalty and/or interest.
-
Payments made on the bill are displayed. The Total due must be paid before the license can be issued (unless a supervisor or other authorized user chooses to issue the license without a zero balance).
-
Surplus is the total of surplus payments on all license revenue objects for that business.
-
Any surplus associated with the business type are displayed automatically in the Business Types Included panel grid. The Tax Bill Charge Totals panel is updated automatically with the total tax bill, taking into account any exemptions and credits.
-
-
Click Edit on any row to edit the details, including:
-
-
Amt/Qty (Current, Total, and Exempt). For example, for a gas credit, you can enter the amount/quantity of gallons of gas. The Current Amt/Qty is the amount/quantity for this business type only. This is the figure used to calculate the tax. The Total Amt/Qty still shows the total for all business types. This is the figure used to determine the step of the rate table to use for calculations.
-
Assess Type, such as Estimated or Actual.
-
-
-
-
Click Apply to apply the surplus. The Tax Bill Charge Totals panel is updated automatically to show the total due.
-
-
-
-
NOTE: If you inactivate a type, it does not remove the associated fees.
-
-
-
-
View the issue date, which is added when a certificate is printed and does not change. and the issue count which is automatically updated each time a certificated is printed.
-
Click Save.
-
Click Notes to add Notes.
-
Click Discharge Changes to discard all changes.
-
Click Post to post the updates.
-
Click Return to return to the previous Maintain Business License view.
Manage Business Types, Requirements, Exemptions, Credits, and Fees
Certain states have business exemptions and credits that are applied to the assessed value of a business. When issuing a business license, these exemptions/credits are applied to the tax bill. Examples are:
-
(Palm Beach) Senior Deferral, a 100% tax exemption for a senior citizen who opens a business
-
(CVB) Gas Credit
NOTE: Exemption amounts apply to the assessed value, not to the tax. It is not possible to have more exemptions than the assessed value. If there are more exemptions than the assessed value, the tax caps at zero.
You can add exemptions and credits two ways:
-
Select the business type if you have associated exemptions and credits with the business type when you set up business exemptions and credits
-
Add credits and exemptions on this screen on the Exemptions and Credits panel.
Steps for Including Business Type to Add Exemptions/Credits
NOTE: When adding a new location for an existing business, the Primary Business type carries forward automatically to the Business Types Included panel.
To select the business types to include that you associated with exemptions and credits when you set up business exemptions and credits:
-
Enter the business type code in the Code field if you know it in the Business TypesIncluded panel
OR
Click Lookup in the panel header to open the Search for Business Type screen and select the business type.
OR
Click New to add more business types to the grid.
Any exemptions or credits associated with the business type are displayed automatically in the panel grid. The Tax Bill Charge Totals panel is updated automatically with the total tax bill, taking into account any exemptions and credits. -
Click Edit on any row to edit the details, including:
-
Amt/Qty (Current, Total, and Exempt). For example, for a gas credit, you can enter the amount/quantity of gallons of gas. The Current Amt/Qty is the amount/quantity for this business type only. This is the figure used to calculate the tax. The Total Amt/Qty still shows the total for all business types. This is the figure used to determine the step of the rate table to use for calculations.
-
Assess Type, such as Estimated or Actual.
-
Click Apply to apply the exemption/credit. The credit/exemption is applied automatically to the Total Due in the Tax Bill Charge Totals panel.
-
Click Delete in the grid row of any business type you want to delete to delete it from the grid.
-
Repeat the previous applicable steps to add/edit business types.
-
Click Save.
Steps for Managing Requirements
Any requirements you set up associated with a business type or associated with any exemptions and credits are displayed in the Requirements panel. Requirements are set up on the Edit Business Exemption/Credit screen.
IMPORTANT: Some jurisdictions accept business license payment or might also issue a business license without approval while others require that all requirements are met before accepting payment or issuing a license. If requirements are not met, a flag is set up in Cashiering. The particular jurisdiction then has the option to accept payment and issue the license, depending on their business rules.
-
Click Add to add additional requirements. For example, you might have added an additional exemption or credit and certain additional requirements may be needed before processing a license.
OR
Click Edit in the grid row for any existing requirement you need to maintain. -
Select the Status from the dropdown list, such as Needing Approval, On Hold, or Approved. For example, a zoning permit might need approval before processing the license.
-
If you checked the Certificate Number Required checkbox on the Set Up Business Requirements screen, enter the required Certificate Number.
NOTE: Certificate Numbers may not apply to your jurisdiction.
NOTE: Any existing certificate numbers associated with the license are displayed in the Certificate Number field in the Current Year panel. -
If you checked the Additional Requirements checkbox on the Edit Business Exemption/Credit screen when you set up exemptions and credits, the Additional Info field opens for you to enter a comment. For example, a senior citizen may need to show proof of senior citizenship to get an exemption, and a note is required indicating that the proof has been provided.
Once you've entered a comment and applied the requirement changes, your user name displays in the By field. -
Click Apply to apply the requirement information.
-
Click Save.
Steps for Adding/Editing Exemptions
Any existing exemptions associated with the business are displayed in the Exemptions grid.
-
Click Add to add additional exemptions or credits
OR
Click the Edit button in the grid row of any existing exemption/credit.
A popup is displayed if you click Add.
-
Select either a credit or an exemption to add from the Exemption/Credit to Add from the dropdown list.
-
If you select to add an exemption, a second dropdown list is displayed. Select the business type to associate with the exemption from the Associate to Business Type dropdown list.
-
Click Add to add the credit or exemption.
-
Click Exit to exit without adding
-
Enter the amount in the Entered Amount field.
-
Click Apply. The credit/exemption is applied automatically to the Total Due in the Tax Bill Charge Totals panel.
-
Click Delete to delete a credit or exemption.
-
Repeat the previous applicable steps to add/edit additional exemptions and credits.
-
Click Save.
Steps for Viewing/Managing Credits and Fees
NOTE: The list of exemptions and credits are set up in Business Revenue > Setup > Business Exemptions and Credits > Select Business Exemptions and Credits > Edit or New > Edit Business Exemption/Credit.
-
Click the View Credits active text in the Tax Bill Charge Totals panel (top, right-hand side). The Add Credits to a License - Webpage dialog box opens.
-
Click Add in the Credits panel to open the Add Credit to a License - Webpage Dialog box.
-
Select the Exemption/Credit to Add from the dropdown list and click Add to add it.
Click Exit to exit the screen without selecting a credit.
-
Click Add in the Requirements panel to add a requirement.
-
Select the Requirement to Add from the dropdown list and click Add to add it.
NOTE: The list of requirements are set up in Business Revenue > Setup > Business Requirements > Set Up Business Requirements >EditorNew.
-
Click Apply.
-
Click Cancel to cancel the selection.
-
Click Delete to delete the credit.
-
Click Exit to exit the screen without selecting a credit.
Final Review and Process
![]()
Steps for Final Review/Process
-
Click Save to save the changes.
-
You can perform various other options at this point, such as post the account, print a renewal, print the bill, add notes, and discharge changes. See the next section, Buttons, for details.
-
When you have finished, click Return to go back to the Enter Licenses to Renew screen where you can scan or enter more licenses or close the task or to the Maintain a Business screen, depending on how you navigated to the Maintain Business License screen.
Buttons
The buttons are listed here in the order that you would use them. NOTE: Some buttons will remain unavailable until you satisfy prior steps.
-
Click Notes if you want to attach a comment about the license on Maintain Notes. The button is available after the license is saved; notes can then be added at any time.
-
Click Pay when you are ready to post all tax charges to advance to the Cashiering > Collect Payments screen. This button is available after all required data is entered.
NOTE: After posting successfully for the current year, a popup window displays for all current years. Select the checkbox for each year in which to create a previous year license. Choose to include penalty and/or include interest as needed. Click Post to create the prior year licenses. -
Click Discard Changes to remove any changes you have made.
-
Click Save to retain changes made. All information is validated. After saving you can make changes, continue to the next step, or Close and return later. Nothing is posted to financial detail at this time.
-
Click Print Cert (top of screen) to print a state certificate, if applicable to your jurisdiction.
NOTES: -
San Francisco. See Jurisdiction Specific Notes at the top of this topic for information about application settings that control printing of certificates if the account or any related revenue object accounts are delinquent.
-
When multiple types of certificates exist, the print certificate processes can determine which certificate to print based on the business type license selected. To set this up:
-
Define the certificate on the Set Up Business Types screen (Business Revenue > Setup > Business Types).
-
Select the certificate type you want to associate to the Business.
-
Set the Business Revenue effective date application setting Printing Multiple Types of License Certificates to true to identify if the county is printing multiple types of license certificates via Configuration > Application Settings > Maintain Application Settings.
-
When set to True the certificate you set on the Set Up Business Types screen is used.
-
When set to False, the existing setting in Global Business Revenue is used. Batch printing of Business Licenses has also been updated to print certificates based on the Application Setting.
-
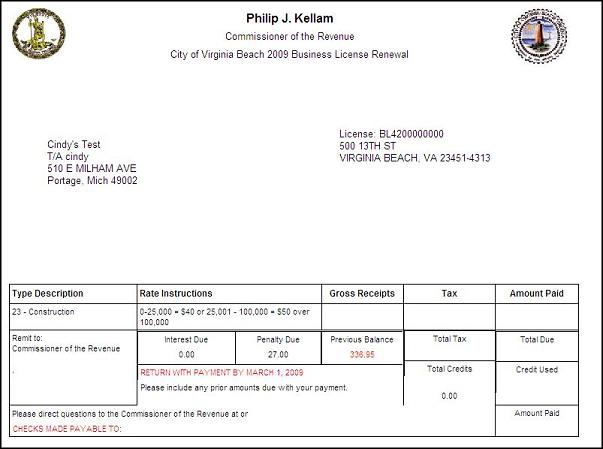
Click Print Bill to preview and print the bill for the license or supplement currently displayed. The button is not available until the license information has been posted. You can print from the preview window.
-
Click Print Renewal (left side of screen in Current Year panel) to print a license renewal. This button behaves according to whether the license is new or requires renewal. If in the current tax year or when selecting the first year the license existed, the Print Renewal button is not available. If renewing an existing license and selecting subsequent tax years, the button is then available.
-
Click Print Delinquent Notice (left side of screen next to Print Renewal button) to print a license bill delinquency notice. This button behaves according to whether a delinquency on the license exists. If so, the button is available. If not, the button is not available.
-
Click Correct to edit information about an existing license after posting. This button does not display until after posting. The Lookup button is activated for the Business Types Included grid.
-
Click New to create a new license bill. The New button is not available if retrieving an existing license.
-
Click Return to return to the previous screen, either Enter Licenses to Renew, Maintain a Business, Maintain Business Location, or View License Summary, where you can work with a different license.
Report Sample

Common Actions
Set Up Business Types - Access the Business Type setup task to make changes to business types.
Roll Business License - Go to Create New Business Tax Receipt Roll to roll over the business licenses to the next tax year.
Manage License Flags - Add or remove a flag attached to the license on Manage License Flags.
Manage Tax Bill Flags - Add or remove a flag attached to the license tax bill on Manage Business License Tax Bill Flags.
View Correction History - View the details of all corrections to the license information on View License Correction History.
Maintain Additional Business License Information - Enter or edit any information in user-defined fields on the Maintain Additional Business License Information that were created previously in the Set Up Additional Information Fields screen for business licenses.
BTR Tracking System - (and various other systems, Palm Beach, Florida) Link to the BTR Tracking System web page as well as a variety of other web sites defined by the jurisdiction for the purpose of tracking and managing business tax revenue licenses and various other data associated with business license information.
Document Image URL - (Virginia) When the application setting "Document Image URL" is defined, an additional Common Action that links to a document image repository web page defined by the jurisdiction for the purpose of attaching document images to the business license record.
Tips
These fields are view only.
-
The Business name, Business account, Location, and Location address information are displayed from the previous screen.
-
The License number is generated automatically when you save. A unique license number is generated for each license. Licenses are normally issued and then renewed each year.
-
The Billing date will be automatically filled when there is a posting or printing of a license.
-
The Certificate number defaults to blank. A unique Certificate number is generated for the license during the printing process, and it is printed on the certificate.
The calendar of the business license regulates the renewal dates.
The license can have a status of Pending, Active, or Inactive. In addition, your jurisdiction can add other statuses, such as Hold.
When the bill is generated, it is stored in Aumentum and available in other modules, like Cashiering or Info Center, like any other bill.
Print business license renewal notices from the Business Revenue > Business License menu.
When you manually set or clear the override checkbox on Maintain Business License, the action of the application setting Business License Lock Late Payment Penalty is nullified. When True, the application setting indicates that the late payment penalty should be locked automatically when the late filing penalty is applied (or unlocked automatically if the late filing penalty is removed).