Tax Information
Navigate:  Info
Center > Tax Detail > Records
Search > Records Search
Results > Tax Information
Info
Center > Tax Detail > Records
Search > Records Search
Results > Tax Information
OR
Personal Property Appraisal
> Accounts
> Search for
Personal Property Accounts > Maintain
PPA Accounts > [Common Action > Tax
Detail] > Tax Information
Description
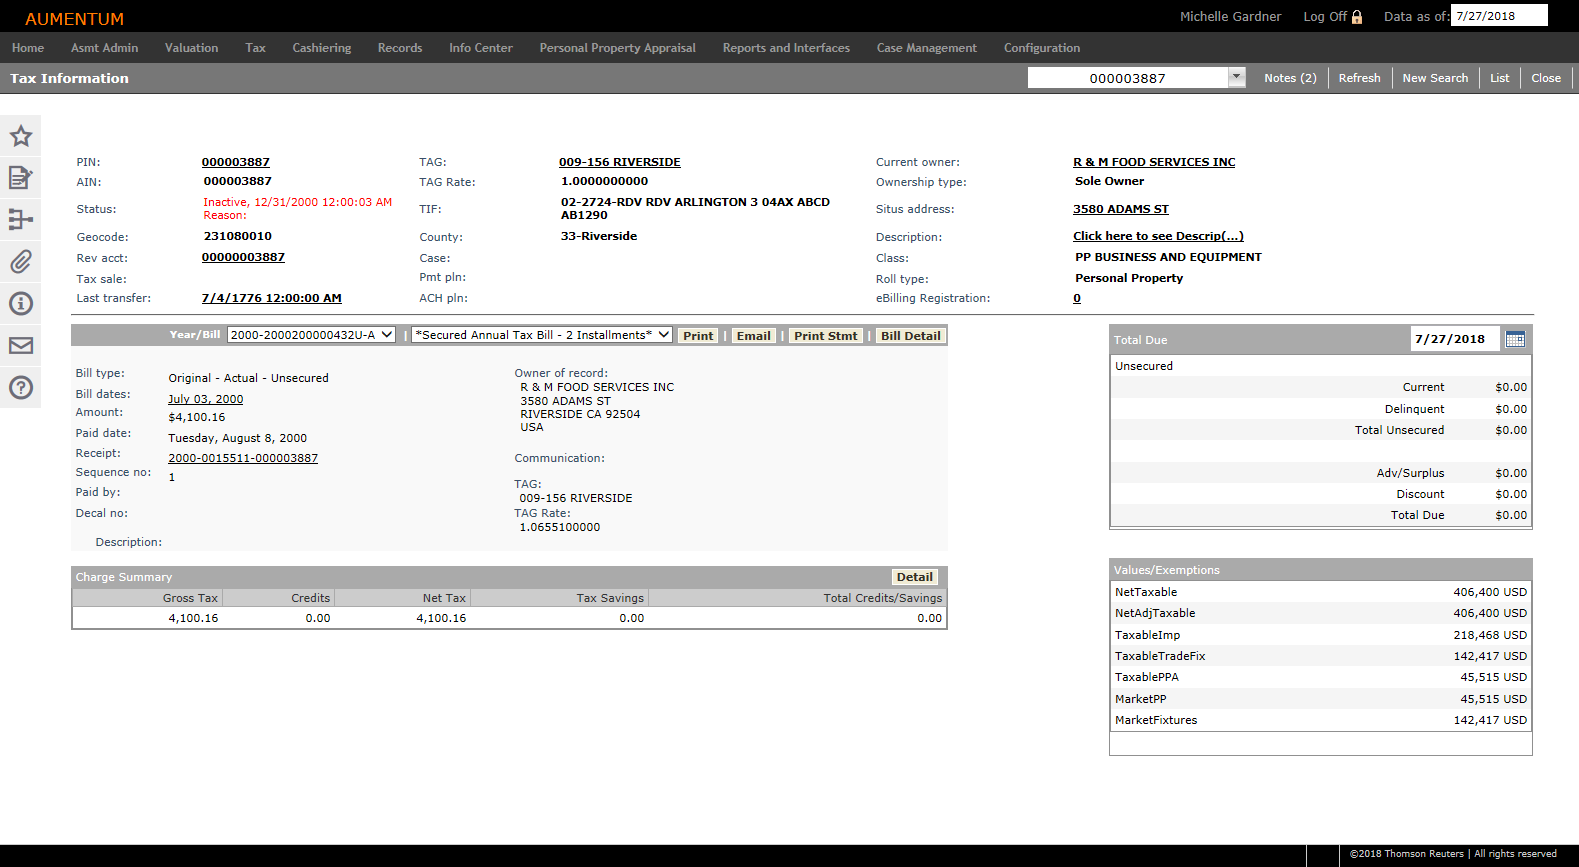
The Tax Information screen contains many of the same fields and navigational aids as other Info Center pages. As the hub of the Info Center, the Tax Information screen provides an overview of revenue object information for a tax year, including identification, owner, situs, billing information, due amounts, values, and assessment information. Print an on-demand tax bill, or navigate to more detailed information.
Jurisdiction Specific Information
Jurisdictions using the collection type attribute
-
The Secured and Unsecured charges have been separated and now display both Current and Delinquent subtotals for each collection type
California
-
The Allow Property to be in Multiple Secure Sales application setting allows tax sale items to be in multiple tax sales, and the tax sale in the Publication List to be in multiple secure sales when set to True. When a tax sale with multiple items is cashiered, the status of any tax sale item also in another tax sale is set automatically to Non Participant in the non-cashiered tax sale with a Change Reason set to Sold in Another Sale. The Assessor, Auctioneer, and Tax Sale Balance reports include an additional Multiple Sales column that contains a count of the number of tax sales in which an item is participating if this setting is set to True and there are multiple items in a secure tax sale. The Copy function via the Process Items drop-down list in the Tax Items Details panel on the Maintain Property Sales screen is used to copy the item from one tax sale to another. Also, a Multiple Sale link in the header of the Info Center > Tax Information screen for any items in multiple sales opens a pop-up to select the particular tax sale, which opens the Tax Sale Information screen with the selected tax sale information loaded.
Riverside, California
-
A Penalty506 value type was created. When printing the Riverside Secured Tax Bill from Info Center or from Billing, if the amount of the penalty is 0 or does not exists, no message is displayed. If the amount is > 0 then the following message is displayed on each coupon of the bill:
-
Pursuant to California R&T Code 506, a penalty in the amount of xxxxxxx has been added to the general taxable assessment of this property.
-
The xxxx is the amount of the 506 Penalty.
Steps
- Click Info Center > Tax Detail.
- On the Records Search screen, enter your search criteria and click Search.
- From the search results, select the checkbox for one or more items in the grid and click Next in the Command Item bar.
There are five sections of the Tax Information screen: Header, Year/Bill, Charge Summary, Total Due, and Values/Exemptions. Each of these five sections are detailed below.
NOTE: You must have security permissions to access maintenance screens from a link in the Info Center.
- PIN (Primary Identification Number) – Click the link to open the Revenue Object Detail Information screen. Click Tax Info in the Command Item bar to return to the Tax Information screen.
- AIN (Alternate Identification Number)
- Status – An inactive status appears in red.
- Geocode
- Rev acct (Revenue Account) – Click the link to open the Related Revenue Objects Information screen. Click Tax Info in the Command Item bar to return to the Tax Information screen.
- Tax sale – Indicates the most recent tax sale in which the revenue object was included. Click Tax Info in the Command Item bar to return to the Tax Information screen.
- Last transfer – Click the link to open the Chain of Title Information screen. Click Tax Info in the Command Item bar to return to the Tax Information screen.
- TAG (Tax Authority Group) – Click the link to open the Tax Rates by TAG report in a new window.
- TAG rate
- TIF (Tax Increment Financing)
- County – A combination of the county code and name, such as 8-Brown.
- Case – A bankruptcy or litigation case number. Click the link to open the Create or Maintain Cases screen. Click Tax Info in the Command Item bar to return to the Tax Information screen.
- Pmt pln (Payment plan) – Click the link to open the Payment Plan Details screen. Click Tax Info in the Command Item bar to return to the Tax Information screen.
- ACH Plan – Click the link to open the Maintain Taxpayer ACH Information screen. Click Tax Info in the Command Item bar to return to the Tax Information screen.
- Current Owner – Click the link to open the Legal Party Information screen. Click Tax Info in the Command Item bar to return to the Tax Information screen.
- Ownership type
- Situs address – The situs address associated with the revenue object. Click the link to open the Situs Address Information screen. Click Tax Info in the Command Item bar to return to the Tax Information screen.
- Description – Displays a portion of the property description. Click the link to open the Property Description Information screen. Click Tax Info in the Command Item bar to return to the Tax Information screen.
- Class – Class code (for example, Residential, Commercial, Mobile Home). If the class is mobile home, click Add Decal to enter decal information.
- Roll type
- eBilling registration – Click the link to open the Electronic Billing Registration screen.
-
The revenue object
-
Any legal party associated with the revenue object
-
Any tax bills associated with the revenue object
-
Any situs address associated with the revenue object
-
From the Year/Bill drop-down list, select a bill. The tax year (the four-digit prefix) you select also affects the Change Summary and Values/Exemptions panels. The year displayed is the year of the bill that you are currently viewing.
If no data is displayed,
click here for application setting instructions.
- Click Configuration > Application Settings.
- In the Maintain Application Settings screen, select Tax Year from the Setting type drop-down list, select Information Center from the Filter by module drop-down list, and select 1990 from the Filter by tax year drop-down list.
- Locate Use Cadastre or Event Date for Owner of Record and click Edit.
- Select or clear the checkbox in the Setting Value column and click Apply.
- If not selected, Aumentum looks up the revenue object as of the billing date, gets the primary owner of the revenue object, and looks up that legal party as of today.
- If it is selected, Aumentum looks up the legal party from the Tax Bill Party of Record table, and gets that legal party as of the billing date.
- Click Save in the Command Item bar, then click Close to end the task.
-
Actual – These bills have an A displayed at the end of the bill number. In certain jurisdictions, such as California, this can also be derived from the TaxBillTran.Status roll caste. If posted, then it is A, for Actual. If closed, then it is E for Estimated.
-
Estimated – These bills have an E displayed at the end of the bill number. These appear only if your jurisdiction uses estimated bills, such as Minnesota's Truth in Taxation.
-
Rollback – These bills have an R displayed at the end of the bill number.
-
Transfer – These bills have a T displayed at the end of the bill number.
-
From the next drop-down list, select the bill or tax statement. Actual and estimated formats may be listed. Tax statements may include revenue object statements and revenue account statements.
-
Click Print to open the bill in a new window. Click Print Stmt to print a Tax Statement. (This button is available when the application setting Force Current Year Tax Statements is set to true.)
IMPORTANT: The Cashiering Use custom receipt functionality application setting displays a Custom Receipts grid of selectable Report Setup names at the bottom of the Cashiering Collect Payment screen when set to True. A Report Setup tied to a Receipt data service category must be set up using the Reports and Interfaces > Data Services and Correspondence tasks. Contact your Aumentum Support representative if you need assistance setting this up. This enables selection of a custom receipt report to print for a bill of sale, for example. The selected document(s) prints in addition to the receipt. You can also print the receipt via the Cashiering Collect Payments screen and Print Mass Receipt screen as well as from the Tax Information screen.
-
Click Email to open an Email Tax Bill dialog.
-
In the To field, type the recipient's e-mail address.
-
The Subject field is auto-populated, but you can edit it if necessary.
-
The e-mail content box is also auto-populated, but you can edit the text if necessary.
-
Click Send, then click Close.
-
-
Click Print Stmt to open the bill in a new window. From there, you can download or print the bill.
-
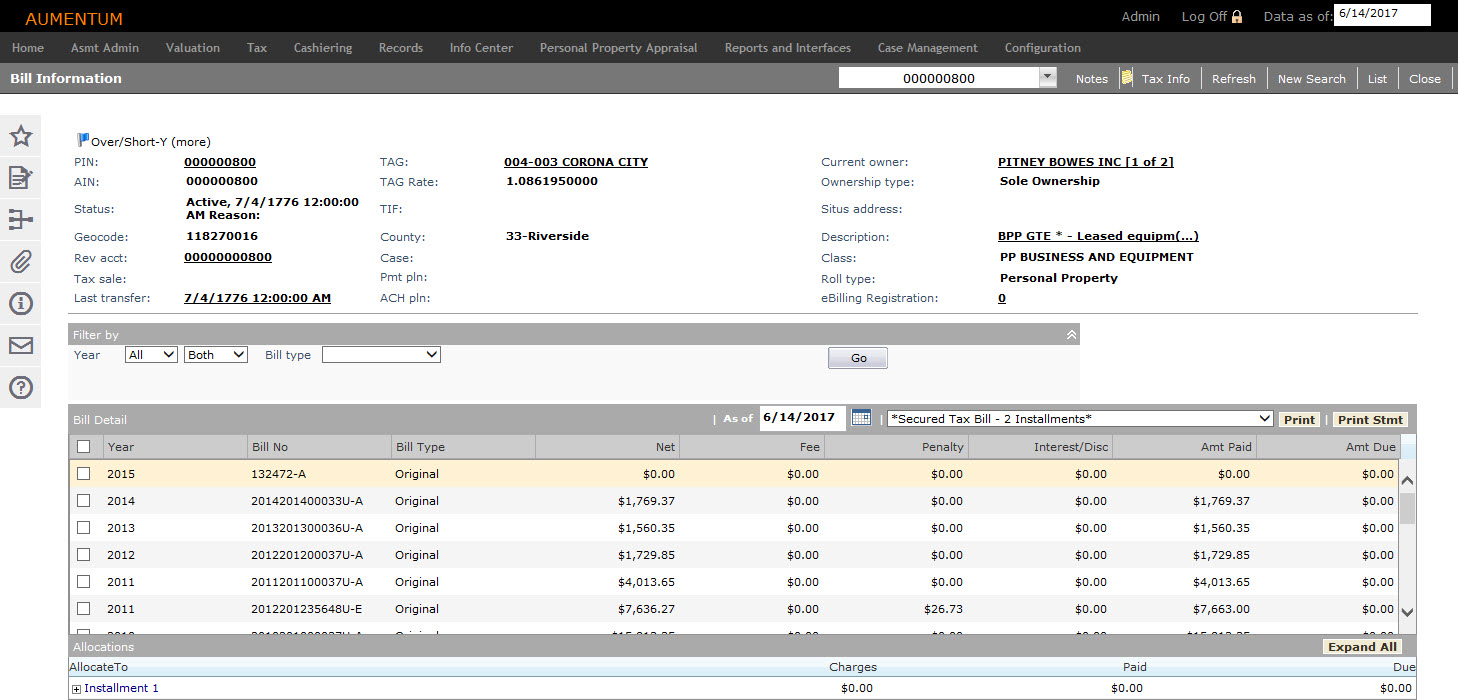
Click Bill Detail to open the Bill Information screen.
- Click the Bill Dates link in the panel to open the Bill Date Information screen.
- Click Previous to return to the Tax Information screen.
- Click the Receipt link to print the receipt. A workstation must be defined before attempting to print.
-
To view delinquent or future projections, use the date picker icon to change the current "as of" date. For example, you can see what interest would be forgiven and what the payment would be if interest is forgiven.
NOTE: The date cannot be earlier than the last payment date or the bill date. -
Use the date for the current tax year or future date projections. It does not apply to previous tax years. For example, you can project what the interest and penalty would be if payment were to be made as of a future date.
- Click Configuration > Application Settings.
- On the Maintain Application Settings screen, select Effective Date from the Setting Type drop-down list, and Information Center from the Filter By Module drop-down list.
- Locate Include Unrounded/Rounded amounts TDC Summary and click Edit. Select the checkbox to indicate True. Clear the checkbox to indicate False.
- Click Apply, then click Save in the Command Item bar.
-
Tax Bill: The values for land, improvement, and agriculture displayed, including a unit of measure. Values that are currency do not show decimal places; other values, such as acreage, show four decimal places. Special assessments are displayed with the basis of a special assessment value, such as square footage or acres. Exemptions are also listed.
-
Business License: The Values grid shows the business license information, if the user has security rights to view the Business Detail view in Info Center.
Header
The top of the page is the header area and contains information about the revenue object.
NOTE: An ellipsis (...) next to Tax Sale indicates that the PIN is associated with more than one Tax Sale.
NOTE: If a payment plan exists on an account and payment plan recalculation is allowed on a roll change based on your setting on the Edit Payment Plan Type screen, the Tax Information and Event History screens show an information icon next to the Pmt pln field in the header.
The current owner is the primary owner of the revenue object as of the user’s current effective date. The primary owner name is displayed when only one name can be shown due to space restrictions on forms, reports, or screen layouts. The term primary owner in Aumentum has no legal implication.
NOTE: When a legal party is confidential and the user has security rights to view confidential legal party data, a stop sign displays next to the name as a warning. If the user does not have the required security, the stop sign does not display. In either case, note that the confidential legal party's "display" name appears, not their actual name.
Flags
A flag icon displays under the screen name if a flag is associated with:
NOTE: Users who do not have security rights to manage flags cannot view the Manage Flags screen (available from Common Actions). If you do not have security clearance to use a link, the data displays in the header area, but the link is not available. This also applies to the other Tax Detail screens that display the same revenue object heading information.
Flags indicate conditions such as bankruptcy or NSF (non-sufficient funds), or various other designation. Different flag colors are used to denote different priorities, such as red (high), yellow (high), blue (medium), and green (low). (The color you use depends upon the Priority setting in Systype Categories.)
The word more is displayed next to the flag icon if two or more flags are associated with the revenue object. When a revenue object has multiple flags associated with it, the color of the highest priority flag is shown. To view detailed information about all the associated flags, click the flag icon, or Common Actions > Manage Flags.
Buttons
Click Notes to view, add or edit a comment about this revenue object. Or, hover over the Notes button to see how many active notes are associated with this PIN.
Click Tax Info to return to the Tax Information screen.
Click Refresh to see any changes made by other users while you were viewing this data.
Click New Search to return to the Records Search screen.
Click List to return to the search results screen where you can select another revenue object.
Click Close to exit Info Center.
Year/Bill panel
Information about the most recent bill and owner of record (owner as of the last cadastre) is included in this panel.
NOTE: If the application setting Force most recent tax bill for tax statements is set to true (default = false), the current year is selected automatically if a bill from a previous year is selected and Tax Statement is selected as the report type. The Year/Bill drop-down list is then disabled and the current year bill is selected automatically. Also, the Tax Statement report type is not available on the Bill Information or Delinquent Information screens (via Common Actions in the sidebar).
When the application setting is set to false, all bill types are available on the Tax Information, Bill Information, and Delinquent Information screens if they are set up in Billing to be associated with the Info Center and Delinquent modules.
NOTE: The Email option may not apply to your jurisdiction and may only display depending on the bill/tax statement selected.
See Dependencies, Prerequisites, and Setup at the end of this topic for more information.
Total Due panel
For jurisdictions that use Secured and Defaulted Secured billing, and for payment plans, the panel display is slightly different from other jurisdictions.
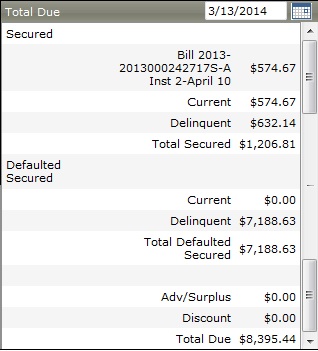
A Credit amount line is included for payment plans with a credit.
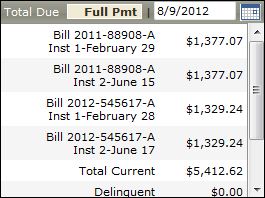
In the Total Due panel, amounts and totals are displayed as of the date shown in the title bar.
Installment information is sorted and displayed by tax year, bill number, and then installment. The advance details that show are for the selected bill. A past due installment is not included here.
The advance and surplus amounts are included in the total due, unless the application setting Include Advance/Surplus in Total Due amounts is set to False. An application setting for Accounts Receivable, Display nominal overages in the Adv/Surplus area in info center, determines whether or not to display a nominal overage amount in the Advance/Surplus area. A nominal overage is a surplus that is over the amount due but within the specified tolerance amount.
The Full Pmt/Inst Pmt button is displayed when the application setting Default Interest Calc Display is set to either Installment or Full. If the application setting is set to None, then the button is not displayed. If the application setting is set to Installment, when first viewing a Revenue Object in Info Center the button will be labeled [Inst Pmt] and the interest that is calculated will be based on the taxpayer paying by installment. If the application setting is set to ‘Full’, when first viewing a Revenue Object in Info Center the button will be labeled [Full Pmt] and the interest that is calculated will be based on the taxpayer paying the bill(s) in full.
Click the button to toggle the interest calculation for all bills with a balance due, from being based on installment payments to being based on a full payment. If the displayed interest is based on installment payments, the button says [Inst Pmt]. If the displayed interest is based on full payments, the button says [Full Pmt].
NOTE: The Full Pmt/Inst Pmt toggle button may not apply to your jurisdiction.
Charge Summary panel
The Charge Summary panel shows a summary or charges. The columns available may vary depending on your jurisdiction.

NOTE: The Unrounded Tax and Round Amt columns are available only in certain jurisdictions and display when the application setting Include Unrounded/Rounded amounts TDC Summary is set to True.
Click here for application setting instructions.
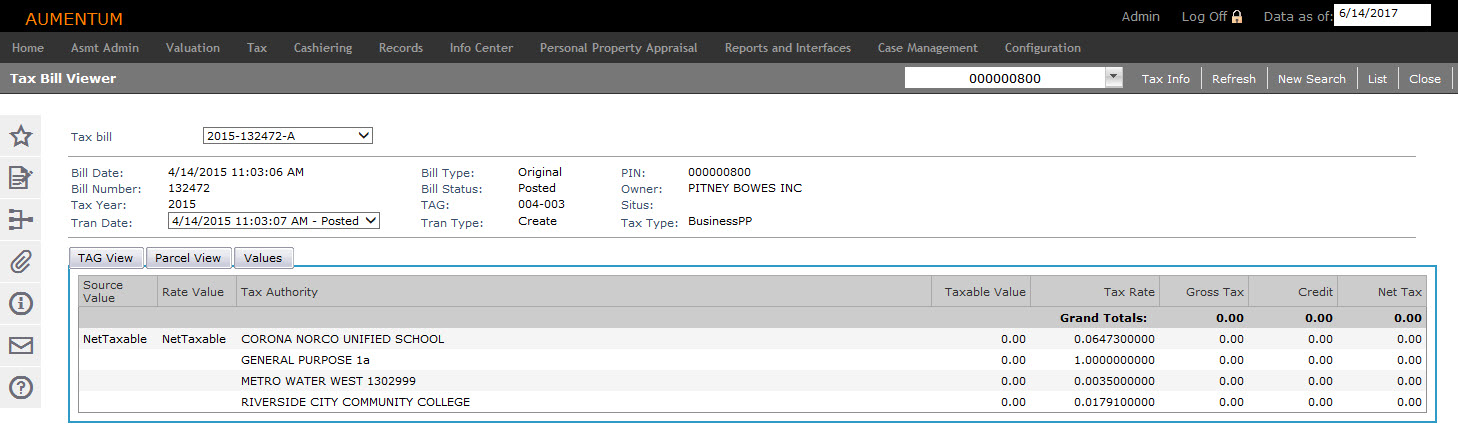
Click Detail to open the Tax Bill Viewer screen, where you can view the calculated charges of any tax bill for the revenue object. The charges can be actual or estimated taxes, and you can review them using the TAG View and Parcel View tabs.
Values/Exemptions panel
The Levy Management values and tax exemptions are displayed, based on tax bill and tax year selected in the Year/Bill panel. The values are those used to calculate taxes for the displayed tax year. Change the tax year to see values of other years.
Other Aumentum Modules
Data in the Tax Information screen is supplied from other Aumentum modules. If it is incorrect, check the setup in the originating module.
Links to other modules and restricting access to sensitive information in the originating module are controlled via Configuration > Security and User Maintenance.
Modules that can be accessed from links within Info Center include:
-
Accounts Receivable Payment Plan Details
-
Aumentum Billing – Update Lender Associations
-
Aumentum Cashiering – Collect Payments
-
Aumentum Delinquent – Search for Cases
-
Aumentum Framework – Notes
-
Aumentum Records – Legal Party Detail
-
Aumentum Records – Maintain Revenue Object Addresses
Billing
-
Items in Tax > Billing > Setup must be complete.
Levy Management
-
Value Type Mapping – The values view on the Values/Exemptions grid of the Tax Information screen are based on the Levy Management Value Type Mapping. To specify new values you want to see, the following must be set up:
-
On Value Type Mapping, choose the Value Type List mapping.
-
Value types must be mapped using the InfoCenterValues process code.
-
The Description is the label that appears in Info Center. See also Systypes.
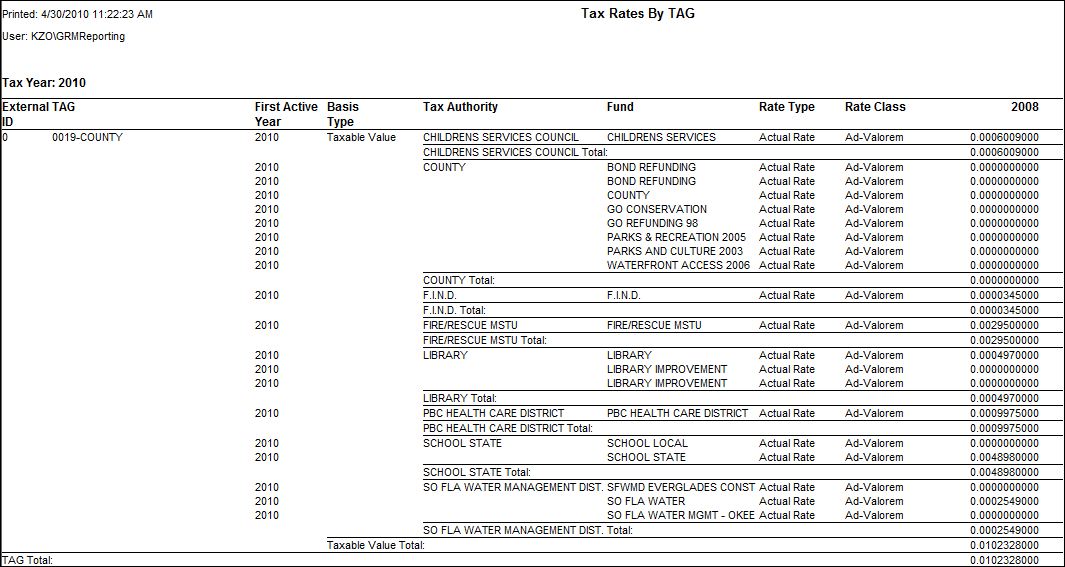
Report Samples
Click the hyperlink for the TAG in the header of the screen. The Tax Rates By TAG report displays.
NOTE: The TAG Rate labels can be overridden via the Configuration > Label Maintenance task.
Common Actions
NOTE: Five External Links called InfoCenter_Default1 through InfoCenter_Default5 let you create links to destination URLs. They are displayed in Common Actions in the sidebar, and on the Tax Information and Revenue Object Detail Information screens if a long description for the External Link was created. Contact your Aumentum Support representative to create the long description to display on the Info Center screens.
Some Common Actions on this screen may be jurisdiction specific. Also, when there are no tax bills for a revenue object, the following links are not available: View Delinquent Detail, View Special Assessments, View Tax Roll Viewer, View Transaction History, Pay Taxes, and Process Corrections.
Excess Proceeds Worksheet
Revenue Object Modifier Maintenance
BVS History
Dependencies, Prerequisites, and Setup
Year/Bill panel
Click the Bill dates hyperlink to open the Bill Date Information screen and view the dates for the selected bill. If no date is available, Info Center will display a 1776 bill date.
The Receipt number of the most recent payment is displayed. Click the hyperlink to send it to the Workstation set up via Configuration > Systems > Workstations.
IMPORTANT: The Year/Bill panel displays the Owner of Record. Its definition depends on the value of the application setting "Use cadastre for owner of record."
-
When the application setting is true, then this is the owner as of the last cadastre, which is the register or roll.
-
When the application setting is false, or if the cadastre information is not available, then the address is the current address of the current owner, as of the effective date.
-
When a legal party is confidential and the user has security rights to view confidential legal party data, a stop sign displays next to the name as a warning. If the user does not have the required security, the stop sign does not display. In either case, note that the confidential legal party's "display" name appears, not their "actual" name.
The default bill form is set up via Billing > Setup > Maintain Reports. The Default Report Display Format (such as PDF) for the bill is set up for your user profile on the Maintain User Information screen.
The sequence number is displayed, which is helpful when a lender payment has one receipt that pays many bills.
Total Due panel
When using CollectMax, there is an icon in the Total Due panel when a web payment is pending.
When alternate dates (set by the application setting) are used for installments, the Tax Information screen displays the alternate dates for the 1st and 2nd installment due dates in the Total Due panel, if the taxpayer had not paid the 1st installment in full by the due date.
The Assessment and Exemption Information screen has been replaced by the Tax Roll Viewer and Cadastre Viewer.
Values/Exemptions panel
The values that display in the Values/Exemptions panel are user-controlled through Levy Management's Value Type Mapping.
When there are multiple bill types, they are listed in this order: actual, estimated, rollback, transfer.
Statements are set up as a bill type in Aumentum Billing, using Info Center as an available module. The statement then is an option to print in the list of available bills.
A delinquent message is now displayed on the child parcel(s) when the parent parcel has a balance due. Set this up via Configuration > Application Setting > Maintain Application Settings. Select the Info Center module and set 'Display message for delinquent parent parcels' to true.