Process Trust Tax Returns
Description
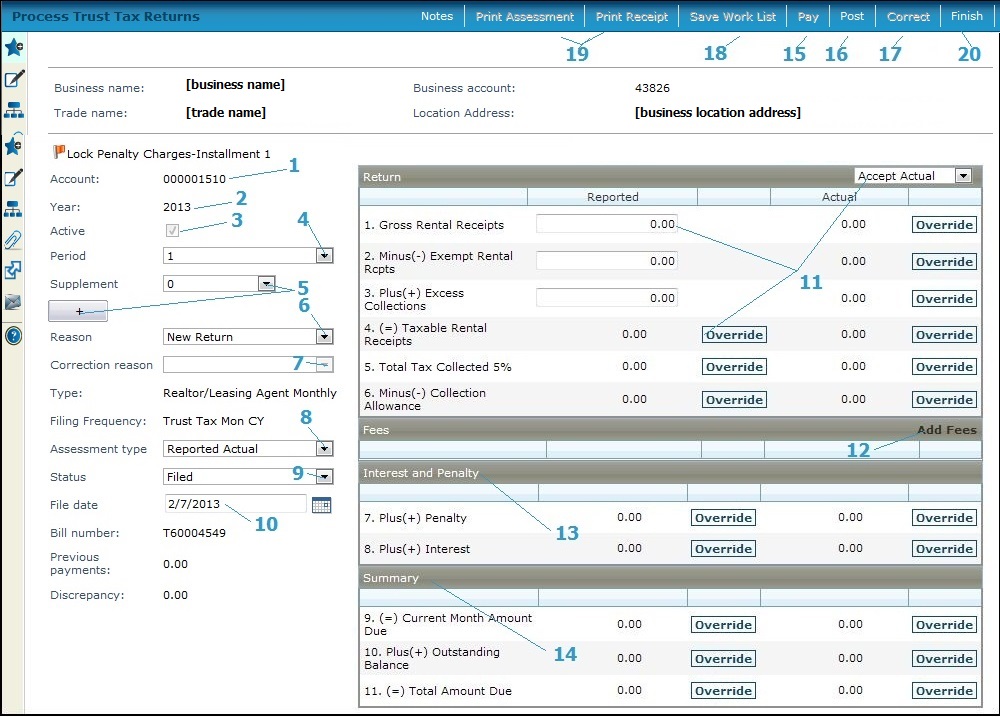
Work with the trust tax return data for a trust tax account and period. The return data is entered, calculated, and posted to apply the period's charges to the account and create the trust tax bills. Corrections can be made and a supplement added for the period as needed when the status is billing or paid. Post information to create the charges and the bill.
NOTES:
-
To perform auditor functions, you must first be set up as an auditor via Business Revenue > Setup > Auditors > Set Up Auditors.
-
An application setting called Trust Tax Assessment Type also controls Auditor access to the Correct button on the Maintain Business License screen as well as the Assessment Type from the Audit dropdown list on this screen. To set this up, go to Configuration > Systypes > Select or Add a Systype. Set the effective date and select the systype category of Trust Tax Assessment Type. Click on Audit to navigate to the Edit a Systype screen. Make sure the Selectable checkbox is checked if you are an Auditor. If you are an implementation specialist or an administrator who is setting up a user account for a non-auditor, uncheck the Selectable checkbox and click Save to make the Audit assessment type for business licenses and trust tax returns unavailable to non-auditors.
-
If you accessed the trust tax account through Business Revenue > Business Maintenance > Search for a Business > Maintain a Business > Edit (business location) > Trust Tax Accounts (Common Action) > Maintain Trust Tax Accounts, and select return from Return Filings panel, the Account, Year, and Type fields are autopopulated.
-
When a Trust Tax bill is paid in full through any batch payment import (e.g., Web/IVR, LockBox, etc.), Accounts Receivable calls a Business Revenue Application Programming Interface (API) so that the Business Revenue module can update the Revenue Object Status from Filed to Paid on the Trust Tax Return.
-
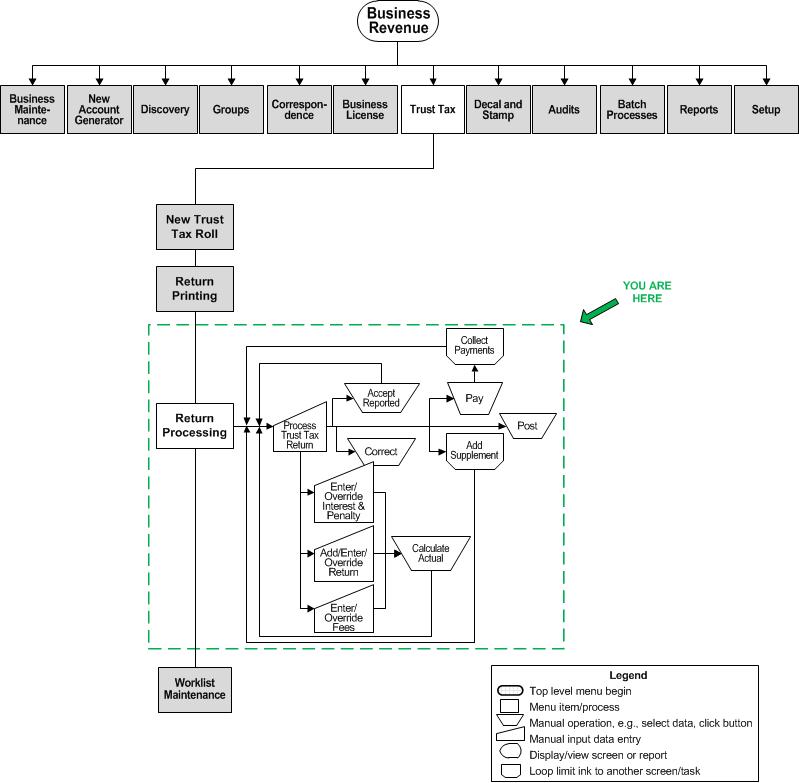
Depending on your navigation path or on how far you are in the processing, the buttons at the top of the screen vary.
-
Security is available for the Notes button on this screen. This is set via Configuration > Security & User Maintenance > Roles > Maintain a Role > Edit Role Details > Edit Non-Menu Item Role Details.
Tasks you can perform for the trust tax return processing are:
-
Enter account information
-
Enter return amounts
-
Add fees, penalty and interest
-
Review and edit the summary
-
Enter notes
-
Collect payments
-
Post the return
-
Correct a return, if necessary
-
Save work list
![]() Jurisdiction
Specific Information
Jurisdiction
Specific Information
SETUP: See Business Revenue, Business Setup, Trust Tax, and Business Maintenance for any applicable prerequisites, dependencies and setup information for this task.
Enter Account Information
If you accessed this screen through the Trust Tax > Return Processing menu option, you will need to define the account number one of two ways:
-
Scan the account number (default)
-
Enter the account number
Steps to Enter Account Information
-
Scan the trust tax account number. All existing information related to the account are displayed in the various fields.
OR
Click the Enter Acct# button at the top of the screen. The Scan field changes to Account and the Enter Acct# button toggles to Scan Barcodes. Enter the account number in the Account field.
-
Select the Year, if not already populated.
-
Check the Active checkbox if the filing is active.
-
Select the Period, for example, 1 for January, 2 for February, etc.
-
Click the + (plus) button for the Supplement field to increase the number of supplements in increments of 1.
NOTE: The Supplement field and the + sign are disabled when the return is new or has been posted. -
Select a reason for processing the return from the Reason dropdown. Options are:
-
Audit
-
Increase
-
New License
-
New Return
-
Regular
-
Renewal
-
Select the Correction reason.
NOTE: The Type and Filing Frequency calendar period information are carried forward from the Maintain Trust Tax Account screen.
-
Select the Assessment Type. Options are:
-
Reported Actual
-
Reported Estimate
-
Statutory
-
Non Reported
-
Audit
-
Accept the existing Status or select a different one. A new return would show Not filed. A return that has been saved but not posted has a status of Filed. Either of these statuses can be edited without doing a correction. Select the Status. Options are:
-
Billed
-
Filed
-
Not Applicable
-
Not Filed
-
Off Season
-
Paid
-
Accept the File Date or define a new one and enter a Billing date, if applicable to your jurisdiction..
-
-
File Date = Trust Tax Return Filing Date. The File date defaults to the current system date and is used to calculate the late filing penalty. It also is the date for calculating the displayed late payment interest and penalty. The Filing Date is used to control whether:
-
-
Penalty should be applied (pre and post Posting)
-
Interest should be applied (pre and post Posting)
-
The Collection Allowance should be applied
-
A Late Filing Penalty should be applied
-
-
-
Billing Date = Trust Tax Return Tran Billing Date. The Billing date defaults to the current system date. The Billing Date is used as the Override value when the Functional Calendar is set up to accept an Override value in the Date Formula. In the case of Trust Tax setup, the Billing Date field is set to a specific value in the calendar and thus is not needed on the screen.
NOTE: Once the trust tax return is processed:
-
A bill number is generated automatically and is displayed in the Bill number field.
-
Previous Payments are displayed.
-
Any Discrepancy is also displayed. The positive and negative amounts for the current filing based on the current payment and current month amount due are captured and displayed in this field as either a positive or negative number, depending on the discrepancy. The discrepancy amount is carried over onto the next period since the value is stored in the outstanding balance.
Enter Return Amounts
Steps for Entering Return Amounts
-
Enter the return amounts in the Reported column. Click Override to enter the values. As you enter reported amounts, the Actual amounts are updated, some are based on reported amounts and others are based on calculations. The return fields may vary, depending on your jurisdiction.
-
-
Click Accept Reported from the Return panel header dropdown if you want to override the calculated amounts in the Actual column with the entered Reported amounts
OR
Click Override next to a specific item to enter a different amount in the Actual column.
-
Add Fees, Interest, and Penalty
Steps for Adding Fees/Interest/Penalty
-
Click Add Fees on the Fees panel if you need to add fees and select the fee from the list. When you select a fee from the list, the amount displays automatically.
NOTE: Fees are set up via Business Revenue > Setup > Business Fees and Rates > Search for Rules and Rates.
-
Click Accept Reported if you want to override the calculated actual amounts with the entered reported amounts
OR
Click Override next to a specific item to enter a different amount in the actual column.
-
Enter any reported Interest and Penalty amounts and click Override to change the existing amounts, if necessary.
NOTE: Interest and Penalty is maintained via Business Revenue > Business Maintenance > Search for a Business > Maintain a Business > click License in Locations panel > View License Summary > click New or select existing license > Maintain Business License when you click the Override button associated with each of the fields (Interest and Penalty) and enter the amounts.
-
Click Accept Reported if you want to override the calculated actual amounts with the entered reported amounts
OR
Click Override next to a specific item to enter a different amount in the actual column.
Review/Edit Summary
Steps for Reviewing/Editing Summary
-
Review the summary of information and to change information:
-
Click Accept Reported if you want to override the calculated actual amounts with the entered reported amounts
OR
Click Override next to a specific item to enter a different amount in the actual column.
Enter Notes
Steps for Entering Notes
Depending on your navigation path, the Notes button may be enabled.
- Click Notes to open the Maintain Notes screen and optionally enter any notes about the return.
Collect Payments
Steps for Collecting Payments
If there is an amount owed to the account (a negative value), you can collect the payment.
-
Click Pay to submit the data to the Cashiering module for processing. The Cashiering Collect Payments screen is displayed automatically. Process the payment and click Return on the Collect Payments screen to return to this screen.
Post Trust Tax Return
Steps for Posting the Trust Tax Return
-
When the amounts are correct, click Post to create the charges and the bill.
NOTE: Once the trust tax return is processed, a bill number is generated automatically and displayed in the Bill number field.
NOTE: San Francisco, California:
-
Trust Tax Return Quarterly True-Up Payments. A Business Revenue effective dated, systype application setting Trust tax VT for recap payment validation is used to select the value type for recap payment validation for quarterly true-up payments for trust tax return processing.
Set up the trust tax type via Business Revenue > Setup > Trust Tax Types and select the Last Period Recap checkbox to define the trust tax type os one that requires quarterly true-up payments..
When the application setting is set to true, and the trust tax type is set up to require Last Period Recap for quarterly true-up payments:
-
Clicking Post on the Process Trust Tax Returns screen initiates a validation to determine if the period being filed is the last period of the year for that trust tax account. If so, posting occurs; otherwise, a message displays indicating why posting cannot occur and the action to take.
-
The Maintain Trust Tax Accounts screen includes a view only Last Period is Total Year Recap checkbox that is selected.
Once the trust tax return is processed, a Levy Management API calls the values and processes them to include the quarterly true-up billing in levy calculations. Accounts Receivable then supports collection of the quarterly true-up payments.
Correct a Return
IMPORTANT: If you need to modify charges after posting, you must perform a correction and use a supplement, as described here.
-
Access the return through the business location, Maintain a Business > Edit (business location) > Trust Tax Accounts (Common Action) > Maintain Trust Tax Accounts > select Return from Return Filings panel.
-
Review the Status. A correction is made when the return has been posted and the status is Billed or Paid.
Steps for Correcting a Return
-
Click Correct. The applicable fields for correcting a return become available.
-
Click the + (plus) button, located next to the Supplement dropdown list to add a supplement. The next number is displayed for the new supplement.
-
Select the CorrectionReason for adding the supplement, such as audit, increase, or regular.
-
Select an Assessment type, which appears in reporting or is used to select returns for a report. The assessment type identifies the source of the correction, such as audit, non-reported, reported actual, reported estimate, or statutory.
-
Make any other changes as needed to the values.
Save Work List
When posting the first return in the group successfully, the Save Work List button becomes enabled.
Steps for Saving the Work List
-
Click Save Work List. The Save Work List - Web Dialog popup is displayed.
-
-
Click New to create a new work list and enter the new Work List name
OR
Select an existing Work List from the dropdown list. -
Click Save. A work list for all items in the group that are processed and posted is then created. The work list is displayed and maintained on the Maintain Work List screen.
-
Click Close to close the popup and return to the screen.
-
Print Assessment and Receipt
-
Depending on the current stage of the trust tax return, the Print Assessment and Print Receipt buttons are available.
-
Select Print Assessment to print a one-off assessment notice for the trust tax return.
-
Select Print Receipt, after the trust tax return is paid, to print a payment receipt.
-
Finish
Steps for Finishing the Trust Tax Return Processing
- Click Finish to return to the Maintain Trust Tax Account screen if you navigated to it from that screen.
Common Actions
Business Detail - Advances to the Info Center Business Detail Information screen for the selected account.
Manage Tax Bill Flags - Add, edit, or remove a flag on a trust tax bill on Manage Business License Tax Bill Flags.
View Correction History - View the details of all corrections to the trust tax return on View Trust Tax Return Correction History.
Transaction History - Navigates to the Info Center Transaction History - Business screen.
Trust Tax Receipt - (Sarasota, FL only) Prints a trust tax receipt for the currently selected record.
Tips
Click Notes to add a note about the trust tax return. When you add a note, the notes icon displays next to the Notes button.
The trust tax type has a functional calendar associated with it which defines the periods.
The late payment interest and penalty is not stored as a receivable until payment is made.
Any period can have multiple supplements.
When you click the Override button next to the penalty field, the action of the application setting Trust Tax Lock Late Payment Penalty is nullified. When true, the application setting indicates that the late payment penalty should be locked automatically when the late filing penalty is applied (or unlocked automatically if the late filing penalty is removed).
Corrections reasons are set up as the systypes Supplement Reasons.