Maintain Trust Tax Account
Navigate:Business Revenue > Business Maintenance > Search for a Business > Maintain a Business > [Locations panel Edit button] Maintain Business Location > Common Action: Trust Tax Accounts > View Trust Tax Account Summary > Maintain Trust Tax Accounts
Description
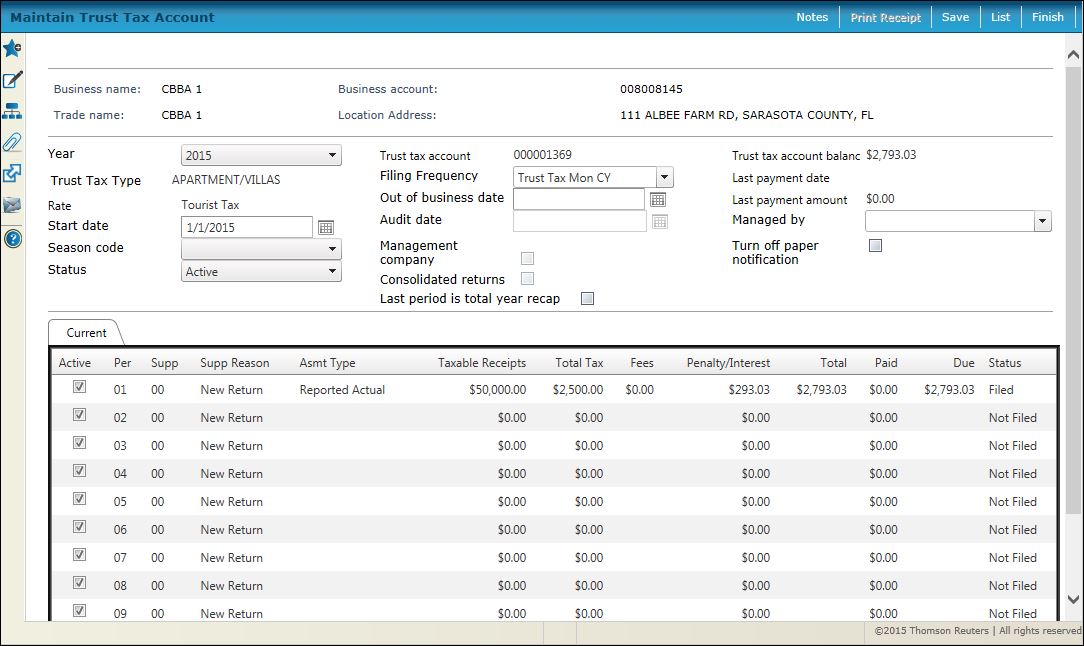
Create, edit/audit and view the details of a trust tax account for a particular business location. The location information is displayed at the top of the screen. You can add notes about the trust tax account as needed, and you can view the trust tax returns for each period and select to process a specific return.
NOTE: The following information is automatically displayed as it becomes available:
-
The Trust Tax Account number is assigned when you click Save when creating a new trust tax account. The format of the number is TT-YYYY-NNNNNN, where TT is trust tax, YYYY is the 4-digit year, and NNNNNN is a 6-digit number.
-
The Current balance, Last payment date, and Last payment amount display when those values are available. They can also be viewed on the summary screen.
-
The Notes button becomes available after clicking Save. You can then add notes to the account information. Security is available for the Notes button, typically set by the jurisdiction System Administrator. This is set via Configuration > Security & User Maintenance > Roles > Maintain a Role > Edit Role Details > Edit Non-Menu Item Role Details.
SETUP: See Business Revenue, Business Setup, and Business Maintenance for any applicable prerequisites, dependencies and setup information for this task.
![]() Jurisdiction
Specific Information
Jurisdiction
Specific Information
Steps
-
Select the Year. This is the tax year.
-
Select the Trust Tax Type when you are creating a new account. Once the trust tax is saved, the type cannot be changed. The functional Calendar and Rate are displayed after the type is selected. However, when you select a new year, these fields become available again.
-
Select the reporting Period.
-
Enter the Start date when the trust tax becomes active, or select the date from the calendar.
-
If closing a trust tax account, enter the Out of business date or click the date picker to select it.
-
Select a Season code, if the trust tax is seasonal.
-
Select the Status, such as active, inactive, pending.
-
Enter the Audit date , or click the date picker to select it, as a date later than the start date. The date the auditor reviews the account is informational only, although it is included as a selection criteria for some reports.
NOTE: The Audit date field is available to you only if you are an auditor. Auditors are set up via Business Revenue > Setup > Auditors > Set Up Auditors. -
Select any of the applicable checkboxes.
NOTE: These may vary depending on your jurisdiction. Certain checkboxes are view only.
NOTE: The Last Year Total Year Recap checkbox is view only. The trust tax type must be set up via Business Revenue > Setup > Trust Tax Types as requiring Last Period Recap (checkbox). -
Click Managed By to select the Managed By name. You must be set up as an Auditor.
-
Click the Turn Off Paper Notifications checkbox if the account is associated with an Public Access account and the legal party account holder does not wish to receive paper returns or notifications if filing electronically via Public Access and if the jurisdiction accommodates Public Access.
-
Click View Returns (default toggle) and click on the Active checkbox in the Current return filings panel for any return and click Save to change the status to Inactive. Using this method, you can set the status of several returns en masse. If you check the checkbox to Active, the filing returns to its former state, for example, Not Filed.
-
Click on any item in the Current panel to navigate to the Process Trust Tax Returns screen on which you can perform actions such as pay, post, and correct the filing information. When you click Finish on that screen, you return to this screen.
-
Click the View Managed Accounts toggle button to view and maintain managed accounts.
NOTE: The information for Managed Accounts comes from the Maintain Business Location screen.Enter a Trust Tax Account number.
Click Update to add or update the managed account information.
Click Cancel to cancel the update.
Click File Returns to navigate to the Process Trust Tax Returns screen for posting. This active link text is available only if the Management Company is not flagged as a consolidated return on the Maintain Business Location screen.
Click View to navigate to the Maintain a Business Screen for the applicable account.
Click Delete to open a delete confirmation pop-up with the message "The selected Trust Tax Account will no longer be associated with this Management Company. Is this correct?" Click Yes to remove the association between the trust tax account and the management company. Click Save.
-
Click No to cancel the delete.
-
-
NOTE: Once managed account information is available, you can select the applicable Managed by from the dropdown list
-
Click the spreadsheet icon on any row to generate the trust tax information to a spreadsheet
-
Optionally click Notes to add any notes to the account.
-
Click Save to save all information.
-
Click Print Assessments to generate an assessment tax return.
NOTE: This button is available only if the trust tax has a status of Filed or Billed. -
Click Print Receipt to generate a trust tax receipt. A Multiple Receipts Exists popup displays if multiple receipts exists so that you can select all or a specific receipt. Select the receipt(s) and click Print.
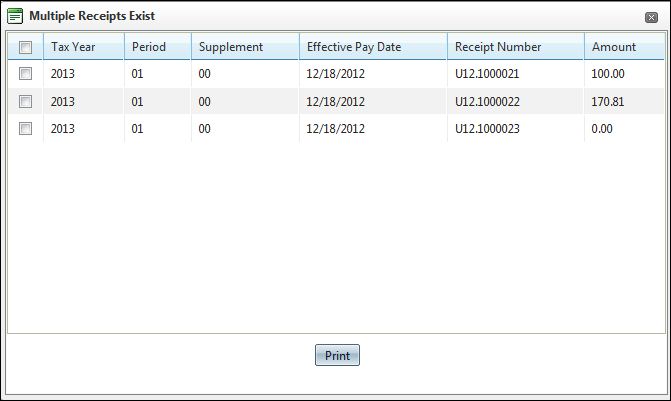
NOTE: This button is available only if the
trust tax has a status of Filed or Billed.
-
Click Finish to finish and return to the previous screen, depending on your navigation path.
-
Click List to return to View Trust Tax Account Summary to see all trust tax accounts for this business location.
Common Actions
Roll Trust Tax Accounts - Create a new trust tax roll for a new year from the previous year's data on Create New Trust Tax Roll.
Manage Trust Tax Account Flags - Add, edit or remove flags from trust tax accounts on Manage Trust Tax Account Flags.
Maintain Additional Trust Tax Accounts Information - Enter or edit any information in user-defined fields previously created in the Set Up Additional Information Fields screen for trust tax accounts.
Audit Summary - Go to the View Audit Summary screen to view a summary of audits for the trust tax account.
-
NOTE: The Audit Summary common action is available only to individuals set up as Auditors. If you are not an auditor, this common action does not display.
Transaction History - Navigates to the Info Center Transaction History - Business screen.
Trust Tax Receipt - (Sarasota, FL only) Prints a trust tax receipt for the currently selected record.
Tips
The setup of trust tax determines the functional calendar to use and the rate to apply.
To add a new trust tax account, click List to go to View Trust Tax Account Summary, where you can click New.
Click Notes to add a note about the trust tax account. After a note has been added, the notes icon displays next to the Notes button.