Business Detail Information
Navigate:Info Center > Business Detail > Business Account Search > Business Account Search Results > Business Detail Information
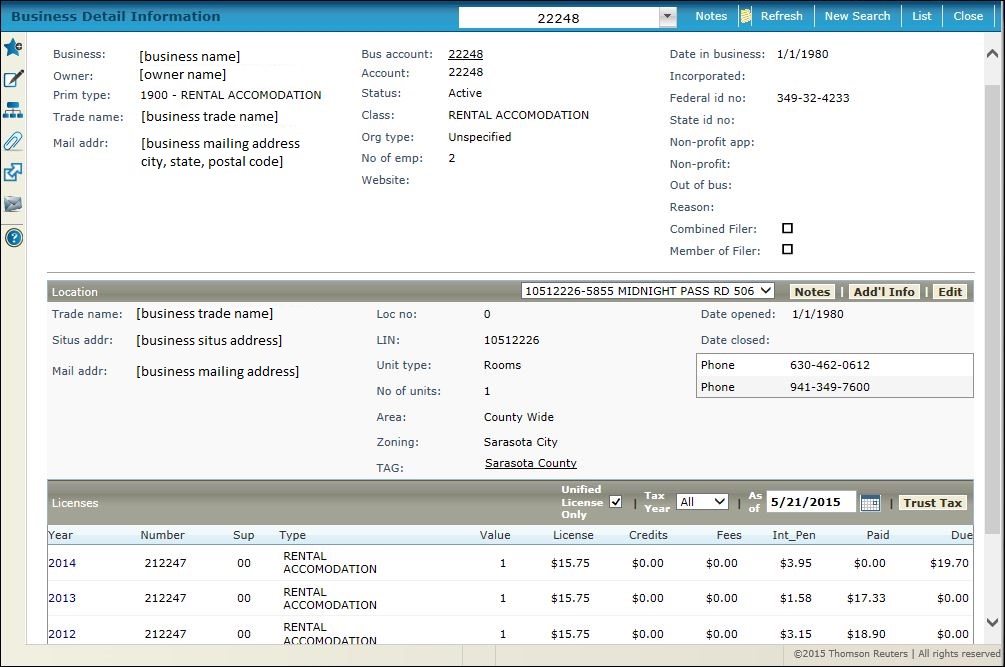
Description
View the charge detail and value information of revenue objects associated with a business. Other information shown includes owner, relevant dates, identification numbers, location and communication information.
NOTE: Security is available for display of License Primary Business Type and Trust Tax Lodging Business Type on this screen and on the Maintain a Business screen. Rights to this information are based on user rights as set up via Configuration > Security & User Maintenance > Roles > Maintain a Role > Edit Role Details > Edit Additional Role Details. Set security rights for the user role. This may not apply to your jurisdiction.
![]() Jurisdiction
Specific Information
Jurisdiction
Specific Information
Security for Sensitive Information
Security for Business Revenue and Trust Tax accounts includes suppression of social security number as well as mailing/situs address.
Security for Notes Setup
Security is also available for creating, maintaining, and viewing Business Revenue and Trust Tax accounts notes on the following screens:
-
Maintain a Business
-
Maintain Business Location
-
Maintain Business License
-
Maintain Trust Tax Account
-
Process Trust Tax Returns
-
Business Information Screen (Info Center -> Business Detail)
Users with write privileges use the Notes panel on these screens to create and maintain notes for any reason specific to the business, location, license, or return. Rights are based on user role, and the user roll to which the user at the jurisdiction is assigned. The System Administrator at the jurisdiction typically defines user roles and rights. This is set as follows:
-
Go to Configuration > Security and User Maintenance > Roles to advance to the Maintain a Role screen.
-
Click Edit on the Role to which the user is assigned (set via Users) to advance to the Edit Role Details screen.
-
Select the expand button (+) preceding Business Revenue in the Granted Menu Items panel, drill down, and select Notes Task to advance to the Edit Non-Menu Item Role Details screen.
NOTE: If Business Revenue is not shown in the Granted Menu Items panel, select it from the Available Menu Items panel to add it. -
Set security rights as applicable for the role to give all users in the role the same rights.
-
Click Save and Close.
Social Security Number Security
The ability to suppress display of SS numbers and Fed ID numbers on Business Revenue searches, reports, and display screens is available. When suppressed, these are not available for selection criteria on search screens, and do not display in search results or on reports.
This enable this, go to Configuration > Security & User Maintenance > Roles > Maintain a Role > Edit Role Details > Edit Non-Menu Item Role Details and define security for Records. Select the Description of Party Identification Number, and for each subitem of ID Number Group 1, ID Number Group 2, and Social Security Number, set the security rights and click Save. When all rights are unchecked, rights to view or maintain SS number and Fed ID is not available.
Go to Configuration > Systypes > Select or Add a Systype, set the Effective date and select the Systype Category of ID Number Security Type. Click on Id Number Security Group 1 and ID Number Security Group 2, respectively. Check the FID and SSN checkboxes and click Save.
IMPORTANT: Both Group 1 and Group 2 selectable items must be the same or the information displays in Business Revenue but not in Info Center; or vice versa, the information will display in Info Center and not in Business Revenue.
Address Security
Confidential records in Business Revenue can display the name but hide the address.
To set this up, go to Configuration > Application Settings > Maintain Application Settings. Choose Records as the Filter by module and Effective Date as the Setting type. Click Edit on the Confidential revenue object message application setting. Define the message to display instead of the address on the BR screens (e.g., CONFIDENTIAL ADDRESS). Click Apply and Save.
Next, go to Configuration > Security and User Maintenance > Roles > Maintain a Role. Click Edit on the account to navigate to the Edit Role Details screen. Click the Non-Menu Items to navigate to the Edit Non-Menu Item Role Details screen. Select Records as the module for which to modify security. Select Confidential Revenue Object, remove the rights (uncheck the applicable checkboxes, such as View, Modify, etc.), and click Save to set the revenue object mailing address to confidential.
Finally, go to Records > Other Revenue Object Maintenance > Revenue Object Information Changes. Search for and select the revenue object. On the Change Revenue Object screen, check the Confidential checkbox and click Save.
The licensing and fee details display in the bottom grid.
In the bottom grid, toggle by using the buttons on the panel header to see other details. Note that access depends on your Role security permissions.
-
Licensing and fee details by license number
-
Trust tax by id number
Flags
A flag icon  is displayed below the screen name as well as in the Location panel if
a flag is associated with:
is displayed below the screen name as well as in the Location panel if
a flag is associated with:
-
Business account
-
Business licenses
-
Any tax bills associated with the business, such as license or trust tax
-
Trust tax and trust tax returns
-
Location panel. Any flags associated with an address are displayed in the Location panel.
-
Flags can be viewed through the View Flags link in Common Actions, or simply click on the flag to view all flags. Then click the Business Detail button on the Business Flag Information screen to return to this screen. Flag color designations are as follows:
Red flag = critical
Yellow flag = high
Blue flag = medium
Green flag = low
Business Information
The identifying codes and information about the business is displayed in the top section, with several links to more detailed information. If you do not have security clearance to use a link in the heading section at the top the link underline will not be displayed. This same heading information is also displayed on other Info Center screens of Business Details.
If information is long, it may have been truncated (shortened or cut off) here to fit in the available space.
-
Business name - name of the business
-
Owner -active text links to the Business Owner Information screen
-
Trade name -Doing Business As(DBA) trade name of the business, which may be different than the business name
-
Mail addr - mailing address for the business
-
Bus account - business account number - active text links to Maintain a Business screen, on which you can maintain business detail information
-
Account - revenue account number, which is different than the business account number
-
Status - Active or Inactive business account
-
Prim type - primary business type based on NAICS (North American Industry Classification System) business codes
NOTE: NAICS codes are business types. You can also manage the NAICS code in the Property Information panel of the Maintain PPA Accounts screen if your jurisdiction has the Personal Property Appraisal module.
IMPORTANT: The NAICS code is applied at the tax year level, not the account level, even though you can define it on the Maintain PPA Accounts screen. -
Class - class of business, e.g., retail, flat corporation, etc
-
Org type - type of organization, such as corporation, sole proprietorship, general partnership, limited liability company, etc.
-
No. of emp - number of employees at the business
-
Website - website of the business, if any, with active text link to the website
-
Date in Business - date the company was established as doing business
-
Incorporated - incorporation date, if applicable, which may be different than the date in business
-
Federal id noandState id no- the federal and state id numbers
-
Non-profit appandNon-profit - Indicates whether the business is a non-profit and the date of application for non-profit status
-
Out of bus and Reason - date the business went out of business, if applicable, and the reason
Location Information
The Location panel shows information specific to a particular location of the business, including all charges associated with the location. The location can have its own flags, notes, and user-defined fields.
-
Select a Location from the dropdown list in the panel header.
-
Notes - Opens the Maintain Notes screen, on which you can maintain notes about the business account
-
Add'l Info goes to Maintain Additional Location Information, where you can view the location address. At a minimum, the mailing address default is displayed
-
Edit goes to Maintain Business Location where you can maintain business location information
-
Trade name - Doing Business As (DBA) name
-
Situs address - physical location of the business unit
-
Mail addr - mailing address of the business
-
Loc no - number assigned in Maintain Business Location to identify the location
-
LIN - License Identification Number
-
Unit type - for a business that is comprised of smaller units, this shows the type of unit
-
No of units - for example, the number of apartments within an apartment building
-
Area - vicinity of the business location
-
Zoning - local township zoning of the land on which the business resides
-
TAG - Tax Authority Group
-
Date open, Date closed - beginning business date and date when the business closed, if applicable
-
Phone number(s), if defined in Records Legal Party Maintenance
Licenses
-
Select one or all tax years from the Tax Year dropdown list in the panel header.
-
Project what the numbers would be by selecting an As Of Date.
-
Click the Unified License Only checkbox to view only those licenses.
NOTE: The Business Revenue effective date systype Unified License Roll Type application setting defines the unified roll type applicable to your jurisdiction and therefore, the list of unified licenses displayed based on the unified license roll type selected. To this: -
Go to Configuration > Application Settings > Maintain Applications Settings.
-
Select the Setting Type of Effective Date and the Filter by Module of Business Revenue.
-
Click Edit on the Unified License Roll Type application setting and set as applicable to your jurisdiction.
-
Click Save and Close.
-
Click the Trust Tax/Business Licensetogglebutton to toggle between viewing trust tax details associated with the business license or business license information. Columns information is filled when available, depending on the charge you are viewing:
-
Business License = year, number, supplemental (if applicable), type, value, license cost, credits, fees, interest/penalty, paid, and due
-
Trust Tax = year, account number, period, supplemental (if applicable), type, taxable receipts, tax, interest/penalty/fees, paid, and due
Buttons
Click Notes to view, add or edit a Notes about this business. An icon appears when a note has been added. The non-menu item security controls your ability to view, add, or edit notes.
Click Refresh to see any changes made by other users while you were viewing this data. It also restores the default sort order of transactions.
Click New Search look for a different business.
Click List to return to the search results list where you can select another item.
Click Close to exit the Information Center.
Common Actions
View Event History - View the events of the business account, such as when a bill was created and printed and the user who performed the action.
View Flags - View the flags that have been attached to the business account, location, license, business tax bill, trust tax account, trust tax return, or trust tax return tax bill.
View Transaction History - View the details of charges and payments for the business account.
View Related Revenue Objects - View the details about revenue objects related to the account.
Tips
Confidential records in Business Revenue display the name but the addresses can be hidden. To set this up:
-
Go to Configuration > Application Settings > Maintain Application Settings. Choose Records as the Filter by module and Effective Date as the Setting type. Click Edit on the Confidential revenue object message application setting. Define the message to display instead of the address on the BR screens (e.g., CONFIDENTIAL ADDRESS). Click Apply and Save.
-
Go to Configuration > Security and User Maintenance > Roles > Maintain a Role. Click Edit on the account to navigate to the Edit Role Details screen. Click the Non-Menu Items button to navigate to the Edit Non-Menu Item Role Details screen. Select Records as the module for which to modify security. Select Confidential Revenue Object, remove the rights (uncheck the applicable checkboxes, such as View, Modify, etc.), and click Save to set the revenue object mailing address to confidential.
-
Go to Records > Other Revenue Object Maintenance > Revenue Object Information Changes. Search for and select the revenue object. On the Change Revenue Object screen, check the Confidential checkbox and click Save.