 Tax Estimator - Maintain Estimate Details
Description
NOTE: This task may not apply to your jurisdiction.
After searching for/selecting an existing tax estimate and clicking Next, or when creating a new estimate, you navigate to this screen. Use this screen to define and maintain details for the tax estimate, to calculate and finalize the tax estimate, and to create a right-of-way bill in PDF format. The bill looks similar to an actual property bill with the word estimation in the bill number field (collector number), except it shows no specials, no delinquent information, and no instructions for paying online. It also has no back page (except for instructions on the coupon), and it shows only one amount due in each amount due area.
NOTE: The estimated taxable values and taxes are calculated using process steps implemented to customer-specific rules, set up by the (Undefined variable: Variables.Implementation).
SETUP: See Levy Management, Levy Management Setup and Tax Estimator for any applicable prerequisites, dependencies and setup information for this task.
![]() Jurisdiction Specific Information
Jurisdiction Specific Information
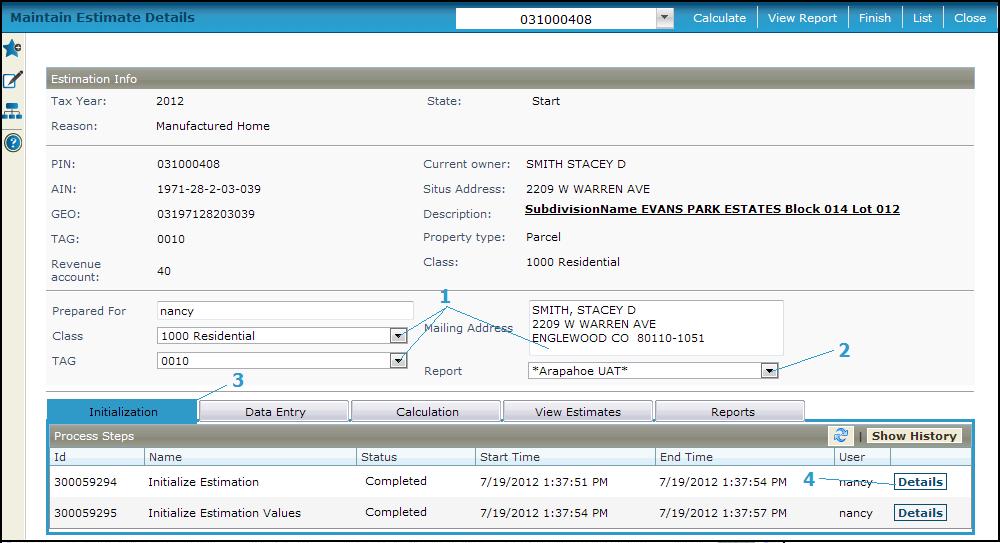
Steps for General Information
-
Maintain the information in the panel below the header area, which is imported from the search, only if necessary, including:
-
Class (property class code)
-
TAG
-
Mailing Address
-
Select the report type from the Report dropdown.
NOTE: For all tabs, described next, you can toggle between Show History and Show Status. A Refresh button on each of the panels refreshes the data as the initialization and calculation occurs.
Steps for Initialization
Process steps are displayed when first accessing this screen.
-
Select the Initialization tab.\
-
Click Details for any process step. The View Batch Process Details screen is displayed and shows available errors and logs. Click Close to return to this screen.
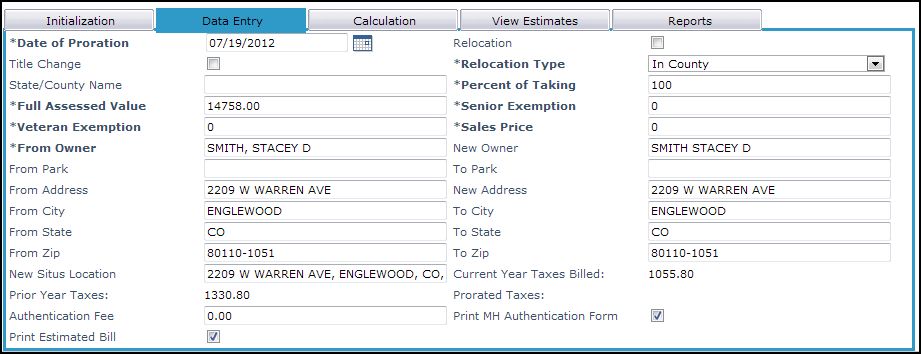
Steps for Data Entry
-
Select the Data Entry tab.
-
Define any data as applicable in the Values panel and for any user-defined fields (UDFs).
-
UDFs are set up via Configuration > User-Defined Fields > Search for User-Defined Fields. Click the New button to navigate to Maintain User-Defined Field.
-
NOTE: Depending on the jurisdiction, the (Undefined variable: Variables.Implementation) may set up the UDFs as applicable.
-
NOTE: Enter a decimal for any UDF rate fields as in the following example:
-
3.17% - enter as 0.00317
-
50% - enter as 0.5
Steps for Calculation
-
Click the Calculation tab. The following graphic shows the Calculation tab before calculations are performed.

-
Click Calculate (top of screen). When calculations are complete, the Status field in the Calculation panel is populated with the results, such as Completed, Failed, System Cancelled, etc, the start/end times, and the user name.
NOTE: Calculations may take a few moments to complete during which time other actions may become unavailable. The following shows the Calculation tab after calculations are complete.

-
Click the Details button to open the View Batch Process Details screen to view any error and log text files. Click Close to return to this screen.
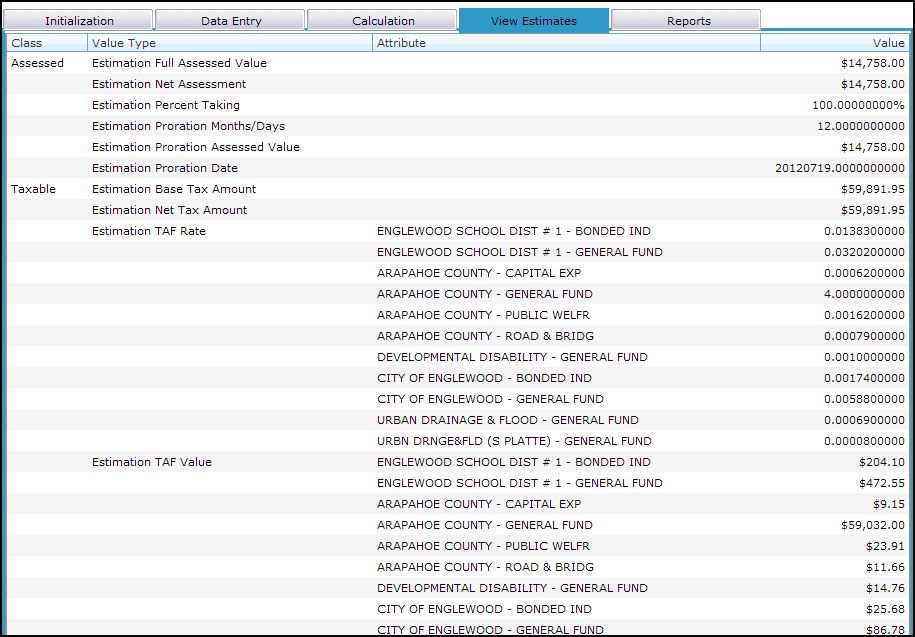
Steps for View Estimates
-
Click the View Estimates tab to view the estimated taxes. The following graphic shows estimates after calculation.
Steps for Reports
-
Click the Reports tab. The following graphic shows the Reports tab after calculation.

-
Click the Finish button (top of screen) to generate the output (estimated bill).
Steps for View Report
-
Click View Report(top of screen) to open and view a report of the process.
-
-
Click List to return to the Tax Estimator - Search for an Estimate screen.
-
Click Close to end the task.
-
Common Actions
none.