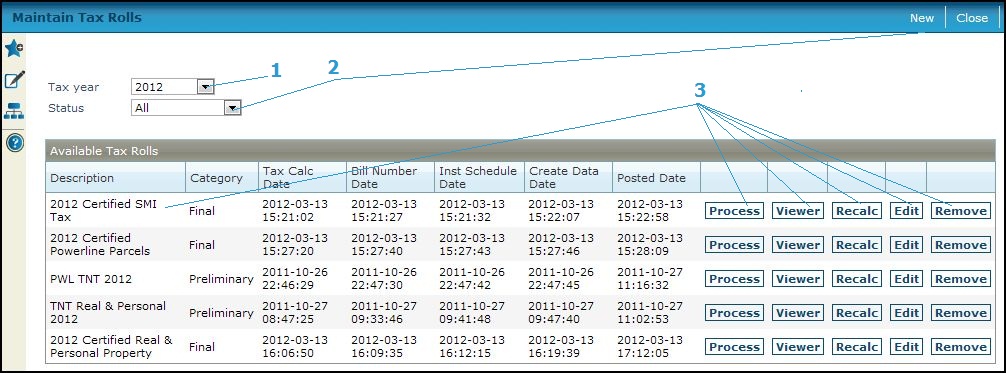
 Maintain Tax Rolls
Description
The existing tax rolls for the selected tax year are displayed. In addition to creating a new tax roll, you can also select an existing roll to edit its settings; process, post, or remove it; or view detailed tax roll data for specific revenue objects.
![]() Jurisdiction Specific Information
Jurisdiction Specific Information
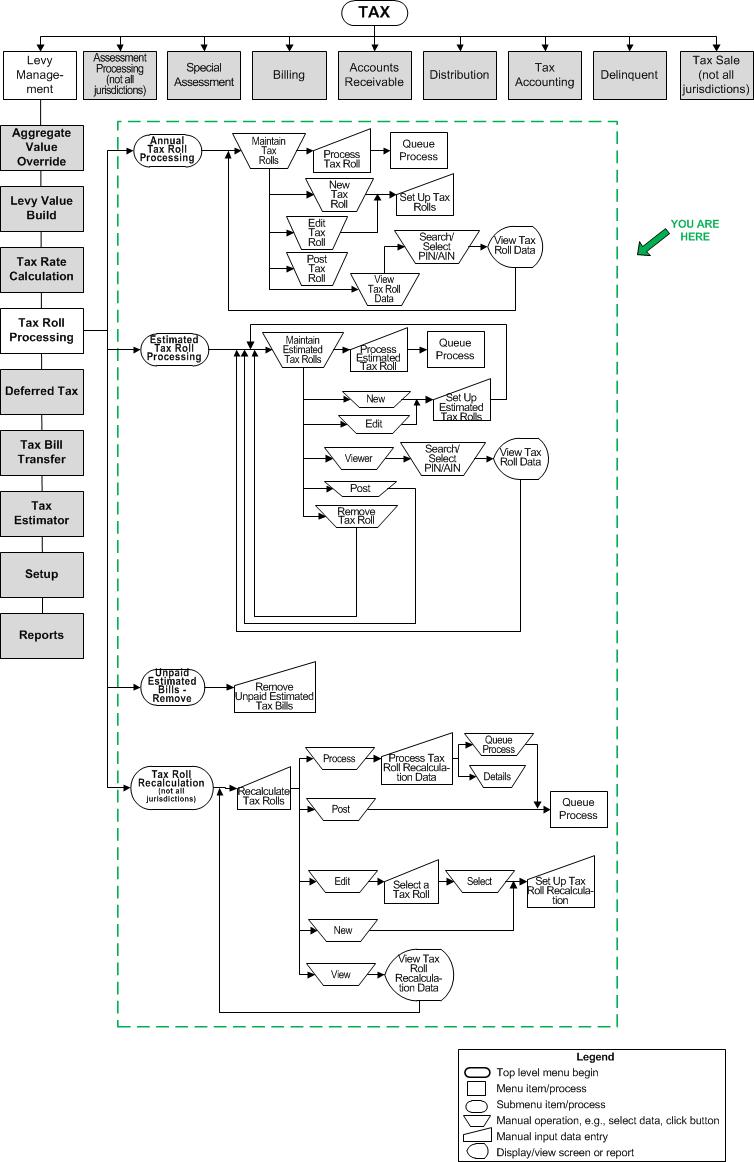
Steps
-
Select the Tax year.
-
Select the Status of tax rolls to view. You can view all tax rolls, only those that have been posted, or only those that have not been posted yet.
- NOTE: To include estimated bills in the posting, check the Post Estimated Bills checkbox. This checkbox may not be available in your jurisdiction. This checkbox is available only if the Tax Levy Management Uses Estimated Billing application setting is set to true. To set this to true, go to Configuration > Application Settings > Maintain Application Settings. Select the Setting type of Effective Date and the Filter by Module of Tax Levy Management. Click on the Uses Estimated Billing application setting and set it to true. The default is false.
-
Select one of the buttons in the Available Tax Rolls list or on the task bar, depending on what you want to do. These buttons are described next.
Create or Edit Tax Roll Settings
-
Click New on the task bar to access the Set Up Tax Roll screen to create a new roll.
OR
Click Edit next to a tax roll in the grid and to edit its settings on the Set Up Tax Roll screen.
NOTE: If the tax roll has been posted, you cannot edit the tax roll but you will be able to review its settings and assessment rolls.
Process Tax Roll
-
Click Process next to a tax roll to go to the Process Tax Roll screen to run one or more of the steps needed to calculate taxes, charges and credits; assign bill numbers and installment due dates; and finalize the creation of tax roll data from all the previous steps.
Post Tax Roll
-
Click Post next to a tax roll to post the charges to Accounts Receivable, for a Final roll, or to save the charges to the database without posting if the roll has a category of Preliminary or Proposed, such as for a sample roll.
 IMPORTANT: After the tax roll has been posted or saved, it cannot be reprocessed. You will need to remove it and recreate it to correct any errors.
The posting process is automatically sent to Batch Processing and the Monitor Batch Processes screen appears (from where you can view batch process details). It will begin processing as soon as the queue is open after the selected start date and time.
View Tax Roll Data
-
Click Viewer next to a tax roll to go to the View Tax Roll Data screen to view the tax roll data for specific revenue objects.
Recalculate Tax Roll
-
You can recalculate a tax roll that has already been processed. Click Recalc to navigate to the Recalculate Tax Rolls screen on which you can select an existing roll recalculation or create a new tax roll recalculation.
Remove Tax Roll
-
Click Remove to delete a tax roll that has not been posted. A warning message displays and if you select to proceed, the removal process is automatically sent to Batch Processing and the Monitor Batch Processes screen displays.
NOTE: You can remove a tax roll even when it has been posted to A/R as long as no payments exist against the tax roll. -
Click Close to end the task.
 Tips
Tips
A tax roll must have a category of final, specified on the Set Up Tax Roll screen, in order for its charges to be posted to A/R and be available for billing and collections.
If you are posting a very large tax roll, set the application settingRecreate indexes during tax roll posting to true to disable the use of database indexes during posting and speed up the process. Keep this setting at the default of false in most cases.
Print the Tax Calc Detail by Value Group Report to proof tax roll data before posting the tax roll.