Personal Property Accounts
Navigate:  Personal
Property Appraisal > Accounts
Personal
Property Appraisal > Accounts
Description
Use this task to view and edit personal property accounts. A personal property account is the equivalent of filing a revenue object in Aumentum Records. Each account has at least one asset associated with it. The account could, however, include multiple assets. The total value of the account is the sum of the associated asset values.
Steps
Search for an Existing Account
- On the Search for Personal Property Accounts screen, make a selection from the Tax year drop-down list.
- Enter data into one or more search fields.
- Click Search in the Command Item bar. Results are displayed in the Search Results panel.
-
Click Clear to clear the search criteria and start a new search.
-
If the search only returns one personal property account, the Maintain Personal Property Accounts screen opens automatically.
-
If multiple accounts are returned, select the checkbox for one or more items in the grid and click Next in the Command Item bar.
NOTE: The tax year defaults to the year specified by the personal property functional calendar, which may not equate to the current tax year.
NOTE: The number of search results returned is limited by the application setting Max number of Personal Property search results to show per page.
NOTE: The Return button is used during other processes to return to the previous screen in the task.
Adding an Account
-
On the Search for Personal Property Accounts screen, select a tax year and click New.
-
On the Set New Revenue Object Type screen, enter or select the relevant criteria.
- The effective date depends on the Create new Personal Accounts as of first day of current tax year application setting. If set to True, this field populates with the first day of the current tax year per the functional calendar. If set to False, it populates with the first day of the preceding tax year per the functional calendar.
- Make a selection from the Copy from existing PIN drop-down list.
- Make a selection from the Revenue object sub-type drop-down list.
- Make a selection from the Class code drop-down list. The New PIN field is automatically populated by your selection.
- Make a selection from the Ownership type drop-down list.
- Click Next.
- On the Search screen, enter your search criteria and click Search.
- Click to select an item in the Legal Party grid.
- On the Select the Situs Address screen, enter a Street Number and Street Name in the Situs Search Criteria panel and click Search.
- Click Next.
- On the Add or Edit Revenue Object Information screen, click Finish.
-
On the Maintain PPA Accounts screen, complete the relevant information for the new account.
- Click Save, then click Close.
NOTE: If there is no matching legal party in the search results, click New in the Command Item bar to add a legal party.
Editing an Account
- On the Search for Personal Property Accounts screen, select a tax year, enter your search criteria, and click Search.
- In the Search Results panel, select the checkbox for one or more items in the grid and click Next.
-
On the Maintain PPA Accounts screen, edit the relevant information for the account and click Save.
NOTE: You can select a future year (one year ahead of the current tax year) from the Tax Year drop-down list and the various panels display data for the corresponding tax year.
Header panel

Flags – Up to five flags can appear in the header panel to indicate conditions like bankruptcy and non-sufficient funds. There are five flag colors representing priority: red (critical), yellow (high), blue (medium), and green (low). Click on a flag to open the Tax Detail screen.
PIN – The unique identifier number for the filing revenue object.
AIN – The alternate identifier number, if one exists, for the filing revenue object.
Date Filed – The last date the owner filed a return for the account.
Last Updated By (may not apply to your jurisdiction) – The individual who last updated the account.
Owner – The name of the legal party who owns the personal property.
Doing business as – DBA information is assigned to and displays for organizations and proprietorships. DBA information cannot be assigned to individuals.
Click here to learn how to set up the DBA systype
- Click Configuration > Systypes.
- Set the effective date and select Alias Type from the Systype category drop-down list.
- In the Description column, click to select Doing business as.
- On the Edit a Systype screen, and set up the systype as applicable to your jurisdiction.
- Click Save.
For DBA information to display on the Maintain PPA Accounts screen, an alias must be associated with the primary legal party.
- Click Records > Legal Party Maintenance.
- On the Search screen, enter your search criteria and click Search.
- In the Legal Party panel, click to select an item in the grid.
- On the Maintain Legal Party screen, click Next.
- In the Aliases panel, click the green plus icon.
- On the Records Search for Legal Party screen, enter your search criteria and click Search.
- On the Records Search Results for Legal Party screen, click to select an item in the grid.
- On the Edit Alias Type screen, select Doing business as from the Alias Type drop-down list. Select the checkbox if you want to make the alias the legal party.
- Click Finish. You automatically return to the Maintain Legal Party screen.
- Click Save.
Business Name
Last Updated On – the most recent date the account was updated.
Tax Year – Corresponds with the year you entered on the Search for Personal Property Accounts screen. You are viewing the account information for the year specified in this field; however, you can change the tax year using this drop-down list.
TAG – The tax authority group to which the account belongs. TAGs are specific to your jurisdiction.
Class – Class codes are used to group or categorize revenue objects and are specific to your jurisdiction. They are maintained in the Revenue Object Sub-Type systypes.
Status – Active or Inactive
NOTE: If a change has occurred to the account, the change reason selected is also displayed. For example, if an account becomes inactive because the business was closed, the Status shows Inactive, the date it became inactive, and then the reason it became inactive, e.g., business closed.
Last Posted: (may not apply to your jurisdiction) – The date and time the account was most recently posted.
- Appraised – The account's appraised value at the time it was last posted during the tax year you are viewing. It is the total calculated value of the account minus the sum of all the associated asset values.
- Assessed – The account's assessed value at the time it was last posted during the tax year you are viewing. This is typically a percentage of the appraised value. If no last assessed value exists, a value of zero (0) is displayed.
-
Working Assessed
NOTES:
- When a Personal Property Account has no TAG assigned to it, the TAG field in the header area of the screen displays Unassigned TAG in red.
- When a Personal Property Account is INACTIVE, the Status field shows INACTIVE in red text along with the date that it became inactive. Also, note that you cannot roll an account when it is inactive as the Roll Account button is not active. You must first click Reactivate to perform actions.
- When a Personal Property Account status is ACTIVE, but there are no Last Posted Appraised or Last Assessed values, the only action available is Roll Account.
- When a Personal Property Account has never been posted, the message in the Last Posted field is: Account has never been posted.
Menu items

Select Item – If you selected more than one item from the search results, use this drop-down list to select from those items.
Roll Account – Click to roll forward the account.
Deactivate/Reactivate – Click to change the status of the account for the current tax year. Click OK in the pop-up confirmation.
Deactivate Tax Year – Inactivate the current account for a single tax year without it affecting later tax years.
NOTE: The Personal Property application setting Option to only inactivate specified Tax Years must be set to True for this button to appear in the Command Item bar.
Post – Click to post a value conclusion for the account on the View Post Personal Property Values screen.
NOTE: The Effective date of change field is disabled if you do not have proper rights.
Click here to learn how to set these user rights.
- Click Configuration > Security and User Maintenance > Roles.
- On the Maintain a Role screen, select the relevant role and click Edit.
- On the Edit Role Details screen, click to highlight Personal Property Appraisal in the Available Menu Items panel and click Add Selected.
- Click Save in the Command Item bar.
- In the Granted Menu Items panel, click Personal Property Appraisal > Details > View Post Personal Property Accounts > txtPostingDate.
- In the Rights panel, select the checkbox for each right you want to assign and click Set Rights.
- Click Save in the Command Item bar.
- Click Close to end the task.
Save – Click to save changes you make on this screen.
Wells (only certain jurisdictions) – Click to open the Maintain Wells screen on which you can define oil/gas/mineral well information for business accounts with oil/gas/mineral assets.
Assets – Click to open the Maintain Assets screen where you can view, add, and edit the assets associated with the account. The screen is also used to value and post the account.
Previous – Click to return to the Search for Personal Property Accounts screen.
Close – Click to end the task.
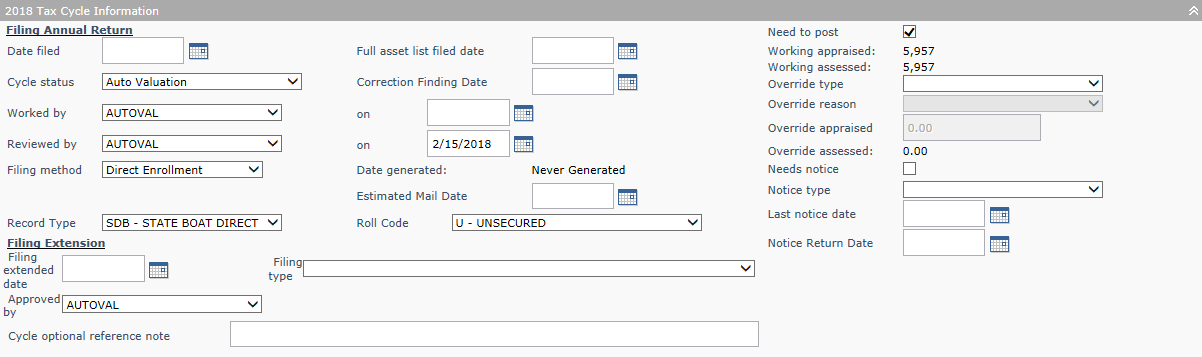
Tax Cycle Information panel
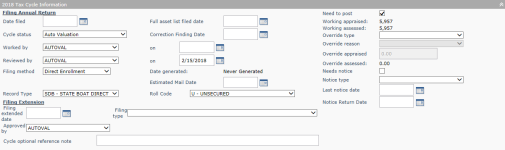
This panel shows dates for events based on the tax year displayed in the header panel.
- Enter or select information for this account. Fields of note include:
- Cycle Status – Indicates where in the workflow cycle the return currently resides (such as Not Filed, Under Review, Sent). The choices that appear in the list are maintained in the PPA-Filing Cycle Status systype.
- The Cycle Status field is controlled by user role security.
- When the Cycle Status is in certain stages (for example, Audit in Progress or Under Review), the Post button is not available and the account cannot be rolled to the next year until the audit is reviewed.
- Certain workflows that advance to the Maintain PPA Accounts screen set the Cycle Status automatically, based on the workflow item.
- Worked by – Select the appraiser who is working the return and enter the date on which it was worked. Appraisers in this drop-down list are maintained on the Maintain Appraisers screen.
- Reviewed by – Select the appraiser who reviewed the return and enter the date on which it occurred.
- Select the Record Type and Roll Code.
- Filing Method – May not be available in your jurisdiction.
- Date generated and Estimated Mail Date
- View the account worksheet values and enter or update the account status fields.
- Need to post – This checkbox is automatically selected when a change affects the account value for the current tax year; for example, an asset status or value changes, or an asset is rolled into the current tax year.
- Working appraised – This amount is the sum of the appraised values (or overrides, if present) for all assets associated with the account for the tax year you are viewing. It is updated each time the account or any of its assets is valued. This field is read-only and is considered a worksheet value for the account. Note that an asset's value is not included in working appraised if its use is exempt.
- Working assessed – This amount is calculated by multiplying the working appraised amount by the assessment percentage from the Assessment Administration module. The result is rounded according to the Rounding - Assessed value application setting. This field is updated each time the account or any of its assets is valued. It is read-only and is considered a worksheet value for the account.
- Override Type – The items in this drop-down list are systypes. If selecting an Override Type, you must select an Override Reason and enter an Override Appraised value.
- Needs notice – If you select this checkbox, make a selection from the Notice type drop-down list and enter a Last Notice date. The choices that appear in the list are maintained in the PPA-Type of PPA Notice systype.
- Select the Needs audit checkbox, if applicable; then select the following:
- Status – This indicates where in the workflow cycle the audit currently resides. The choices that appear in the list are maintained in the PPA-Audit Status systype.
- Assigned to – Select the person who is working the audit. This drop-down list is maintained on the Maintain Appraisers screen or the Set Up Auditors screen, depending on your jurisdiction.
- Audited date – Enter or select the date the account was audited (mm/dd/yyyy).
- Audit type – Select the type of audit being performs, such as a book audit or site visit audit. The choices that appear in the type list are maintained in the PPA-Type Audit systype.
- Audited by – Select the person who performed the audit. This drop-down list is maintained on the Maintain Appraisers screen.
- Under appeal – Select this checkbox, if applicable; then select the Status, which indicates where in the appeals process the account currently resides. This drop-down list is maintained in the PPA-Valid Appeal Status systype.
- Filing Type – This is a user-defined systype.
NOTES:
NOTE: Any changes to existing appraiser assignments is saved to the database. You can generate a report of appraiser changes
NOTE: These two fields display only if the Record Type field entry required application setting is set to True. You must make a selection from at least one of the fields.
NOTE: For some jurisdictions, owners of business assets are provided electronic filings rather than paper filings, at the owners' request. The Export Electronic Filings screen is used to export the data.
The jurisdiction reviews the spreadsheets and sets a flag indicating electronic filing. When the is uploaded to Aumentum, the account is automatically updated.
Personal (not business) filings can use either I-File or paper.
Approved by – Appraisers in this drop-down list are maintained on the Maintain Appraisers screen.
Cycle optional reference note – This is a free-form text area and can hold up to 32 characters.
NOTE: The system allows you to change and post the working appraised and working assessed value at the account level (for an account that has been posted once before) only when a modifier is added to the account, specifying the reason why there is a change between working appraised and the last posted appraised.
When the Fixture Split Enabled application setting is set to True, additional account level override fields are displayed.
NOTE: The Override Assessed field is read-only.
NOTE: In the sidebar, click Additional Information > Personal Account Change Tracking to see who made changes to an account. Click the Excel icon in the title bar of the pop-up to save the information to an Excel spreadsheet.
Summary Group and Account Totals panel

This panel is not available in all jurisdictions.
Assessment History hyperlink
NOTE: The Edit and Clear buttons are security enabled.
Modifiers panel

This panel displays modifiers (penalties, exemptions, or flags) that were defined on the Maintain Assets screen or that you define on this screen.
To create a modifier:
- Click Add in the Modifiers panel.
- Select the modifier from the drop-down list.
- Enter or select information in the other fields.
- Click Apply.
Modifiers Quick Add panel
This panel contains preset modifiers that you select from the Maintain Modifier Definitions screen.
- Click Personal Property Appraisal > Setup > Modifier Definitions.
- On the Maintain Modifier Definitions screen, make a selection from the Effective tax year drop-down list.
- Select one or more items in the grid and click Edit in the grid's title bar.
- From the Apply Modifier drop-down list, select Interactive/Quick Add.
- Make a selection from the Default Effective Date and Default Expiration Date drop-down lists.
- Click Applyin the grid's title bar, then click Save in the Command Item bar.
Property Information panel

This panel contains descriptive information about the account.
- The property Revenue object Id identifies the account in the database tables.
- The Property description is created automatically based on the class of the property.
Steps
- Enter of select information in the editable fields. Fields of note include:
- NAICS code – auto-populated if available. Some jurisdictions have a data entry field, rather than a Select button for the purpose of entering the code. If you click Select, search for and select the business type NAICS code on the Search for Business Type screen.
- Neighborhood, Appraisal Area, and Map Code – these drop-down lists are populated via Configuration > Systypes and are used to define these areas in the GIS - Parcel Map panel at the bottom of the screen.
- Business use code – this drop-down list is populated via Configuration > Systypes.
- Inactivate during roll forward – select this checkbox, if applicable.
NOTE: Your selection in the Neighborhood Assigned to drop-down list persists when rolling forward the account to the next year.
If the checkbox is not selected, the effective date of the inactivation is equal to the first day in the new Tax Year during the Batch Group Roll Forward process. The Group Roll Forward process looks at both the Date out of Business/Sold date and this checkbox to determine how to process group roll forwards.
Audit Information panel

This panel is editable and displays current audit information.
- Enter of select information in the editable fields. Fields of note include:
- Needs audit – Select this checkbox if an audit of the account is required.
- Status – Note that selecting Audit in Progress inactivates the Post button and prevents posting or rolling forward of the account to the next year until the audit is complete and the status is changed to Audit Complete. During batch posting, the account is skipped until Audit in Progress status is removed.
NOTE: When selected, a Needs Audit flag is automatically placed on the revenue account. If the checkbox is cleared, the flag is automatically removed from the revenue object account.
Field Canvass Information panel

NOTE: This panel may not apply to your jurisdiction.
- The Field Canvass Information panel contains details to help assess personal property. In certain jurisdiction, field canvassing is required.
- The Status drop-down list is populated via Configuration > Systypes.
- If you select Scheduled, enter or select a Scheduled Date. If you select Completed, enter or select a Completed Date.
- When you make a selection from the Assigned to drop-down list, an event is created.
NOTE: Field canvass information is not carried forward to the next year when rolling forward an account.
Case Information panel

If a case exists and is pending for the account, this panel displays relevant information for the case.
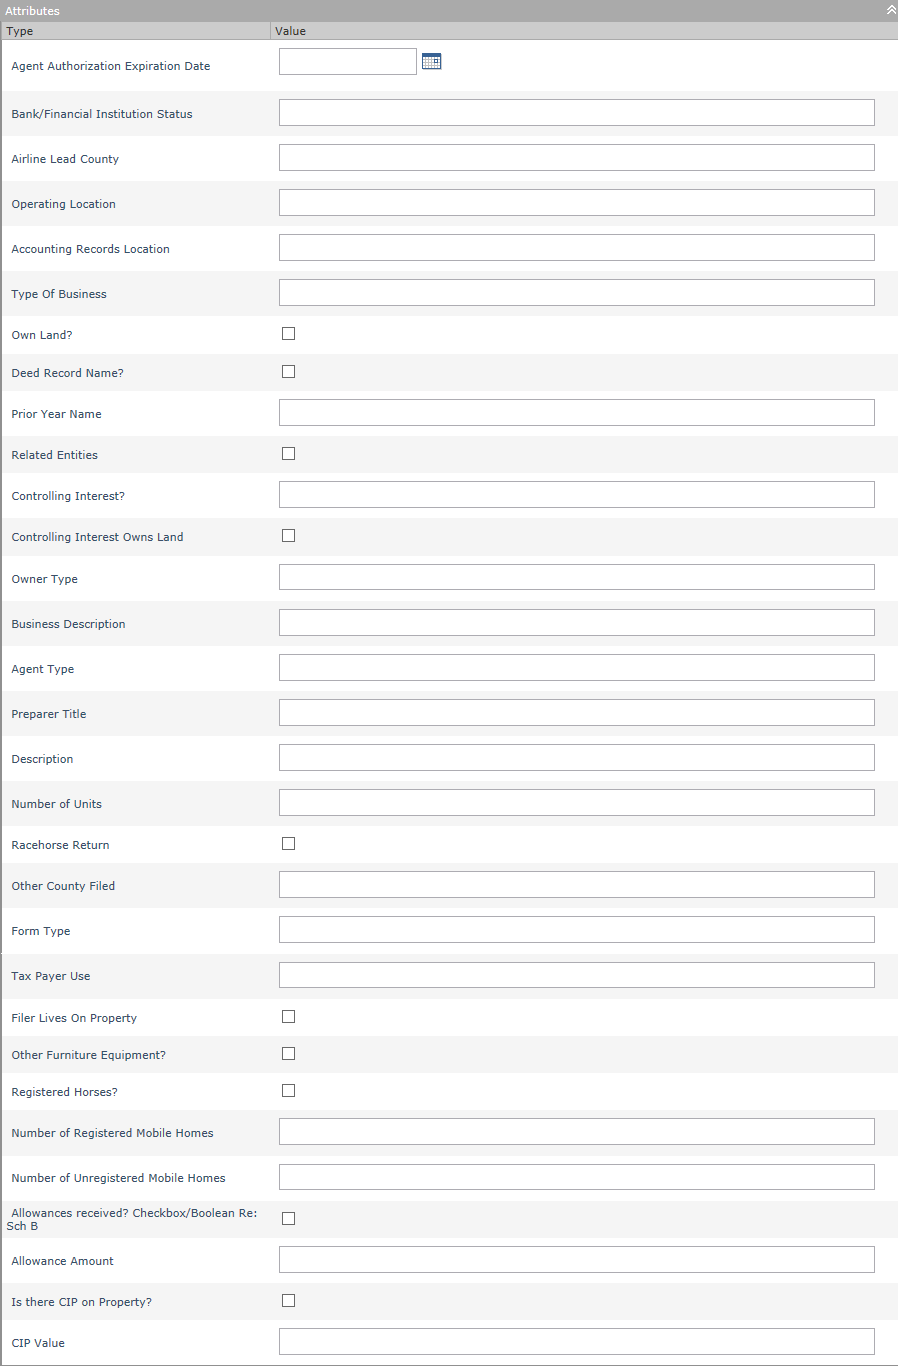
Attributes and Identifiers panels

Many attributes are initially set up by your Aumentum Implementation team and some are maintained with user-defined fields.
The Attributes and Identifiers panels are set up on the Maintain Attributes screen and are associated with the account class code.
NOTE: Some jurisdictions include Add, Edit, and Remove buttons in the Identifiers panel header.
Parties panel

There is always at least one owner party. Other associated parties include taxpayer, lender, and interested third party. Legal party associations are established using the Creating Legal Party Associations task.
- Click Add.
- On the Search screen, enter your search criteria and click Search.
- In the Legal Party tab, click to select a legal party. You automatically return to the Maintain PPA Accounts screen.
- Enter the Agent Begin Date and Agent End Date.
- Click Add.
- Edit the information as needed and click Save.
- Click Return to go back to the Maintain PPA Accounts screen.
- Make a selection from the Role drop-down list.
- Click Configuration > Application Settings.
- Locate PPA Account Agency type Legal Party Roles ignore Funcl Calendar and click Edit.
- In the Setting Value column, select the checkbox to set it to True and ignore the functional calendar. Clear the checkbox if you want to use the functional calendar.
- On the Maintain Application Settings screen, select Effective Date from the Setting type drop-down list, and select Personal Property from the Filter by module drop-down list.
- Click Apply.
- Click Save in the Command item bar.
- Select the Primary checkbox if this is the primary owner.
- Click Delete to remove this party from the panel.
- Click OK in the pop-up.
OR
Click Edit to open the Maintain Legal Parties screen.
NOTE: The account cannot be saved without at least one legal party role.
NOTE: You can ignore the functional calendar for agency-related role types.
Click here to learn more about the application setting.
Situs Addresses panel
This panel displays one line of information for each situs address associated with the personal property account. The primary situs displays first with a checkmark in the Primary column. You can add, edit and delete situs addresses in this panel.

When you add an item to the Related Revenue Objects panel and make a selection from the Update Related PIN Situs TAG drop-down list, the primary situs and Tax Authority Group in the Situs Addresses panel is updated to match.
- Click Add or Edit to open the Maintain Situs Addresses screen.
- Enter or edit the relevant information and click Finish.
To delete a situs address, click Delete for an item in the grid.
Landlord/Facility Info panel

If an account is associated with a landlord or facility, this panel displays related information.
- Click on a hyperlink in the Facility Name column.
- On the Maintain Landlord/Facility Operator screen, make changes as necessary.
- Click Previous to return to this screen.
Related Revenue Objectspanel
NOTE: This panel may not apply to your jurisdiction.

- Click Add.
- On the Records Search screen, enter your search criteria and click Search.
- On the Records Search Results screen, click to select a revenue object. You automatically return to the Maintain PPA Accounts screen.
- Make a selection from the Relationship drop-down list.
- Make a selection from the Update Related PIN drop-down list.
- Update TAG
- Update Situs
- Update Geo Code
- Click Apply.
OR
Click Edit.
NOTE: The Effective Date will be the last day of tax year or today's date, whichever is earlier.
Personal Account Notes panel
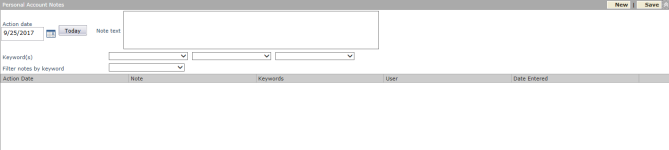
This panel contains notes about the account. The lower half of the panel shows any actions that have occurred.
- Click New in the title bar.
- Enter an action date or click Today to enter today's date.
- Enter the text for your note.
- Select up to three keywords to associate with the note.
- Click Save in the Personal Account Notes title bar to save the note.
- To filter notes, make a selection from the Filter notes by keyword drop-down list.
GIS - Parcel Map panel
When the Appraisal Area, Map Code, and Neighborhood Assigned To fields are defined in the Property Information panel, the information is loaded into this panel.
- Click Close to end the task.


Tips
While on the Maintain Accounts screen click the Aumentum logo and click the Page Properties tab. The ClassCd and BusUseCd information is displayed in the State Variables panel, which specifies how correspondence reports are filtered.
An account can have different NAICS codes for different tax years.
-
NAICS codes can be valued and posted.
-
You can edit an NAICS code for one tax year; it should not carry forward to tax years if the account has already been rolled forward.
-
You can track the edits of the NAICS code via Personal Account Change Tracking (sidebar > Additional Information > Personal Account Change Tracking)
-
When the NAICS is displayed in Discovery after importing an account, no error will be displayed in the confirmation detail report.
-
The NAICS for the PPA account in Info Center (Info Center > Personal Property) is displayed for the different tax years.
Dependencies, Prerequisites, and Setup
Assessment Administration Module
-
Property class codes must be set and available for personal property.
Personal Property Appraisal Module
-
Auditors and/or Appraisers have been entered.
-
Attribute and Asset types exist.
Business Revenue Module
-
The Business Revenue module is installed and available to provide NAICS code selection.
NOTE: NAICS codes are business types. You can also manage the NAICS code in the Property Information panel of the Maintain PPA Accounts screen if your jurisdiction has the Personal Property Appraisal module.
IMPORTANT: The NAICS code is applied at the tax year level, not the account level, even though you can define it on the Maintain PPA Accounts screen.
Configuration Module
Contact your Aumentum Support team if you need assistance with specific application settings.
-
Set AIN to Real Estate Parcel PIN on Secured Accounts (Tarrant, Texas). This application setting determines whether a child AIN on secured accounts is set to the primary real PIN or to the primary personal PIN for processing existing account values and for processing imported values. If set to true, the child AIN is set to the primary real PIN. If set to false, the child AIN is set to the primary personal PIN.
-
Roll forward accounts with no active assets. This is an application setting. If the application setting value is true, accounts are rolled forward regardless of whether they have active assets in the target tax year. If the application setting is false, accounts with no active assets in the target tax year are not rolled forward and they are inactivated as of 1/1 of the target tax year. Go to Configuration > Application Settings > Maintain Application Settings. Select the Setting type as Effective Date and the Sort by module of Personal Property. Click Edit on the Roll Forward accounts with no active assets and set as applicable.
-
Default Flag - Inactivated Account with Sch B1/B2 Items. This application setting is required when selecting the Inactivated PPA Account Containing Schedule B Fixture Items flag from the Manage Flags screen (Personal Property Appraisal > Accounts > search/select > Maintain PPA Accounts [Common Action - Manage Flags]. A workflow is kicked off for processing via My Worklist when this application setting is set and when selecting this flag to apply to an account.
-
A user preference called PPA Default Tax Year eliminates the need to select a Tax Year when searching for an account or asset. To set this up, go to Configuration > Configuration > Security and User Maintenance > Users > Select or Add a User > Maintain User Information and enter the year for this new user preference. When a tax year is entered, the setting allows searching without defining the Tax Year. When left blank, searching by Tax Year is required.
-
You must set the associated application setting and systypes for Class Codes. If not set, an error is displayed on the Search for Personal Property Accounts screen and on the Search for Assets screen, and you cannot perform a search.
Application settings
- Click Configuration > Application Settings.
- On the Maintain Application Settings screen, select Effective Date from the Setting type drop-down list, and select Personal Property from the Sort by drop-down list.
- Locate Personal Property Class Type and click Edit.
- Make a selection from the drop-down list in the Setting Value column and click Apply.
- Click Save.
Systype
- Click Configuration > Systypes.
- On the Select Systype screen, enter or select the effective date.
- Start typing Personal Property Class Codes and select it from the Systype Category drop-down list.
- Double-click on Personal Property Class Codes in the Description column.
- On the Edit Systype screen, edit the description if necessary and enter the display order in which you want the systype to appear in the drop-down list.
- Select the Selectable checkbox to make this systype available in the drop-down list.
- Select the Deletable checkbox if this systype can be deactivated in the database.
- Optionally, expand the History panel to see the changes made to this systype.
- In the Associated Systypes panel, select the checkbox for one or more systypes to include in the Class Code drop-down list on the search screens. Click Save and Close.
-
Frozen Value Asset Modifier. This is an asset level modifier created in Personal Property Appraisal automatically during valuation when an asset reaches the depreciation table end of life. The effective year for the asset is set to 01/01/current year, and from that point forward, when the asset is valued, the effective date year is used to determine the cost table year to pull. During calculations, if the modifier is present, the asset is valued using the tables in the year it was frozen, and the LOV defaults to 1.0. The frozen value asset is then configured to roll forward to the next year. To set this up, create an LOV schedule via PPA > Setup > Value Schedules > Maintain Value Schedules. Note that the assets must be configured using a Value Method type of Value Schedule Configuration. Set this up via PPA > Setup > Value Method > Maintain Value Method. Add a step to the value schedule and select LOV in the Schedule column.
-
IMPORTANT: Security is available for the Post and Value All buttons. If you are the administrator, you can limit access rights to these buttons via Configuration > Security and User Maintenance > Roles > Maintain a Role > [Edit or New] > Edit Role Details. From the Available Menu Items panel, select Personal Property Appraisal and click Add Selected to add it to the Granted Menu Items panel, if not already there. Select Personal Property Accounts > Personal Property Accounts > Maintain Personal Property Accounts. Set rights for btnPost and for btnValueSaveAll by selecting the applicable checkboxes. To deny rights, leave checkboxes unchecked. You can also set rights for the Deactivate, Post, and Roll Account buttons on the Maintain Assets screen by selecting Personal Property Accounts > Personal Property Accounts > Maintain Assets from the Granted Menu Items panel and set rights as applicable for btnDeactivate, btnPostSingle, and btnRollAccount. Any buttons to which a user role does not have rights are deactivated on the particular screen.
-
The Personal Property Tax Year Account Attribute and Identifier Filter By application setting defines whether to filter Attributes and Identifiers by Business Use Code or by Class Code on the Maintain PPA Accounts screen.
-
The Cycle Status field on the Maintain PPA Accounts screen is controlled by user role security. To set this up:
-
Go to Configuration > Security and User Maintenance > Roles. Click Edit on the particular Role to advance to the Edit Role Details screen.
-
In the Granted Menu Items panel, click on the expand button (+) preceding Personal Property Appraisal and drill down to Accounts > Details to advance to the Edit Additional Role Details screen.
NOTE: If Personal Property Appraisal is not displayed in the Granted Menu Items panel, select it from the Available Menu Items and click Add Selected to add it.
-
Click on the expand button (+) preceding Maintain PPA Accounts in the Details panel and select ddlCycleStatus.
-
Set the rights as applicable for the role. Set to View only to disable maintenance activities to the Cycle Status field.
Workflows
The PPA Account Maintenance workflow task allows state variables to pass back to workflows. On the Maintain PPA Accounts screen, make the necessary changes to the account and click Save, then click Finish. If there are no changes to the account, just click Finish. You automatically return to the View My Worklist screen to proceed to the next activity or to end the workflow.
Edit Checks
Depending on your jurisdiction and setup, certain fields and screens in the Personal Property Appraisal module are configured for edit checks, meaning when specific data is changed, the system verifies that the data defined is correct.
For example, if a rule is defined for the Override appraised field on the Maintain PPA Accounts screen that states that the amount entered cannot be greater than the total appraised value amount, then the account cannot be saved. A message to that effect is displayed when you click Save.
Rules can be defined for the following screens in Personal Property Appraisal, such as for:
-
Maintain PPA Accounts
-
Maintain Assets
-
Manage Discovery Worklist
Set these rules via Configuration > Edit Check configuration.
Additional Information
Authorized Agent Tracking – Opens a pop-up that displays the history of authorized agents.
Dependencies, Prerequisites, and Setup
Click here for information on security settings and behaviors.
When posting values for an account, the Post and Submit buttons on the Maintain PPA Accounts and Maintain Assets screens are displayed or hidden depending on security settings.
- Click Configuration > Security and User Maintenance > Roles.
- On the Maintain a Role screen, click Edit for the desired role.
- On the Edit Role Details screen, ensure that Personal Property Appraisal is displayed in the Granted Menu Items panel. If not click to select it in the Available Menu Items panel and click Add Selected, then click Save in the Command Item bar.
- Click Personal Property Appraisal > Accounts and/or Assets (individually) > Details.
- In the Details panel, click to expand View Post Personal Property Values.
- Individually, click to select PostBtn_CurrentYear, PostBtn_PreviousYear, and SubmitBtn_PreviousYear.
- In the Rights panel, select the checkbox for each right you want to allow and click Set Rights.
- Click Save in the Command Item bar.
The following table explains the expected behaviors based on your security settings.
| PostBtn_CurrentYear | PostBtn_PreviousYear | SubmitBtn_PreviousYear | Expected Behavior | Buttons Displayed |
|---|---|---|---|---|
| All rights | All rights | Blank | User can Post in any tax year |
Post button is available for any tax year Save button is available for any tax year |
| All rights | Blank | All rights |
User can Post in current tax year User can Save or Submit for previous years |
Post button is available for current tax year Submit button is available for previous tax years Save button is available for previous tax years |
| Blank | All rights | Blank |
User can Post in previous tax years User can Save in current year |
Post button is available for previous tax years Save button is available for current tax year |
| Blank | Blank | All rights |
User cannot Post in any tax year User can Save in current year and previous tax years User can Submit in previous tax years |
Post button is not available for current tax year or previous tax years Save button is available for current tax year and previous tax years Submit button is available for previous tax years |
| Blank | Blank | Blank |
User can cannot Post in any tax year User can Save in current year and previous years User cannot Submit in previous tax years |
Post button is not available for any tax years Submit button is not available for any years Save button is available for current and previous tax years |