Legal Party Maintenance
Navigate:  Records > Legal Party Maintenance
Description
A legal party is an individual person, organization, public agency, trust, or proprietorship that has legal standing and is recognized as a legal entity under the law.
Steps
- Click Records > Legal Party Maintenance.
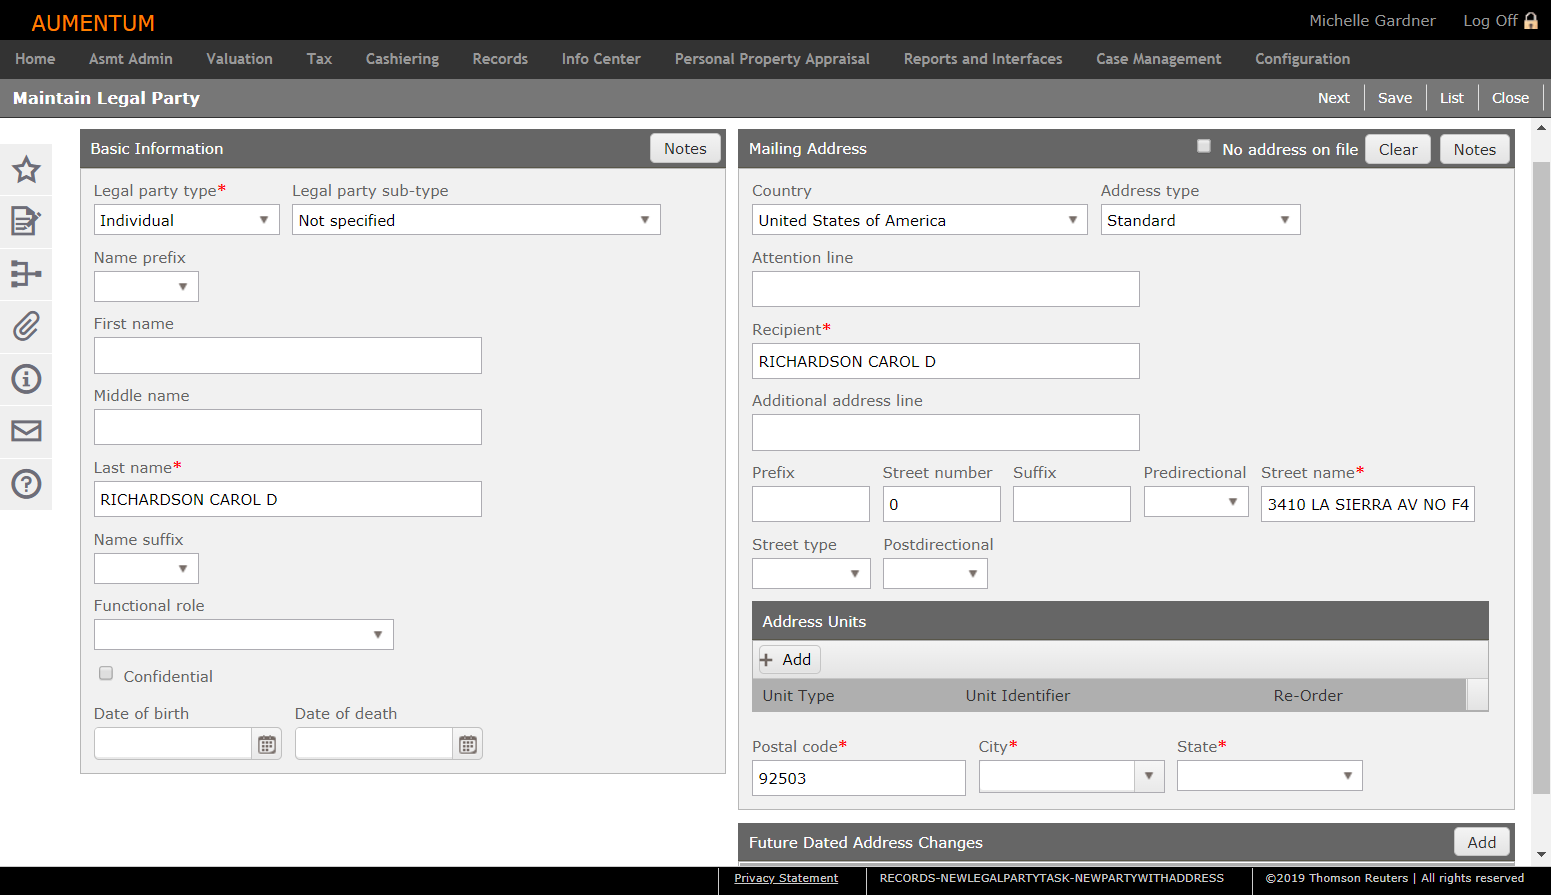
- On the Search screen, click New in the Command Item bar to open the Maintain Legal Party screen.
- In the Basic Information panel, make a selection from the Legal party type drop-down list. If you do not know the legal party type, you can leave it blank.
- Optionally, make a selection from the Legal party sub-type drop-down list to further describe the legal party. Values in the drop-down list depend on the legal party type you select.
- A last name for the legal party is required. Enter the first name, middle name and suffix if you have that information. All together, this name is used as the display name in Aumentum.
- Optionally, make a selection from the Functional role drop-down list, which identifies residency and citizenship for individual legal parties or type of organization for organization, agency, and trust legal parties.
- If necessary, select the Confidential checkbox (if not selected, the legal party is not confidential). A confidential status is typically used for legal parties who cannot have public records, such as judges.
- Display name – A fictitious name for display on Aumentum screens, such as Info Center and Records.
- Actual name – The real name of the legal party. It is defined in the actual name field and is stored encrypted in the database.
- Optionally, enter or select a date of birth or date of establishment.
- Enter or select a date of death or date of dissolution, if applicable.
- In the Mailing Address panel, the name address of the new legal party is displayed. If it is the same or similar to another legal party name, the Similar or Matching Names Found screen is displayed so that you can verify whether this is a new record or a duplicate record.
- Click Save in the Command Item bar.
- On the Search screen, enter your search criteria and click Search.
- In the Legal Party panel, click a hyperlink in the Name column.
- On the Maintain Legal Party screen, update information as needed and click Save in the Command Item bar.
- Basic Information
- Mailing Address - See Editing Mailing Addresses
- Address Units
- Future Dated Address Changes – On the specified activation date, this address replaces the permanent mailing address to redirect the taxpayer's correspondence until the specified expiration date. Click Add to open the Future Address pop-up and enter the address information.
- Click Next to access more legal party information.
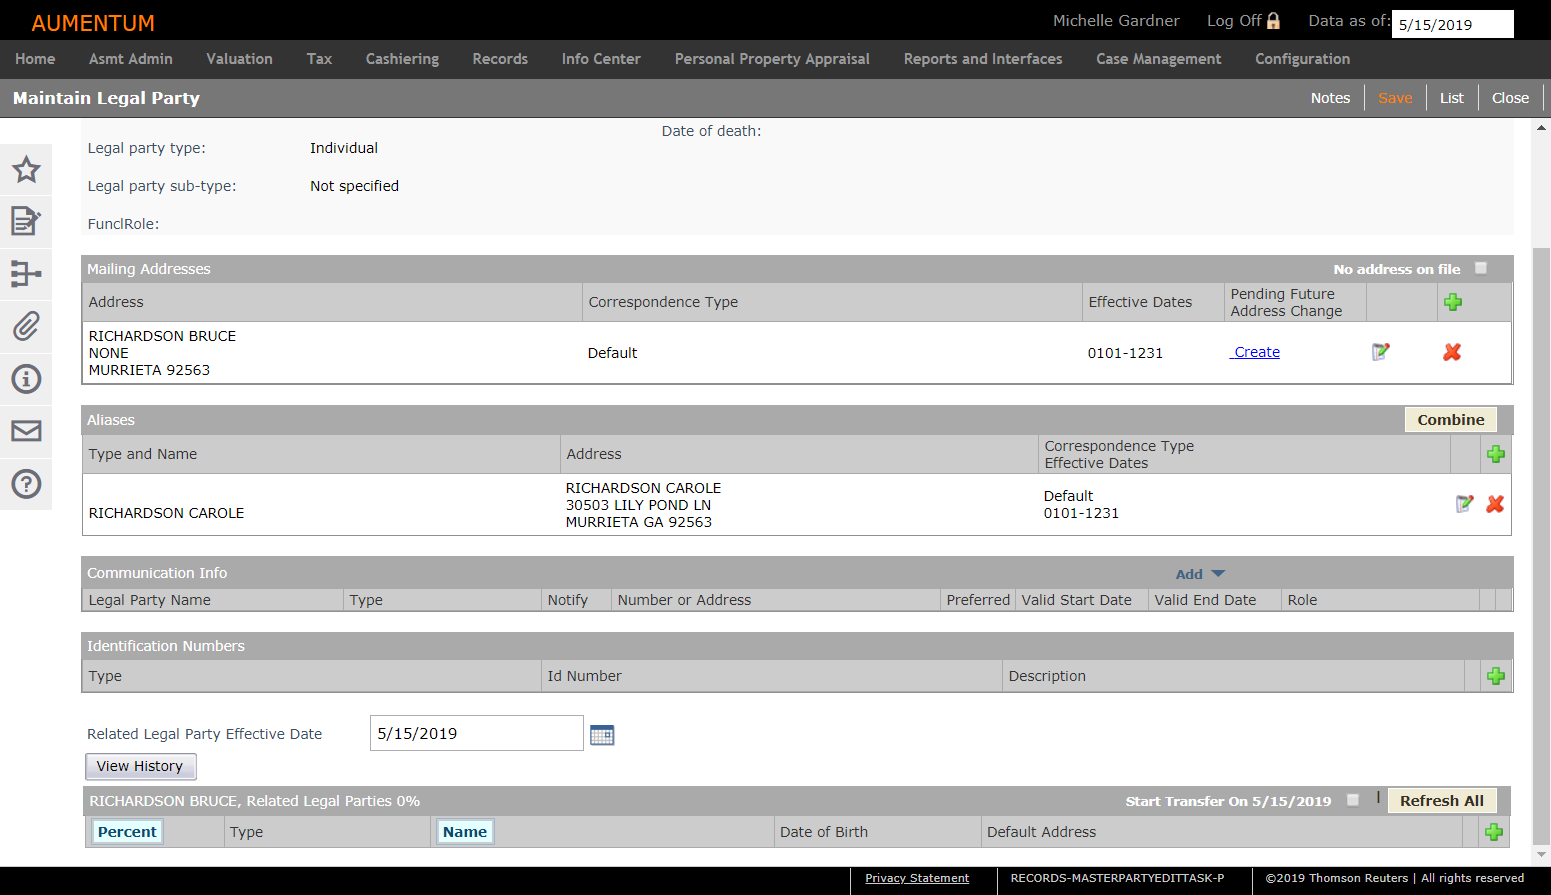
- In each panel, click the green Plus icon to add mailing addresses, aliases, communication info, identification numbers, and related legal parties.
- For each item added, click the Pencil icon to edit the information, or click the red X to delete the item.
- Click Edit party to return to the Basic Information and Mailing Address panels.
- Click List to return to your search results, or click Close to end the task.
- Click Records > Legal Party Maintenance.
- On the Search screen, enter your search criteria and click Search.
- In the Legal Party panel, click a hyperlink in the Name column.
- On the Maintain Legal Party screen, make a selection from the Address type drop-down list in the Mailing Address panel.
- Click Save. The Change Reason and Statutory References pop-up appears. Make a selection from the drop-down list and click OK.
- For help with addressing foreign mail, visit https://www.usps.com/international/preparing-international-shipments.htm.
- If Military overseas is selected, APO, DPO, or FPO must be specified in the PO designation drop-down list. APO refers to the Army/Air Force post offices. DPO refers to Diplomatic Post Office. FPO refers to the fleet post offices (ships and Navy personnel). The Military domestic address type uses the same format as standard.
- If General Delivery is selected, the Street name field is populated with General Delivery, and only the Postal Code, City, and State are required.
- The Recipient field defaults to the legal party name, but can be changed.
- Click Save in the Command Item bar.
- Click Records > Legal Party Maintenance.
- On the Search screen, enter your search criteria and click Search.
- In the Legal Party panel, click a hyperlink in the Name column to open the Maintain Legal Party screen.
- Click Next in the Command Item bar.
- In the Mailing Addresses panel, click the Edit icon for the address you want to change.
- In the Mailing Address pop-up, make the necessary changes and click OK.
- Enter the beginning month and day, and the end month and day for this address.
- Click Next to open the Add Address Note screen.
- Click Previous to return to the Confirm Mailing Address screen, or click Finish.
- Click Close to end the task.
- Also known as (AKA) – For example, a nickname (Rebecca Smith also known as Becky Smith.)
- Formerly known as (FKA) – For example, the maiden name of a married woman (Ann Smith formerly known as Ann Jones. Ann Smith is her married name and Ann Jones is her maiden name.)
- Doing business as (DBA) – For example, the primary legal party name is Kirby Callahan with alias of Kirby Jones. The alias (Kirby Jones) owns the revenue object.
- Click Records > Legal Party Maintenance.
- On the Search screen, enter your search criteria and click Search.
- In the Legal Party panel, click a hyperlink in the Name column.
- On the Maintain Legal Party screen, click Next.
- In the Aliases panel, click the green Plus icon.
- On the Records Search for Legal Party screen, enter your search criteria and click Search.
- On the Records Search Results for Legal Party screen, click to select an item from the grid.
- On the Edit Alias Type screen, make a selection from the Alias Type drop-down list.
- If applicable, select the checkbox next to Make this alias the legal party.
- Click Finish.
- On the Maintain Legal Party screen, click Close to end the task.
Adding a Legal Party
When a legal party is confidential and a user has security rights to view confidential legal party data, Info Center displays a stop sign next to the name as a warning. If the user does not have the required security, the stop sign does not display. In either case, note that the confidential legal party's display name appears, not their actual name.
Steps
NOTE: A red asterisk denotes a required field.
NOTE: This field is displayed for users who have the security rights to view and edit confidential legal parties.
If you select the checkbox, the Actual first name, Actual middle name, and Actual last name fields are automatically populated. You can now enter the fictitious or display name in the First name, Middle name, and Last name fields in the Basic Information panel.
Two names are stored for confidential legal parties:
Regardless of a security level, confidential legal parties do not display in Aumentum search results when the actual name is used as the search criteria. Users must know and use the confidential party's display (fictitious) name as the search criteria when searching by name.
When a legal party is confidential and a user has security rights to view confidential legal party data, Info Center displays a stop sign next to the name as a warning. If the user does not have the required security, the stop sign is not displayed. In either case, note that the confidential legal party's display name appears, not its actual name.
NOTE: If a legal party has a Date of Death, the party is displayed only when the Return field on the Records Search for Legal Party screen is set to All. When Return is set to Active Only, legal parties with a Date of Death are not displayed, regardless of the effective search date.
NOTE: Adding or confirming a mailing address when creating a new legal party is not mandatory. If bypassing this, you return to the Maintain Legal Party screen.
Editing a Legal Party
NOTE: When you click Save, the Change Reason and Statutory References pop-up appears. Make a selection from the drop-down list and click OK.
Editing Mailing Addresses
IMPORTANT: For Postal Code/USPS method, Content and Functionality for the lookup of United States Postal Service Zip Codes is included in the Records module. When using this functionality, the user expressly assumes all liability and risk of loss associated with its use. There is no warranty or representation as to quality or correctness of the data contained within the Zip Code lookup Content and Functionality.
This Content and Functionality is not included in Maintenance and Support coverage. You can make updates or modifications to this Content and Functionality, but any such changes will be solely at the expense and risk of the user.
NOTE: For either the Postal Code/USPS and Spectrum Address Validation Module software lookup methods, if there are different variations of the city name for a given postal code (for example, vanity names), a drop-down list is available so that you can select the city name you want to use for this address.
Mailing Addresses
NOTE: If you have Group1 software, the Confidence level is returned by the software to indicate the probability that the validated address is correct. The higher the number, the higher the likelihood the address is correct. In batch validation, addresses are accepted at or above the level. This confidence level is set in Application Settings.
NOTE: All days in the calendar year must be accounted for. If the address is used by the party for the entire year, the dates will be 01/01 and 12/31. Note that February 29 is not supported; during leap year use February 28.
If the party is at a different address for part of the year, define a separate address for each date range. Also, address date ranges cannot cross over from one year to another, so you may need two entries for the same address for the beginning and end of the year. For a party who resides at Address A from April through September and at Address B from October through March, you will need separate entries for Address B because its date range crosses into the new year.
| Address B (entry 1) | 01/01 - 3/31 |
| Address A | 04/01 - 09/30 |
| Address B (entry 2) | 10/01 - 12/31 |
Aliases
An alias is another way to identify a legal party linked to a primary legal party. It is the same person, but a different name. Aliases include:
Steps
Communication Info panel
Contains preferred contact or alternate communication for a specific date range.
Identification Numbers panel
Enter a value for each type of identification number if appropriate. These are systypes and new identification number types can be entered if needed.
View History button
Click to open the Related Legal Party History screen.
Related Legal Parties panel
Shows % of partnership, or ownership in stock for the Change in Control (LEOPS) transfer.
Identification Numbers
Legal parties may have an identification number, and revenue objects must have a PIN. Although these numbering systems sound alike, they are two separate tracking mechanisms. See Revenue Object Maintenance for more information.
Legal Party Identification Number Security
A legal party optionally may have one or more ID numbers assigned to uniquely identify individuals, agencies, and organizations. For example, a social security number is frequently stored as the ID number for an individual. Other ID numbers include driver license, employer identification number, and state identification number.
Although the ID numbers are intended to be unique, Records currently does not require it. If you add or edit an ID number and Records finds another party with the same ID number, a warning message displays, but you can still add or edit the number.
When you add an identification number to a legal party, you also select the type and enter the number, up to 64-characters. An example of when the description is particularly useful is a Tenancy by Entirety ownership type in which two people are in one legal party name (e.g., WATKINS JEFF & TAMMY). Two separate social security numbers can be entered, each with a description that identifies the appropriate legal party (e.g., one has a description of JEFF WATKINS and the other has a description of TAMMY WATKINS).
ID numbers are secured through a combination of Systype setup and Role setup.
Revenue Object PIN
Revenue objects are assigned a PIN (primary identification number).
-
PIN is required for the revenue object.
-
It must be a unique PIN.
-
The legal party ID numbers, either primary or non-primary, do not conflict with PINs.
-
PIN is stored in the database as PIN.
Revenue Object AIN
You can automatically increment the AIN (Alternate Identification Number) when creating a new revenue object for Split, Merge, Plat, and Create New Revenue Object.
You can also control how the AIN performs with systypes, including
-
Manually enter AIN - allows edit
-
Automatically increment AIN to next number - no edit
-
Automatically set AIN to rev obj ID - no edit
Set up systypes via Configuration > Systypes > Select or Add a Systype.
Revenue Object Security
Revenue objects have security rights. If you do not have view rights, the Primary Situs field displays the default security message Confidential Address. When security rights for user roles do not allow read or write privileges for revenue objects, users are not allowed to change ownership, create or maintain mailing or situs addresses, create or update revenue objects, or set the revenue object effective date.
- Click Configuration > Application Settings.
- Select Effective Date from the Setting type drop-down list, and select Records from the Filter by module drop-down list. Find Confidential revenue object message and click Edit to type your own message in the Setting Value field.
- Click Apply, then click Save in the Command Item bar.
- Click Close to end the task.
- Click Configuration > Security and User Maintenance > Roles.
- In the Maintain a Role screen, find the role and click Edit.
- In the Edit Role Details screen, click Non-Menu Items in the Command Item bar.
- In the Edit Non-Menu Item Role Details screen, select Records from the drop-down list.
- In the Details panel, click to highlight Confidential Revenue Object.
- In the Rights panel, select the checkbox for each permission you want this role to have and click Set Rights.
Click here to learn how to customize this setting
Click here to learn how to set security rights:
Steps
- Click Records > Legal Party Maintenance.
- On the Search screen, click New in the Command Item bar to open the Maintain Legal Party screen.
- In the Basic Information panel, make a selection from the Legal party type drop-down list. If you do not know the legal party type, you can select Unknown.
- Optionally, make a selection from the Legal party sub-type drop-down list to further describe the legal party. Values in the drop-down list depend on the legal party type you select.
- Enter a last name for the legal party.
- Optionally, make a selection from the Functional role drop-down list, which identifies residency and citizenship for individual legal parties or type of organization for organization, agency, and trust legal parties.
- If necessary, select the Confidential checkbox (if blank, the legal party is not confidential; if selected, the legal party is confidential). This field is displayed for users who have the security rights to view and edit confidential legal parties.
- Display name – A fictitious name for display on Aumentum screens, such as Info Center and Records. It is defined in the legal party name field.
- Actual name – The real name of the legal party. It is defined in the actual name field and is stored encrypted in the database.
- Enter or select a date of birth or date of establishment.
- Enter or select a date of death or date of dissolution, if applicable.
- In the Mailing Address panel, the name and address of the new legal party is displayed. If it is the same or similar to another legal party name, the Similar or Matching Names Found screen is displayed so that you can verify whether this is a new record or a duplicate record.
- Click Save in the Command Item bar.
NOTE: A red asterisk denotes a required field.
NOTE: Prefix, first and middle names, and suffix are optional. All together, this name is used as the display name in Aumentum.
NOTE: A confidential status is typically used for legal parties who cannot have public records, such as judges. When selected, enter the information in the additional Actual Name fields. There is a 32-character limit for the first and middle names, and a 64-character limit for the last name.
NOTE: Two names are stored for confidential legal parties:
Regardless of a security level, confidential legal parties do not display in Aumentum search results when the actual name is used as the search criteria. Users must know and use the confidential party's display (fictitious) name as the search criteria when searching by name.
When a legal party is confidential and a user has security rights to view confidential legal party data, Info Center displays a stop sign next to the name as a warning. If the user does not have the required security, the stop sign is not displayed. In either case, note that the confidential legal party's display name appears, not its actual name.
NOTE: If a legal party has a Date of Death, the party is displayed only when the Return field on the Records Search for Legal Party screen is set to All. When Return is set to Active Only, legal parties with a Date of Death are not displayed, regardless of the effective search date.
NOTE: Adding or confirming a mailing address when creating a new legal party is not mandatory. If bypassing this, you return to the Maintain Legal Party screen.
Systype Setup for ID Numbers

-
Click Configuration > Systypes.
- In the Select or Add a Systype screen, enter or select an effective date, and select ID Number Security Type from the Systype category drop-down list.
- Click on an item in the grid to open the Edit a Systype screen.
-
Securable ID numbers are definable by your jurisdiction, so you may add ID numbers to the following list.
-
Driver license
-
Employer identification number
-
Federal identification number
-
State identification number
-
Social security number
-
-
Define one or two groups of security authorizations using the systype category ID Number Security Type. Use 07/04/1776 for the effective date.
-
ID Number Security Group 1
-
ID Number Security Group 2
-
-
Click ID Number Security Group 1 or ID Number Security Group 2. The Edit A Systype screen is displayed.
NOTE: The ID numbers that display in each group were defined in step 1 using systype category Identification Number Type.
-
Click the checkbox to the left of each ID number to select it for the group. An ID number (such as social security number) does not have to be in either group, or it can be in both groups.
IMPORTANT: If an associated systype is in neither group, then the user has full rights. If a user has view rights in one group and edit rights in the other, then the role will have both view and edit rights.
IMPORTANT: Both Group 1 and Group 2 selectable items must be the same or the information displays in Business Revenue but not in Info Center; or vice verse, the information will display in Info Center and not in Business Revenue.
Role Setup for ID Numbers
After the ID numbers are defined and assigned to Group 1 or Group 2 using Systypes, assign security rights using non-menu item role security.
-
Click Configuration > Security and User Maintenance > Roles.
- On the Maintain a Role screen, click Edit for the desired role.
- On the Edit Role Details screen, click Non-Menu Items in the Command Item bar.
- On the Edit Non-Menu Item Role Details screen, select Records from the Modify security for drop-down list.
-
In the Details panel, click to open Records > Party Identification Number and select the following, one at a time:
- ID Number Group 1
- ID Number Group 2
-
In the Rights panel, select the applicable checkboxes: View, Execute, Create, Modify, and Delete.
- Click Set Rights, then click Save in the Command Item bar.
When an ID number, such as a social security number, is set to no rights for a particular user, that user can not perform a record search by that ID number.