Maintain Condominium
Navigate:  Valuation > Condominium > Maintain Condominium
Description
Use the Maintain Condominium task to define and track individual condominium unit characteristics, as well as view and maintain information related to a condominium project, including its project descriptive data, common areas, unit types and individual units. You also have the ability to identify PINs to associate to a specific unit type within the condominium project.
Steps
The Maintain Condominium task is comprised of six tabs:
-
Condominium Project Configuration (prerequisite)
- Project Description - View the project's basic data and related notes.
-
Common Areas - Define and track common area structures, features and land records.
-
Unit Type Summary - View a summary list of all Unit Types found within a project.
-
Unit Type Detail - View all of the characteristics (as defined in the Condominium Configuration process) for each Unit Type.
-
Assignment - Identify all parcel accounts associated with a condominium project, as well as their corresponding assignment of Unit Type.
-
Individual Unit Detail - View and maintain individual unit data, defined at the appraisal level.
Upon navigating to the Maintain Condominium screen, the screen is blank, allowing you to perform a New Search on the Advanced Search screen for a condominium project for which to perform maintenance.
Configure Condominium Projects
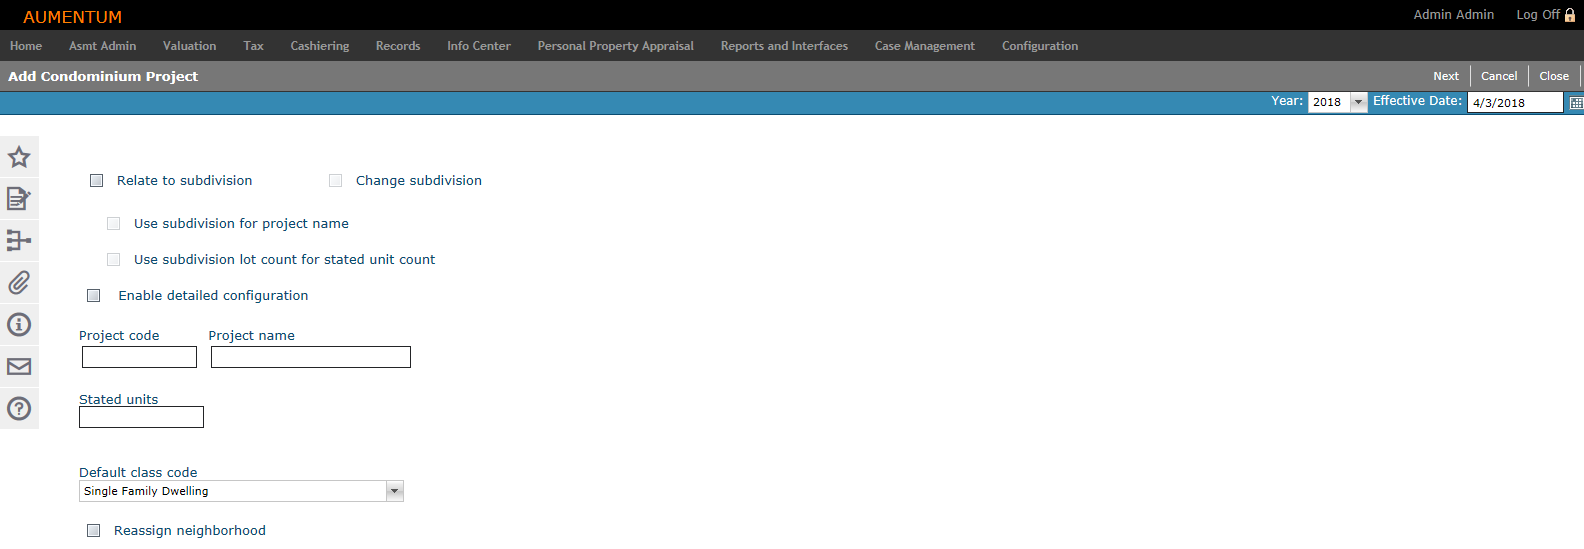
- On the Configure Condominium Projects screen, click New.
- On the Add Condominium Project screen, select the Relate to Subdivision checkbox if you want to relate this project to a Records Subdivision.
- If selected, the wizard will guide the user through a subdivision search when you click Next.
- Select the Use Subdivision for Project Name checkbox, if desired.
- Select the Use Subdivision lot count for stated unit count checkbox, if desired.
- Enter a Project Code (up to 16 characters).
- Enter a Project Name (up to 64 characters).
- Enter the Stated Units, which is the total number of condo units in the project.
- Make a selection from the Default class code drop-down list, which is the class code to be assigned to unit types by default.
- Click Next.
- On the Advanced Search screen, enter your search criteria and click Search.
- If you selected the Relate to Subdivision checkbox on the Add Condominium Project screen, you are prompted to search for a subdivsion. Otherwise, search for a neighborhood.
- In the Search Results tab, select an item in the grid and click Next.
- On the Configure Condominium Projects screen, click the Unit Type Summary tab to track how many of each unit type there are a project.
- In the Characteristics Categories tab, select which categories are to be made selectable within the project (Condo Maintenance).
-
In the Characteristic Codes tab, the codes to be selectable within the project are mapped by category.
-
In the Notes tab, create, edit or delete notes as needed.
A Unit Type is best described as a model or floor plan. Every unit in the project must be described by a unit type, and a unit type may describe more than one unit in the project. For example, units with the same floor plan can be described by a single unit type that represents the floor plan.
Project Description
-
View the project's basic characteristics.
-
Stated Units - Total number of units existing in the project, as identified during the project's creation.
-
Defined Units - Total number of units accounted for by totaling the number of defined Unit Types; this field is calculated by the application.
-
Assigned Units - Total number of units associated with a PIN in the condominium project.
-
Project Class Code - The defined class code, as defined during the project's creation.
-
Neighborhood Code & Description - The neighborhood code and name, as defined during the project's creation.
-
Subdivision Code, Description & Lot Count - Displays the subdivision that is associated with the project, when applicable. These fields are blank if a subdivision has not been associated with the project.
-
-
View and add Notes, as desired. Condominium Project Notes uses standard Aumentum Notes functionality.
-
Click Save.
Common Areas
Tracking and valuing common areas does not exist in many jurisdictions' valuation methods; definition of common area characteristics, buildings, land and features is optional. The areas defined as Common Areas represent a unique appraisal site, which may include land, and multiple features or buildings.
The Common Areas tab is comprised of five subtabs that track common area attributes defined at the appraisal site level:
-
Site Data - The site's basic information.
-
Land - View and add land types as common areas.
-
Buildings - Buildings identified as common areas (e.g., recreation halls, sports facilities, etc.).
-
Features - View and add features as common areas.
-
Notes - View and add notes associated with the common areas (not the project itself).
In addition, Aumentum's visual tools are available from the Common Areas tab, on the vertical flyout menu.
-
Sketch - View any sketches associated with the appraisal site.
-
Site Plan - View prints of the appraisal site.
-
Photos - View any photos associated with the appraisal site.
-
GIS - Open the GIS viewer to the PIN you are viewing.
-
Pictometry - Open the Pictometry system to get an aerial view of the appraisal site which is fully integrated within the Aumentum application.
Site Data
-
Click the Edit icon to edit the basic Site Data. The top panel is active for editing the site's basic characteristics.
-
Click the Add New icon in any of the Site Information grids to edit the site's:
-
Appraisal Site Flag - Appraisal site flags use standard Aumentum Flags functionality.
-
Area Data - Add new area definitions to the site (e.g., square footage, acres, etc.)
-
Adjustments & Obsolescence - Add relative adjustments or obsolescences, as necessary.
-
Characteristics - Includes user-defined fields, as configured.
-
-
Optionally delete any Site Information.
-
Optionally view/edit notes. Notes use standard Aumentum Notes functionality.
-
Click Save.
OR
Click the Edit icon to edit any Flag, Area Data,Adjustment / Obsolescence displayed.
Land
- Click the Add from Template icon to add a new common land line to the appraisal site from an existing template with the Apply Site Template task. You are directed to the Advanced Search screen to Search by Template Header.
-
Characteristics and Size Records - Define the land line's basic information, and add Additional Characteristics and Size Records as desired.
-
Adjustments - Add or edit land line adjustments.
-
Notes - Optionally view and add/edit notes.
-
Click the Add New icon to add a new use of land. The Edit Land Use wizard displays.
-
Click to select any land line in the Land grid to view its related Characteristics and Size Records and Adjustments in the subtabs below; this information is read-only.
-
Click Save.
OR
Click the Add New icon to add a new common land line to the appraisal site. A pop-up appears allowing you to add land line information.
OR
Click the Edit icon to edit any existing land line in the list.
Buildings
NOTE: The information in the Floor Detail, Structural Elements & Unit Counts, Size Records and Adjustments & Depreciation tabs are read-only.
-
Click the Add New icon to add a building from an established Building Type data template.
-
Click the Edit icon next to any item in the Building Characteristics grid to edit its details. The Edit Building wizard displays.
-
Click the Expand icon to expand a building in the Building Characteristics grid. Four subtabs display with read-only information related to the building.
-
Click the Add New icon to add a new building section. The New Section wizard displays.
-
Click - to delete a record
-
Define the New Section.
-
Select theImprovement Style.
-
Enter the Year Built.
-
Select the Construction Class.
-
Select the Quality.
-
Select the Condition.
-
Enter the % Complete.
-
Add or edit any related Structural Elements.
-
Add or edit the elements' Unit Counts.
-
Click OK to save the new section and exit the wizard.
-
Click Cancel to exit the wizard without saving.
-
-
Click Save.
OR
Click the Add New icon to add a new building in the New Building editor pop-up.
OR
Click the Edit icon Edit Sketch to open the sketch editor for the selected building.
OR
Click the Edit icon next to any section listed in the Building Sections grid. The Edit Section wizard displays.
Features
-
Click the Add New icon to add a new feature. The New Feature wizard displays.
-
Define the new feature.
-
Select a Feature.
-
Enter the Year Built.
-
Enter the Relationship Type.
-
Enter the % Complete.
-
Select the Grade of the feature.
-
Select the Effective Year.
-
Select the Object Type by which the feature is Attached/Related.
-
Select the Condition of the feature.
-
Enter the Remodeled Year.
-
Select another feature of which the new feature is Related.
-
-
Access the Size & Unit Counts, Elements & Adjustments, Feature Characteristics, and Notes tabs to continue defining the feature.
-
Click Save.
OR
Click the Edit icon next to any existing feature listed in the Features Characteristics grid. The Edit Feature wizard displays.
OR
Click on any feature in the Feature Characteristics grid to display its details below.
Notes
View and add notes related to the Common Area.
The Notes tab uses standard Aumentum Notes functionality.
Unit Type Summary
The Unit Type Summary tab displays a list of unit types that have been defined for the project.
-
Click the Expand icon to expand any Project Unit Type listed in the grid to display its details.
-
View and/or add any notes related to the unit type. Unit Type Notes uses standard Aumentum Notes functionality.
-
Click Save.
Unit Type Detail
The Unit Type Detail tab displays the characteristic details that have been defined for a particular unit type. This information is divided within five subtabs of read-only information:
Site Data - View and edit the selected unit's site information and notes.
Land - Displays the land record summary for the Unit Type and when selected, shows the corresponding characteristic data for the land record.
Buildings - Displays the corresponding characteristic data for each building and each section of Structural Elements, Unit Counts, Floor Details and Adjustments.
Features - Displays the feature record summary for the Unit Type and when selected, shows the corresponding characteristic breakdown of the feature record.
Notes - uses standard Aumentum Notes functionality.
Use the Unit Type drop-down list located in the header panel of the page to navigate between Unit Type to Unit Type. The information displayed in each of the subtabs within Unit Type Detail are relevant to the Unit Type selected from the drop-down list.
Assignment
There are two main sections of information in the Assignments tab - the Account Assignment grid on the left, and the Unit Type Assignment list on the right.
-
The Account Assignment grid displays as empty upon initially accessing the Assignment tab.
-
The Unit Type Assignment list displays each Unit Type that has been defined on the project, along with a running count of how many of each Unit Type has been assigned. This information is updated as the Account Assignment grid is edited.
Unit Types are assigned to PINs; they are not assigned to appraisal sites because they represent an individual appraisal site of their own, not just a structure. Assigning Unit Types to PINs can be accomplished two ways (see below):
-
Using the edit feature in the Account Assignment grid.
-
Using the mass update tool (Assign by Unit Type)
-
Click the Search icon in the grid to search for an account to assign to the condominium project on the Records Search screen.
- Select the desired PIN(s) from the Search Results grid. You are navigated back to the Maintain Condominium screen. The selected PINs are displayed in the Account Assignment grid. NOTE: Unassigned PINs appear in red text in the Account Assignment grid until they have been assigned.
-
Select a Change Reason.
-
Click Assign by Unit Type to assign a Unit Type to PINs/Accounts in the list, in mass.
-
Enter a user-defined User ID.
-
Select a Unit Type or Common Area to Assign from the drop-down list.
-
Select a Change Reason.
-
-
Click OK.
-
- Click Save.
OR
Click the Pencil icon to edit an existing assignment in the list. The line is active for editing the Unit ID and Unit Typeor Common Area.
NOTE: The Unit Type assignments list (below the Assign by Unit Type button)displays a running count of how many of each Unit Type has been assigned to PINs. The list updates after each Edit instance/Assign by Unit Type process.
Individual Unit Detail
The majority of the information displayed in the Individual Unit Detail tab is populated by the information defined in the configuration process, however, the Individual Unit Detail tab allows you to define specific information (e.g., view, condo phase, floor level, features, etc.) for each individual type.
Individual Unit Detail is comprised of six subtabs:
-
Site Data - View and edit basic information about the unit.
-
Land - Land associated with the condominium unit.
-
Condo Data - Building-level attributes defined by the condominium project (e.g., view, building phase, etc.).
-
Buildings - Building and section-level data for the condominium unit.
-
Features - Features associated with the condominium unit.
-
Notes - Building-level notes.
Site Data
-
Click the Pencil icon to edit the unit's basic Site Data. The top panel fields are active for editing.
-
Click Add New in any of the Site Information grids to edit the site's:
-
Appraisal Site Flag - Appraisal site flags use standard Aumentum Flags functionality.
-
Area Data - Add new area definitions to the unit (e.g., square footage, acres, etc.)
-
Adjustments & Obsolescence - Add relative adjustments or obsolescences, as necessary.
-
Characteristics - Includes user-defined fields, as configured.
-
-
Optionally delete any Site Information.
-
Click the Notes tab to view and add notes. Notes use standard Aumentum Notes functionality.
-
Click Save.
OR
Click the Pencil icon to edit any Flag, Area Data,Adjustment / Obsolescence displayed.
Land
- Click the Add from Template icon to add a new land line to the unit from an existing template with the Apply Site Template task. You are directed to the Advanced Search screen to Search by Template Header.
-
Characteristics and Size Records - Define the land line's basic information, and add Additional Characteristics and Size Records as desired.
-
Adjustments - Add or edit land line adjustments.
-
Notes - Optionally view and add/edit notes.
-
Click Add New to add a new use of land. The Edit Land Use wizard displays.
-
Click to select any land line in the Land grid to view its related Characteristics and Size Records and Adjustments in the subtabs below; this information is read-only.
-
Click Save.
OR
Click Add New to add a new land line to the unit. A pop-up appears allowing you to add land line information.
OR
Click the Pencil icon to edit any existing land line in the list.
Condo Data
Condo Data contains descriptive data for the unit that has been configured at the condominium project-level (during the Condominium Project Configuration process).
Selecting the edit in the Limited Common Elements grid activates the list of elements for editing.
Buildings
NOTE: The information in the Floor Detail, Structural Elements & Unit Counts, Size Records and Adjustments & Depreciation tabs are read-only.
-
Click Add New to add a building from an established Building Type data template.
OR
Click Add New to add a new building in the New Building editor pop-up.
-
Click the Pencil icon next to any item in the Building Characteristics grid to edit its details. The Edit Building wizard displays.
-
Click the chevron to expand a building in the Building Characteristics grid. Four subtabs display with read-only information related to the building.
-
Click Add New to add a new building section. The New Section wizard displays.
-
Click - to delete a record.
-
Define the New Section.
-
Select theImprovement Style.
-
Enter the Year Built.
-
Select the Construction Class.
-
Select the Quality.
-
Select the Condition.
-
Enter the % Complete.
-
Add or edit any related Structural Elements.
-
Add or edit the elements' Unit Counts.
-
Click OK to save the new section and exit the wizard.
-
Click Cancel to exit the wizard without saving.
-
-
Click Save.
OR
Click Edit Sketch to open the sketch editor for the selected building.
OR
Click the Pencil icon next to any section listed in the Building Sections grid. The Edit Section wizard displays.
Features
-
Click Add New to add a new feature. The New Feature wizard displays.
-
Define the new feature.
-
Select a Feature.
-
Enter the Year Built.
-
Enter the Relationship Type.
-
Enter the % Complete.
-
Select the Grade of the feature.
-
Select the Effective Year.
-
Select the Object Type by which the feature is Attached/Related.
-
Select the Condition of the feature.
-
Enter the Remodeled Year.
-
Select another feature of which the new feature is Related.
-
-
Access the Size & Unit Counts, Elements & Adjustments, Feature Characteristics, and Notes tabs to continue defining the feature.
-
Click Save.
OR
Click the Pencil icon next to any existing feature listed in the Features Characteristics grid. The Edit Feature wizard displays.
OR
Click on any feature in the Feature Characteristics grid to display its details below.
Notes
View and add notes specific to the condominium unit.
The Notes tab uses standard Aumentum Notes functionality.
-
Click New Search to return to the Advanced Search screen to search by Condominium Project.
-
Click Refresh to clear all selections and refresh the page.
-
Click Close to end the task.
Common Actions
Configure Condominium Projects