 Adjust Charges
Description
Make adjustments to the charges on the selected bill.
![]() Jurisdiction
Specific Information
Jurisdiction
Specific Information
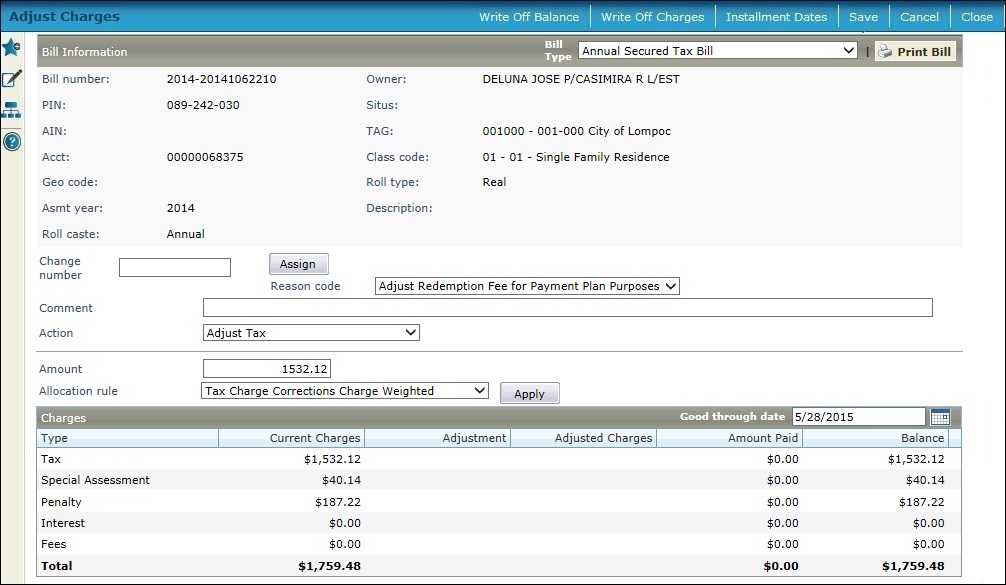
Steps
-
Select the Bill Type.
-
Click Show Full Description to show the full description.
-
Enter/select a Change number, Reason code, and Comment for the adjustment. This information will display in the Adjustment Information panel of the Transaction History - Revenue Object screen in Info Center.
NOTE: Click Assign next to the Change number field to generate the next available change number. -
Select the Action you want to take. You can adjust tax amounts and add or adjust penalties, fees, interest, or special assessment charges. NOTE: The Add Fee action has been changed to Add Fee - Allocation Rule Required.
Other fields on the screen will change based on your selection.
-
-
Select the Penalty, Fee, or Interest type or the Special assessment authority, if applicable to the adjustment.
-
When adding or removing a special assessment, select both the authority and fund of the charges.
-
-
Enter the Amount of the adjustment.
-
Select an Allocation rule, if applicable, to determine how the adjusted charges will be allocated among tax authority funds (TAFs) and/or installments and click Apply.
-
-
Charge weighted - For each TAF, multiply the total adjusted charges by the ratio of the TAF charge to the total of all charges on the bill. The ratio for each TAF is obtained by dividing the prior charge amount for the TAF by the total prior charge amount for all TAFs.
-
Rate weighted - For each TAF, multiply the total adjusted charges by the ratio of the TAF rate to the total rate. The ratio for each TAF is obtained by dividing the TAF rate by the total rate for all TAFs. This rule should usually only be used for charges with a fractional rate basis, such as ad valorem taxes.


-
|
Example of Rate Weighted Allocation to Funds A, B, and C |
|||||
|
Fund |
TAF Rate |
Percent
of |
New Charges |
Allocation Calculation |
New Charge |
|
A |
5% |
5/20 = 25% |
|
120 x 25% |
$30 |
|
B |
5% |
5/20 = 25% |
fund allocation to be determined |
120 x 25% |
$30 |
|
C |
10% |
10/20 = 50% |
|
120 x 50% |
$60 |
|
Totals |
20% |
100% |
$120 |
|
$120 |
-
-
Last installment - Applies the adjusted charges to the last installment only. This would only be used when you are adding charges.
-
The results of the adjustment in the Charges grid.
-
-
Click Write Off Balance to set the charges equal to the payment amount, so that the charges and payments match, leaving a balance due of $0.00.
-
Click Write Off Charges to set the balance due for the selected charges to zero, meaning if there are payments, those payments go into surplus because there are no charges left against which to allocate them.
-
Click Installment Dates to change the due date or other dates on the Change Installment Date screen.
-
-
Select the Good through date to display only items through the defined date.
-
Click Save to save the new charges and post them to Accounts Receivable.
NOTE: A Refund Address panel with refund address details displays automatically after saving whenever the transaction results in a negative balance (a surplus).
-
-
Click Cancel to clear your entries and return the charges to their previous amounts.
-
Click Close to end the task and return to the screen from which you accessed the corrections process.
-
 Tips
Tips
Click Print Bill in the Bill Information panel title bar to print the bill with the current information. Click Show Full Description to expand the property description information, and click Hide Full Description to collapse the Description panel again.
Change the Good through date in the Charges panel title bar to view the charges as of that date.
The tax bill Transaction type of a tax charge correction defaults to Correction, but when you click Write Off Charge, it is changed to Write Off Charges. Note: If Apply is clicked again before saving, the transaction type will change back to Correction. The transaction type can be viewed in the Transaction History screen of the Info Center.