Advertising List
Navigate:  Tax > Delinquent > Advertising > Advertising List
Description
The Print Advertising List task creates a delinquent list that is sent to newspapers and other publications and advertises parcels for delinquent status, tax sale, foreclosure, etc., as required by your jurisdiction.
The layout and selections of the Advertising List may be changed and printed as many times as necessary until Final List is selected, which indicates that the file was sent to the newspaper for advertisement.
Before running the report, you must have:
-
A delinquent group set up for a single tax year, using the appropriate year to select the prior delinquencies.
-
An advertising template modified for the correct year.
IMPORTANT: Check the effective date in the sidebar; it determines the current tax year printed on the advertising list.
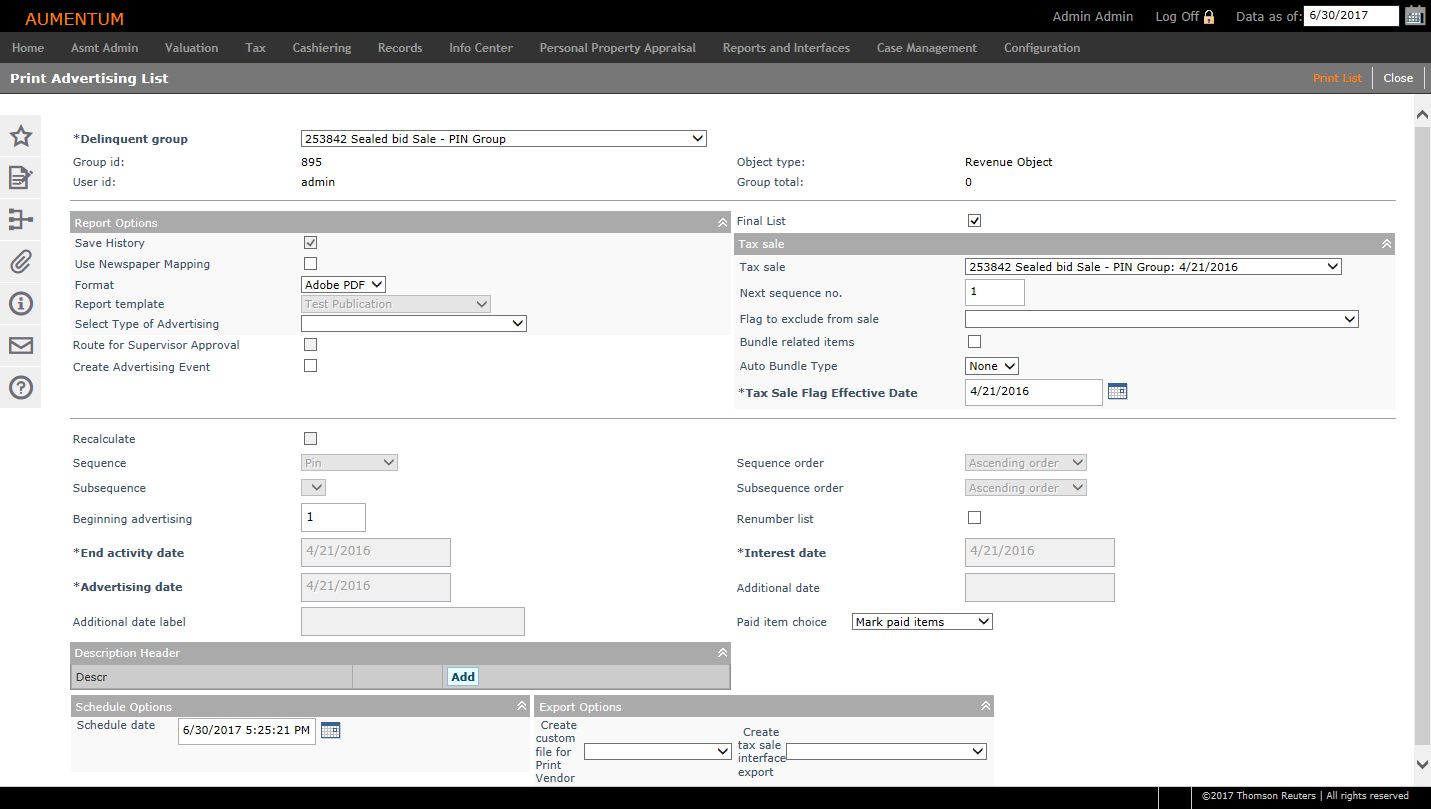
Steps
-
On the Print Advertising List screen, make a selection from the Delinquent group drop-down list.
-
If the Advertising List has already been printed for this group, the advertising options selected at the time of printing are displayed.
-
Groups built from an Enforcement Case list are excluded from the Delinquent group drop-down list for unsecured items.
-
In the Report Options panel:
-
Select the Save History checkbox to save the Advertising List History to the Advertising List Newspaper table (AdvrtListNewspaper).
-
Select the Use Newspaper Mapping checkbox to generate separate reports for each associated newspaper. The PDF identifies the newspaper name. If not selected, the result is only one file.
-
Make a selection from the Format drop-down list. Adobe PDF is the default.
-
Make a selection from the Report Template drop-down list.
-
Make a selection from the Select Type of Advertising drop-down list.
NOTE: To modify or add Advertising Types (which is a systype category), see Systypes.
-
-
Select the Route for Supervisor Approval checkbox, if necessary.
NOTE: When the Tax Sale Approval required for final advertising list application setting is set to True, the Route for Supervisor Approval checkbox is selected by default (and is disabled from editing) for the final advertising list.
-
Select the Create Advertising Event checkbox to create a system event and, in turn, a workflow.
NOTE: Advertising Types is a user-defined field that can be added to the Report Options panel.
- Final List checkbox – This field is dependent on the Print final tax sale list ad type application setting.
- When set to False, the field is not displayed. When set to True, the field is displayed.
-
In the Tax sale panel:
-
Make a selection from the Tax sale drop-down list to which the PINs will be added.
NOTE: You must select a tax sale if you select the Final List checkbox and you have set the Tax Delinquents Tax Sale Supported application setting to True.
-
Verify the next sequence number. The default displays as the next number available for the tax sale year.
-
Make a selection from the Flag to exclude from sale drop-down list, if applicable. Bills with this flag do not participate in the Tax Sale. The bills are listed on the Tax Sale in Tax Sale Maintenance, but with the Is Participating flag set to False.
-
Select the Bundle related items checkbox if you want to automatically bundle related tax sale items.
NOTE: You must have the Tax Sale Automated Bundling supported by application setting set to either PIN or Owner. If None is selected, this checkbox cannot be selected. You must also have the Tax Sale Tax sale items support multiple tax bills by PIN application setting set to False.
Click here for Tax
Sale Bundling Options.
Use the options that best fit your jurisdiction.
Auto Bundle Option
Manual Bundling Option
Advertising List
Description
None
None
Bundle option not selectable.
No Bundling functionality supported for jurisdiction
None
Min bid amounts not summed on Cert
Bundle option not selectable.
No Automated bundling will occur, but you are able to bundle in Tax Sale Maintenance. Bundled items are not included in the same certificate. If there is enough overbid, then the overbid amount is used to pay off the delinquent taxes on the bundled items and remove them from the sale.
None
Min bid amounts summed on Cert
Bundle option not selectable.
No Automated bundling will occur, but you are able to bundle in Tax Sale Maintenance. The certificates are a combination of all certificates included in the bundle.
Owner
Min bid amounts not summed on Cert
Bundle related items gives options for Owner and None.
Advertising List Automated Bundling occurs using the Owner Legal Party as the basis for the bundles. The bundling is for tax sale purposes; these items are not sold together. If the overbid is enough, delinquent taxes are paid on items in the bundle and those items are set as not participating.
This option combination is typically used in South Carolina.
Owner
Min bid amounts summed on Cert
Bundle related items gives options for Owner and None.
Automated bundling in the Advertising List program uses Owner Legal Party as the basis. The bundled bills are combined into one Certificate. The Min bid amount is a sum of all Min bid amounts.
PIN
Min bid amounts not summed on Cert
Bundle related items gives options for PIN and None.
Automated bundling occurs using the PIN as the basis for the Bundle. The items are not be sold together. The Delinquent taxes are paid if the Bid is high enough and set to not participating.
PIN
Min bid amounts summed on Cert
Bundle related items gives options for PIN and None.
Automated bundling occurs using the PIN for the Bundle basis. All bundled PINs are combined into one Certificate to be sold together.
This bundling combination is typically used in Iowa.
-
If you selected to bundle related items, make a selection from the Auto Bundle Type drop-down list.
- Tax Sale Flag Effective Date – The Final List checkbox must be selected in order for this field to be active. The date is defaulted to the Advertising Date.
- Additional fields in the bottom half of the Report Options panel might be disabled, depending on your jurisdiction and implementation.
-
Select the Recalculate checkbox to update the recalculations for the advertising list.
-
Select the sequence information to include in the report. These options provide the list in sequence of year, bill number or other data, and in either ascending or descending sequence. The default is ascending for all sequences.
-
Sequence
-
Sequence Order
-
Subsequence
-
Subsequence Order
-
Enter the Beginning Advertising number, which is used to sequence the items in the advertising list.
-
Select the Renumber List checkbox if additional items have been added to the list and the numbers need to be reorganized.
-
Enter or select the End Activity Date (payments, adjustments, etc.) to include in the list.
-
Enter or select the Interest Date that is used to calculate the amount of interest due on the properties included in the listing.
-
Enter or select the Advertising Date on which to publish the list. This is usually the same date when the advertising fee is assessed on the revenue objects.
-
Enter or select the Additional Date as a date of your choice. If used, also enter the Additional Date Label so that you can identify the date on the report.
-
Make a selection from the Paid item choice drop-down list, or how you want to list delinquent amounts that have since been paid, when reprinting a list. Options are:
-
Mark paid items – Run a new listing that includes all items from the first printing, but label paid items with an asterisk (*).
-
Exclude paid items – Run a new listing that leaves off the paid items.
-
Original listing – Reprint the original listing.
-
In the Description Header panel, click Add if you want to include legal description detail; for example, metes and bounds for redemption notices.

The drop-down list consists of systypes. The report template must be one that offers additional description header lines.
-
Make a selection from the drop-down list and click Apply.
-
Repeat to add additional descriptions.
-
In the Schedule Options panel, enter or select the schedule date if you are using the batch processing scheduling. A batch process is run automatically at the scheduled time.
-
In the Export Options panel:
-
Select the Create custom file for Print Vendor checkbox and select the file.
-
Select the Create tax sale interface export checkbox and select the export.
-
Click Print List in the Command item bar when all of the information is complete. The Monitor Batch Processes screen opens to show the status of the process.
-
The Tax Delinquents Tax Sale Supported application setting must be set to True to send the final list to Tax Sale. The Tax Sale options that display depend on settings in your jurisdiction and if you preform tax lien/certificates sales and/or property sales.
-
Only secured tax sales are listed for selection when printing the final list. When you select the Final List checkbox, tax sales created for unsecured sales are excluded from the drop-down list. These are identified by a sale collection type of unsecured.
-
After you have printed and verified your Advertising List, select the Final list checkbox to send it for advertising and to update tax sale information.
IMPORTANT: Do not select this checkbox if this is the first time you are printing this advertising list.
IMPORTANT: If this is the first time to print this advertising list, do not select this checkbox.

NOTES:
California only: The final advertising list is available for viewing on the Property Sale Maintenance screen (click the Attachments icon in the sidebar) once it has been approved by the assigned user (via his or her workflow queue).
NOTE: The Tax Sale Flag Effective Date field in the Tax Sale panel is available to edit only when the Final List checkbox is selected. The date is defaulted to the Advertising Date. Also, when applied to the tax bills, the flag roles have the same date for the beginning effective date and start date as the Tax Sale Flag Effective Date.
NOTE: You may prepare this list as often as needed without selecting the Final List checkbox to update system information.
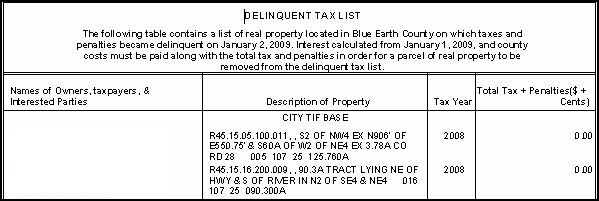
Report Samples
Blue Earth County Advertising List
Common Actions
View All Group Items – Opens the View Group Detail screen; view the details of delinquent charges.
View Paid Group Items – Opens the View Paid Group Items screen; view delinquent charges that have already been paid for the revenue objects that are members of the delinquent group in view.
View Batch Processes – Opens the Monitor Batch Processes screen; search for existing batch processes to check the progress and status, and access the resulting files and/or reports.
Tips
(California) The advertising list export process is modified to include the Original PIN, when configured in the Input/Output File Configuration task. The Original PIN is the PIN for the revenue object as of the earliest roll selected for the export. If only a single year is being exported, it is the PIN for the tax year; if the property sale and PINs are combined into a single entry, the Original PIN included is the PIN from the earliest defaulted tax year being exported.
If you need to advertise a group more than once (i.e. creating the final list), you should create a new group. Move the current group items into the new group.
The advertising list is jurisdiction-specific; however, you can use any template that serves your needs.
A new description header can be added, if needed, as a systype of Description Header Type. For example, you may need more than one for metes and bounds.
The report templates are added and updated from the Maintain Template screen.
If you have the Tax Sale module supported and use Bundling, printing the advertising list finds all matching primary owners and links the properties in a bundle. Every item in the owner bundle is given the same bundle ID number.
Tax Sales are created via Tax > Tax Sale > Tax Sale Maintenance and must be created prior to running the Final Advertising List.
During Final Advertising, the Tax Sale Participation Flag is applied to the delinquent bills. Set up the Tax Sale Participation Flag via Tax > Tax Sale > Tax Sale Settings.
Prerequisites, Dependencies, and Setup
Jurisdiction Specific Information
California
-
The advertising list can be set up to use PIN ranges before applying TAG Mapping to the process. This can be set up on the Edit Newspaper screen (Tax > Delinquent > Newspaper/Publication > Setup/TAG Mapping > [select a newspaper to edit]).
-
The Advertising List Export process now exports the original PIN as well as the current PIN when selected as part of the File I/O configuration. To set this up:
-
Click Configuration > File Input/Output > Input/Output File Configuration.
- On the Manage Input/Output File Configuration screen, select Advertising List Export from the Process table drop-down list and click Search.
- Click Edit for Tax Sale Advertising List Export.
-
Click Add in the Payment Detail header panel. A new line populates at the bottom of the panel.
-
Select the Original PIN from the Process Field drop-down list.
-
Click Apply, then click Save in the Command Item bar.
-
The standard advertising export file now contains the overridden publication from any delinquent group that contains overrides. This file is only produced when creating a Final list. Overrides can be added to a group using the Publication and Advertising Fee Maintenance task.
-
When the Approval required for final advertising list application setting is set to True, the final advertising list defaults the Route for Supervisor Approval checkbox as disabled. For non-final lists, or for all lists which the ‘Approval Required’ setting is set to false, the check box is enabled and available you to select.
-
When the advertising list is not final, you may request advertising events be created by checking the box to create the events. For the final list, the events are controlled by the Approval Required for Final Advertising List application setting combined with the checkbox for creating events.
Riverside, California
-
The Advertising List's print order matches that of the sequence order assigned to each PIN when generating the Final list.
-
Publication List Data for Outbound Interface with 3rd Party Vendor: The tax sale advertising list can be exported. To set this up:
-
Click Configuration > File Input/Output > Input/Output File Configuration.
- On the Manage Input/Output File Configuration screen, select Advertising List Export from the Process table drop-down list and click Search.
-
Click Edit for Tax Sale Advertising List Export and configure the fields as applicable. Save your changes.
-
Return to the Manage Input/Output File Configuration screen, select Tax Sale Export from the Process table drop-down list and click Search.
-
Click Edit for Tax Sale Export and configure the fields as applicable. Save your changes.
-
Click Tax > Delinquent > Advertising > Advertising List.
-
On the Print Advertising List screen, make a selection from the Delinquent Group drop-down list.
- In the Export Options panel at the bottom of the screen, select the Tax Sale Advertising List Export in the Create Tax Sale Interface Export drop-down list.
- Click Print List in the Command Item bar and confirm that the advertising list export file is printed.
-
Click Tax > Tax Sale > Property Sale > Publication List.
- On the Print Publication List screen, make a selection from the Sale Description drop-down list.
-
In the Export Options panel at the bottom of the screen, select the Tax Sale Advertising List Export in the Create Tax Sale Interface Export drop-down list.
- Click Print List in the Command Item bar.
-
Click Tax > Tax Sale > Property Sale > Tax Sale Export.
-
Enter your search criteria to search for the sale. Click to select an item in the Tax Sales panel.
- On the Export Tax Sale Information screen, select Tax Sale Export from the Export Format drop-down list.
- Click Export to submit the export to batch processes.