Income Model Maintenance
Navigate:  Valuation > Valuation Management > Income Model Maintenance
Description
Use the Income Model Maintenance task to create and maintain income cost models and define which options can be used in the model.
Steps
On the Income Model Summary screen, click Add New in the Income Model Summary Grid title bar, or click the Pencil icon for an item in the grid.
The Income Model Maintenance screen contains three tabs.
-
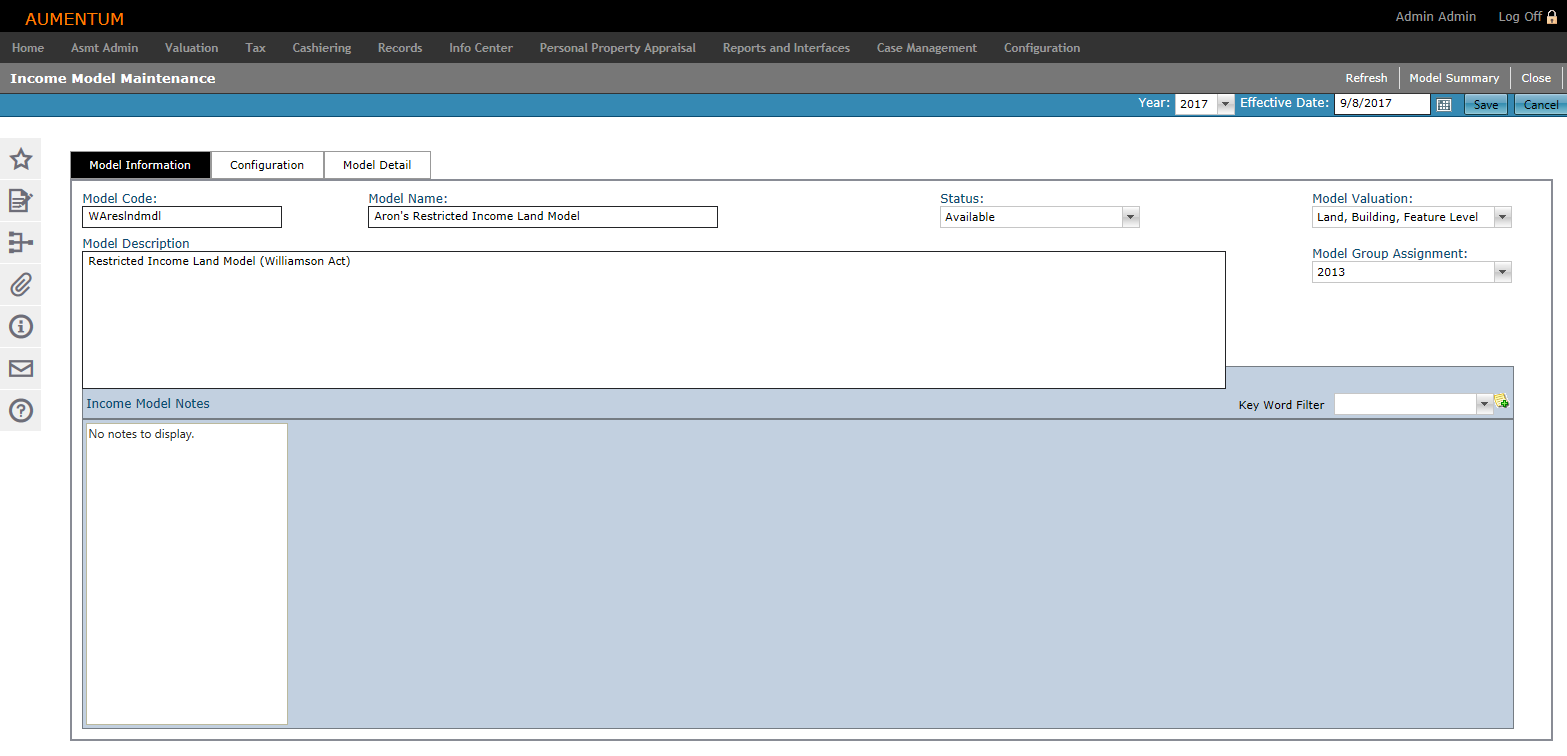
Add or edit the model's basic information.
-
Model Code – Enter a code representing the model.
-
Model Name – Enter the name of the model.
-
Status – This information is defined by jurisdiction.
-
Model Description – Enter a description of the model.
-
Make a selection from the Model Valuation and Model Group Assignment drop-down lists.
-
-
Optionally, click the Add Note icon. Model notes use standard, Aumentum Notes functionality.
-
Click OK to add the note.
-
Click Cancel to cancel adding the note.
-
-
Click Save at the top of the screen.
-
Locate the improvement type and style you want mapped to a specific income type or subtype. Use the page navigation at the bottom of the grid to browse through all configured improvement types and styles.
-
Select an Income Type - SubType from the drop-down list. Continue mapping Building Improvement Types and Styles with Income Types and Subtypes, as desired.
-
Click Save.
-
Locate the Feature Type you would like mapped to a specific Income Type/SubType. Use the page navigation bar at the bottom of the grid to browse through all configured Feature Types.
-
Select an Income Type - SubType from the drop-down list. Continue mapping Feature Types with Income Types and Subtypes, as desired.
-
Click Save.
-
Locate the Land Type you would like mapped to a specific Income Type - SubType. Use the page navigation bar at the bottom of the grid to browse through all configured Land Types.
-
Select an Income Type - SubType from the drop-down list. Continue mapping Land Types with Income Types and Subtypes, as desired.
-
Click Save.
-
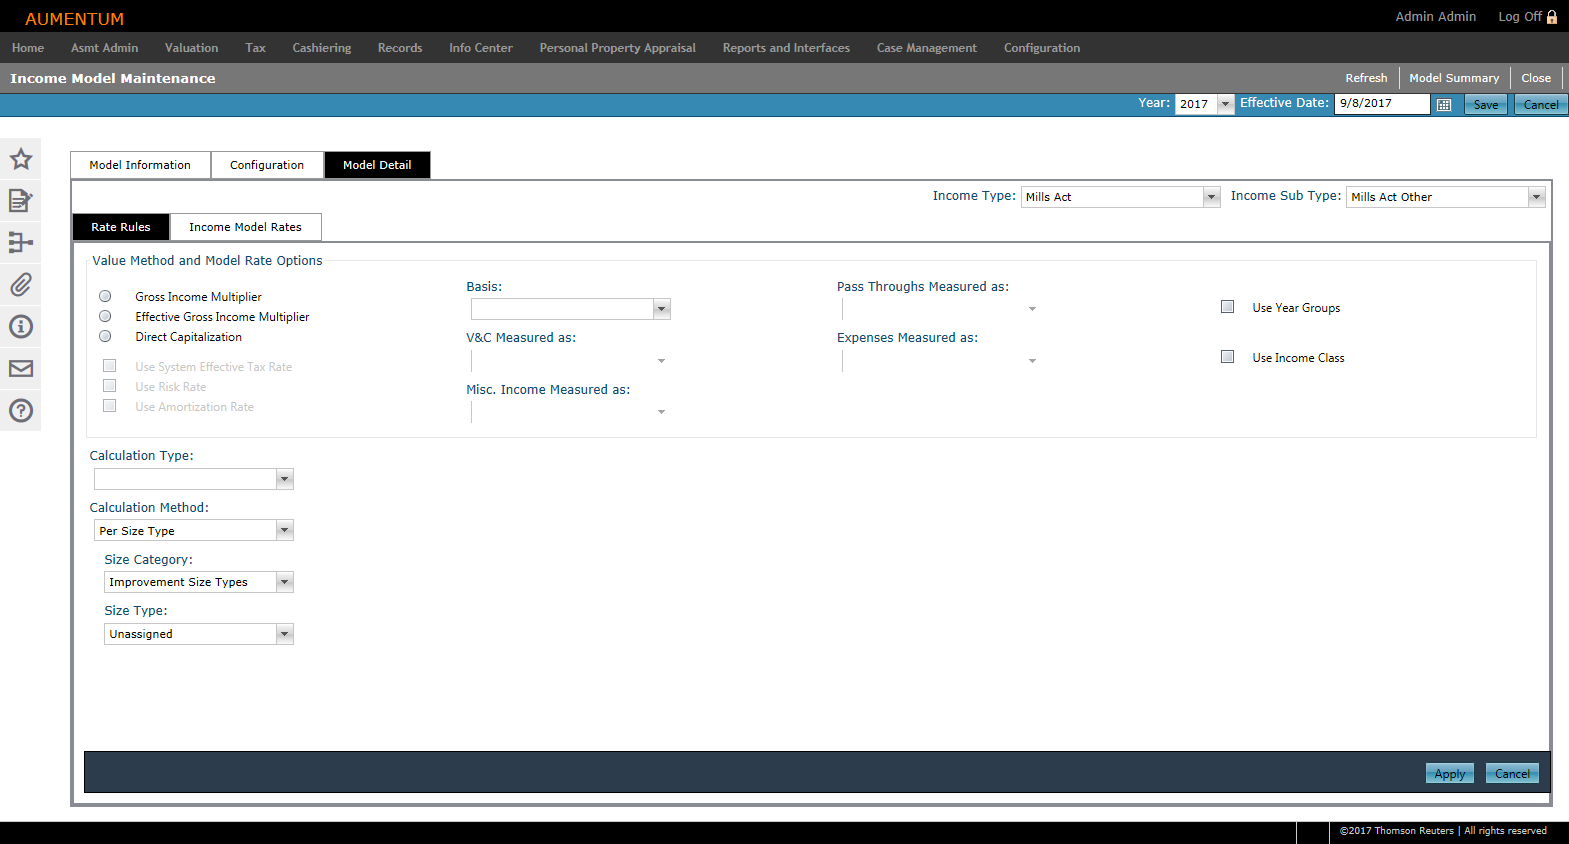
Make a selection from the Income Type and Income SubType drop-down lists.
-
Select the Value Method and Model Rate Options. The following settings and options are used to determine the valuation method to be used by the model and how certain rates, when used, are stratified and interpreted by the Aumentum application.
-
Gross Income Multiplier – The simplest value method that requires the least amount of data to generate a value in a model. When selected, the Calculation Type, Calculation Method, and its Basis are the only required fields.
-
Effective Gross Multiplier – This income method requires more data to generate a value than the Gross Income Multiplier. When selected, the Calculation Type, Calculation Method, and its Basis are the only required fields.
-
Direct Capitalization – When selected, all settings and options are valid and enabled. This income approach also includes an option to use a system-calculated effective tax rate.
-
Basis – Select the time period over which the revenue period is received. Available options are defined in the Income Configuration task.
-
V&C Measured as – Define how the Vacancy and Collection Loss rate is interpreted by Aumentum.
-
Misc. Income Measured as – Define how the Miscellaneous Income rate is interpreted by Aumentum.
-
Pass Throughs Measured as – Define how the Pass Through Income rate is interpreted by Aumentum.
-
Expenses Measured as – Define how the Operating Expense rate is interpreted by Aumentum.
-
Use Year Groups
-
Use Income Class – When selected, the Income class grid displays. Edit the order, as desired.
NOTE: No two records can be assigned the same order number.
-
Calculation Type – Select the type of value to be generated.
-
Calculation Method – Select the income calculation method to be used. Calculation Methods are populated depending on your Calculation Type selection.
-
-
Per Size Type – When selected, the Size Type drop-down list displays below. Select the Size Type to be used on the Model Rates sub-tab.
-
Per Size Type by Range – When selected, the Size Type drop-down list and Size Ranges grid populate below. Select the Size Type and specify the Size Ranges to be used on the Model Rates sub-tab, where rates are entered.
-
Per Unit Count – When selected, the Unit Category and Unit Code drop-down lists display below. Select the Unit Category and Unit Code to be used on the Model Rates sub-tab, where rates are entered. Available Unit Codes populate depending on your Unit Category selection.
-
Per Unit Count by Range – When selected, the Unit Category and Unit Code drop-down lists, as well as the Unit Count Ranges grid, display below. Select the Unit Category and Unit Code to be used on the Model Rates sub-tab. Available Unit Codes populate depending on your Unit Category selection. Next, specify the Unit Count Ranges in the grid below.
-
Per Unit Count by Unit Type – When selected, the Unit Category drop-down list and Unit Type grid displays below. Select the Unit Category; Unit Types populate in the grid below depending on your Unit Category selection.
-
Unit Category – Select the Unit Category.
-
Unit Type – Select the Unit Type. Available options populate depending on your Unit Category selection.
-
Click Apply.
-
Click Save.
-
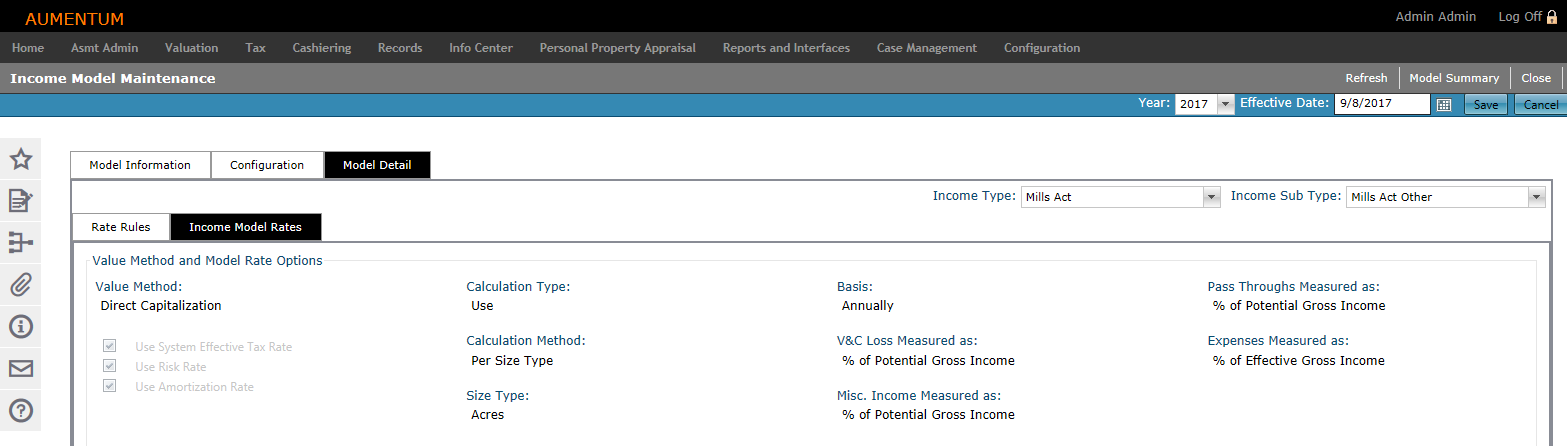
Select the Income Type and Income SubType. The Value Method and Model Rate Options panel displays as read-only for the selected Income Type and SubType.
-
Click the Expand icon to expand Income Class details.
-
Click Save.
-
Click Model Summary to return to the Income Model Summary screen.
-
Click Refresh to clear all selections and refresh the page.
-
Click Close to end the task.
-
Model Information
Contains high-level model definition information (e.g., model number, name, description, notes).
Configuration
Modify mapping relationships of individual object types to income types and subtypes without affecting the physical characteristic data.
The Configuration tab contains three sub-tabs.
Buildings
Map configured building improvement types with Income Type or SubTypes.
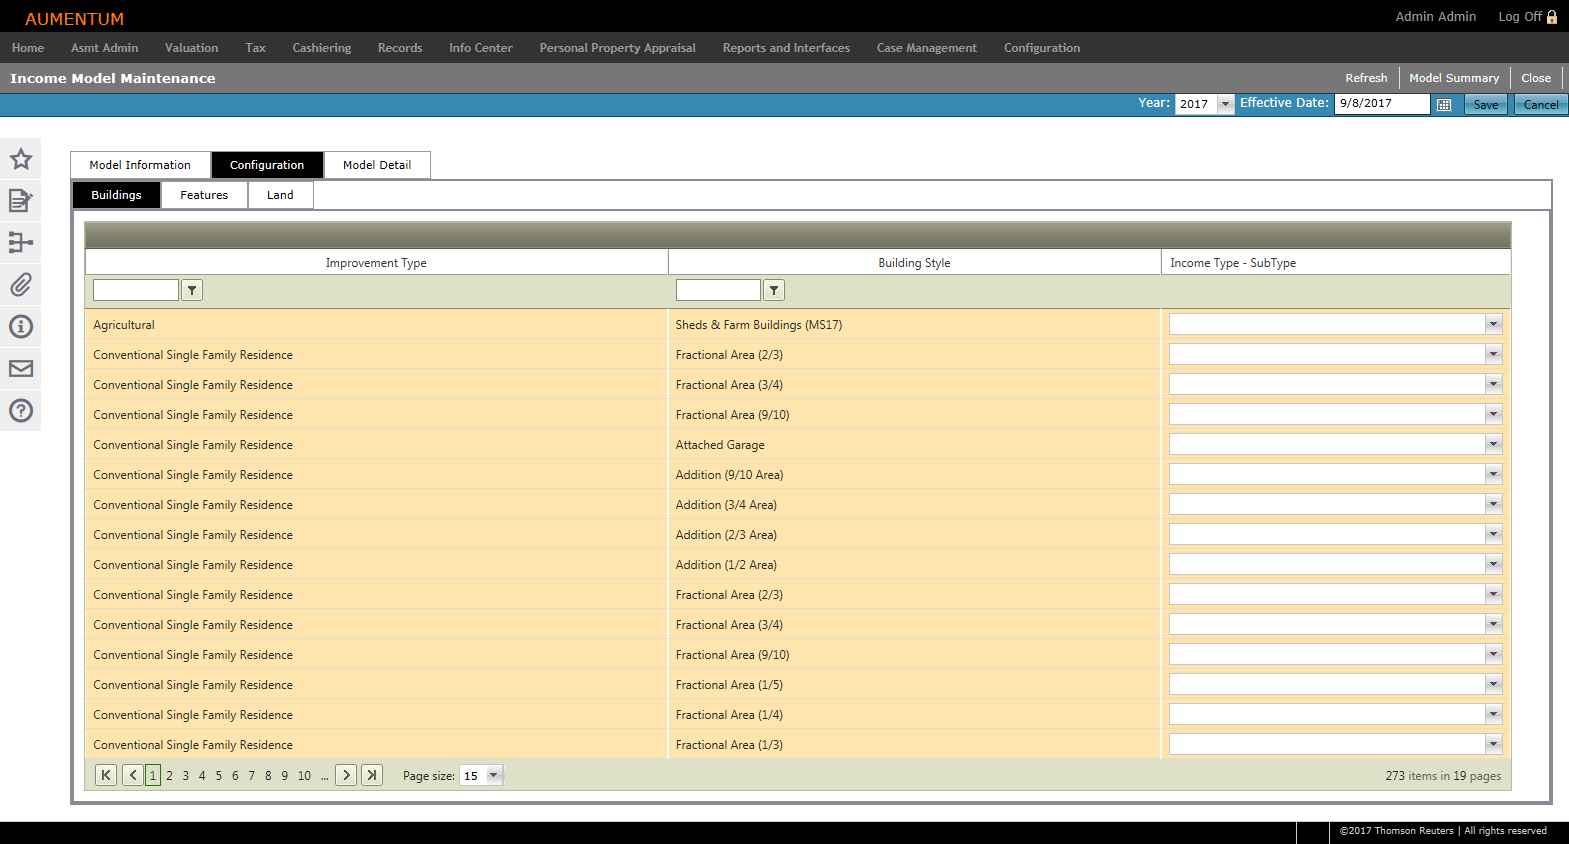
NOTE: A maximum of one distinct Income Type/SubType may be assigned to any single Building Type, but you are not required to assign an Income Type/SubType. Multiple Building Types may be assigned to the same Income Type/SubType.
Features
Map configured feature improvement types with Income Types/SubTypes.
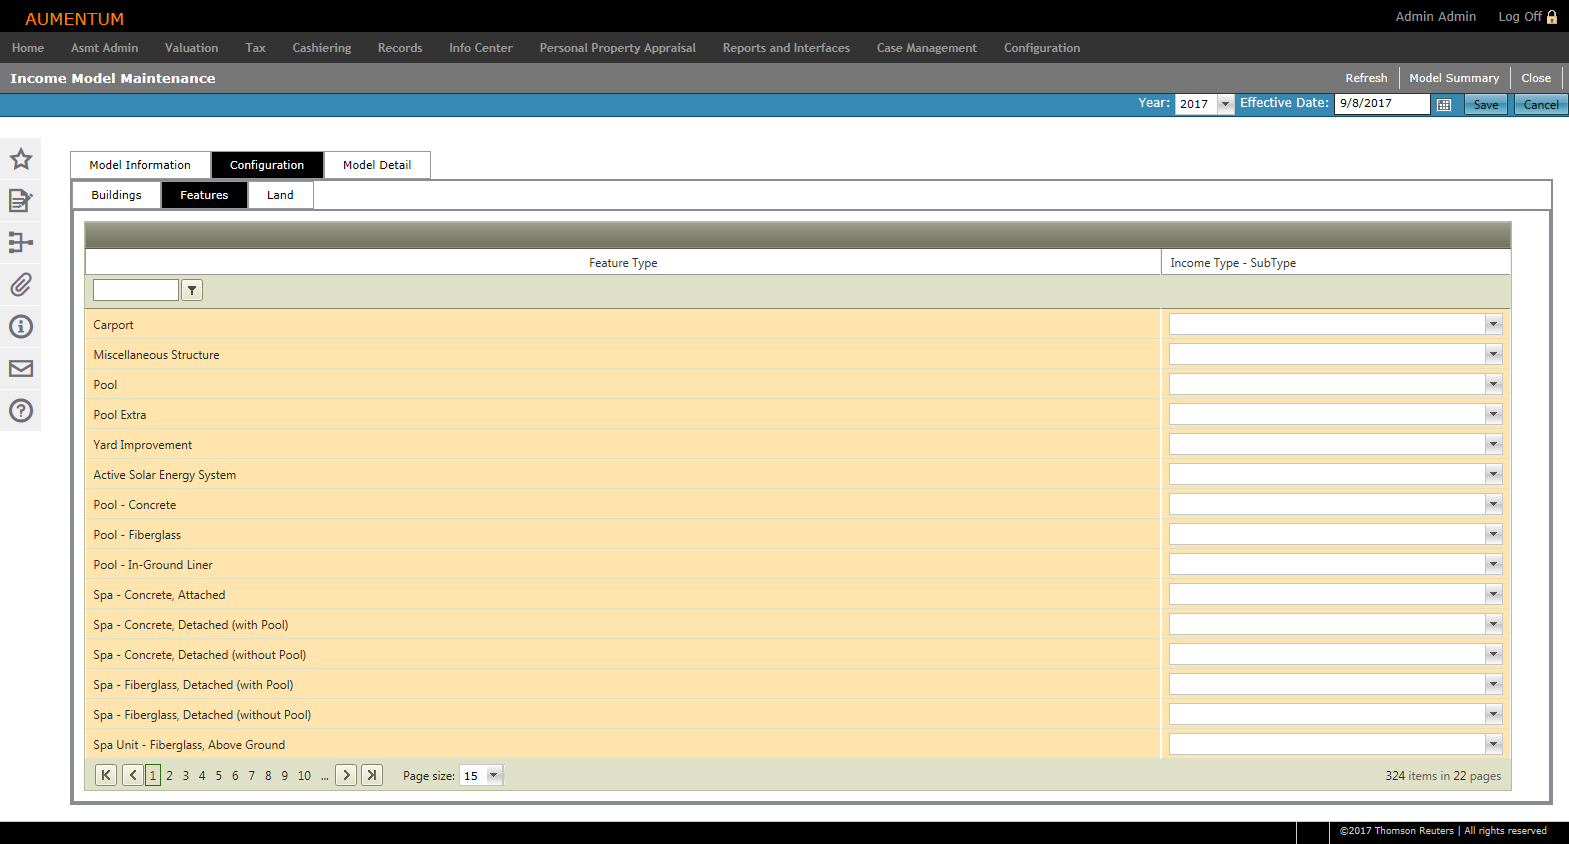
NOTE: A maximum of one distinct Income Type - SubType may be assigned to any single Feature Type, but, you are not required to assign an Income Type - SubType. Multiple Feature Types may be assigned to the same Income Type - SubType.
Land
Map configured land improvement types with Income Type/SubTypes.
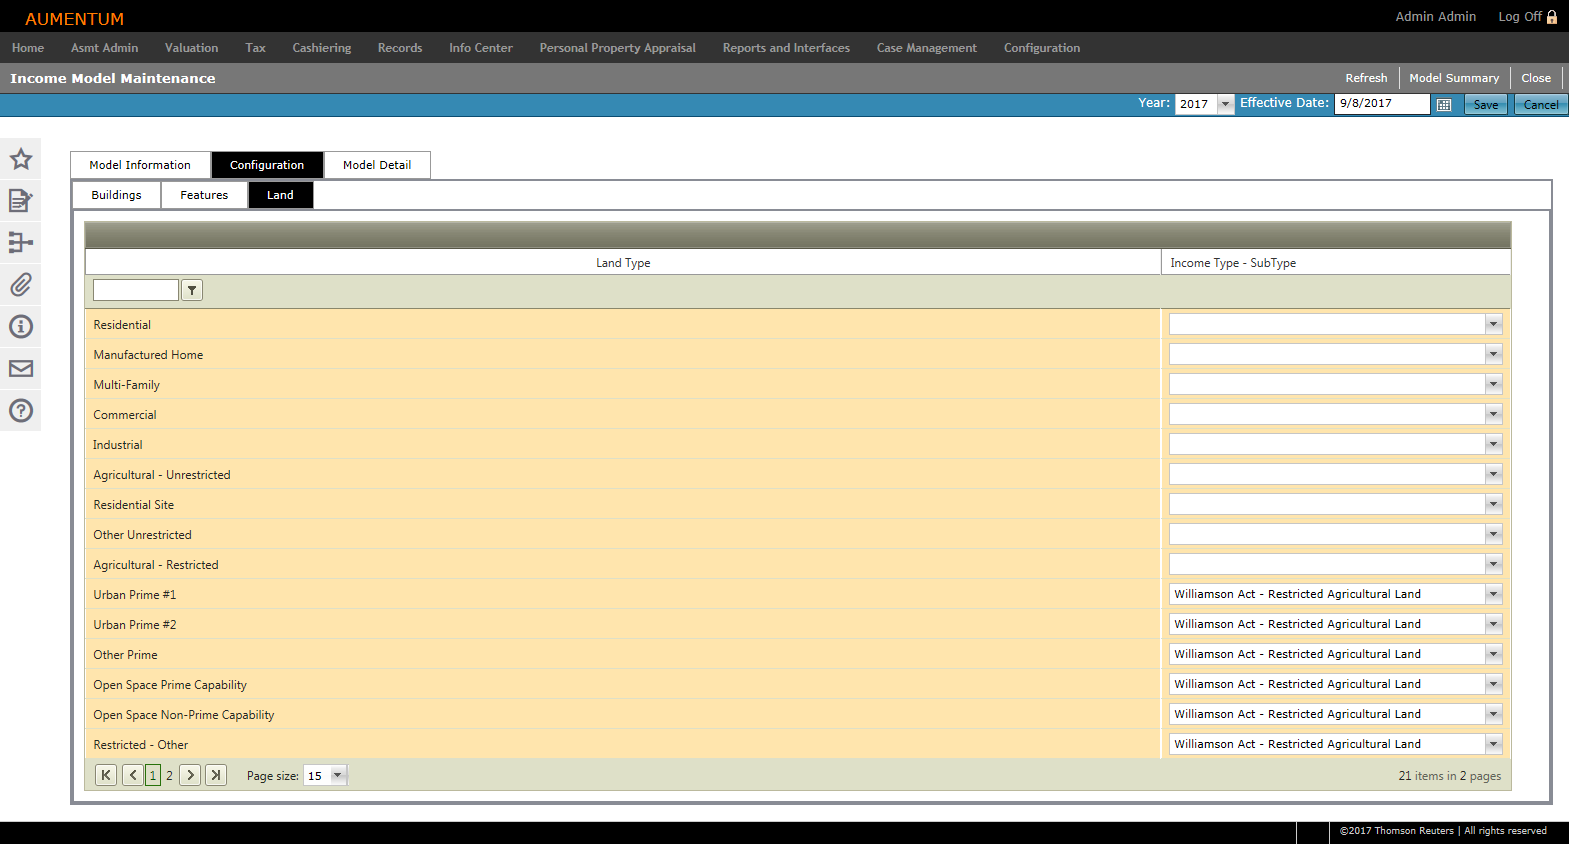
NOTE: A maximum of one distinct Income Type - SubType may be assigned to any single Land Type, but you are not required to assign an Income Type - SubType. Multiple Land Types may be assigned to the same Income Type - SubType.
Model Detail
Identify the rules and rates to be used with the income model, and define the Income Types/SubTypes by which the rules and rates are applied.
The Model Detail tab contains two sub-tabs that will display after an Income Type and Income Sub Type are selected from the drop-down lists.
Rate Rules
Configure what types of rates are to be used and how the income value is calculated for each Income Type - SubType.
NOTE: Drop-down lists and selectable checkboxes are available depending on your data selections. Some fields may not be available for selection.
NOTE: A list of available Size Types and Unit Counts for the following Calculation Methods vary based on what object type has been mapped within the model to the Income Type/SubType being configured.
Income Model Rates
Enter rates to be used for a specified Income Type/SubType (using rules set on the Rate Rules sub-tab).
OR
Click the Edit icon to edit the Income Class.