Stratified Cost Model Maintenance
Navigate:  Valuation
> Valuation Management >
Cost Model Maintenance >
Stratified Cost Model Summary
> [Add New] OR [Edit] > Stratified Cost Model Maintenance
Valuation
> Valuation Management >
Cost Model Maintenance >
Stratified Cost Model Summary
> [Add New] OR [Edit] > Stratified Cost Model Maintenance
Description
Use this task to create and maintain stratified cost models.
Each cost model is based on the concept of benchmark (model) homes with different quality breaks; the model is therefore stratified by size and quality.
Steps
-
Model Information tab – Contains high-level model definition information (e.g., model number, name, description, notes).
-
Rate Definitions tab – Add, update and/or delete any the statistical rates for the selected cost model.
-
Model Assumptions tab – View and maintain all assumptions concerning model home sizes and attributes that are used as the basis of a model.
-
Model Rates tab – Add new rates for base rates, structural elements, adjustments and depreciation.
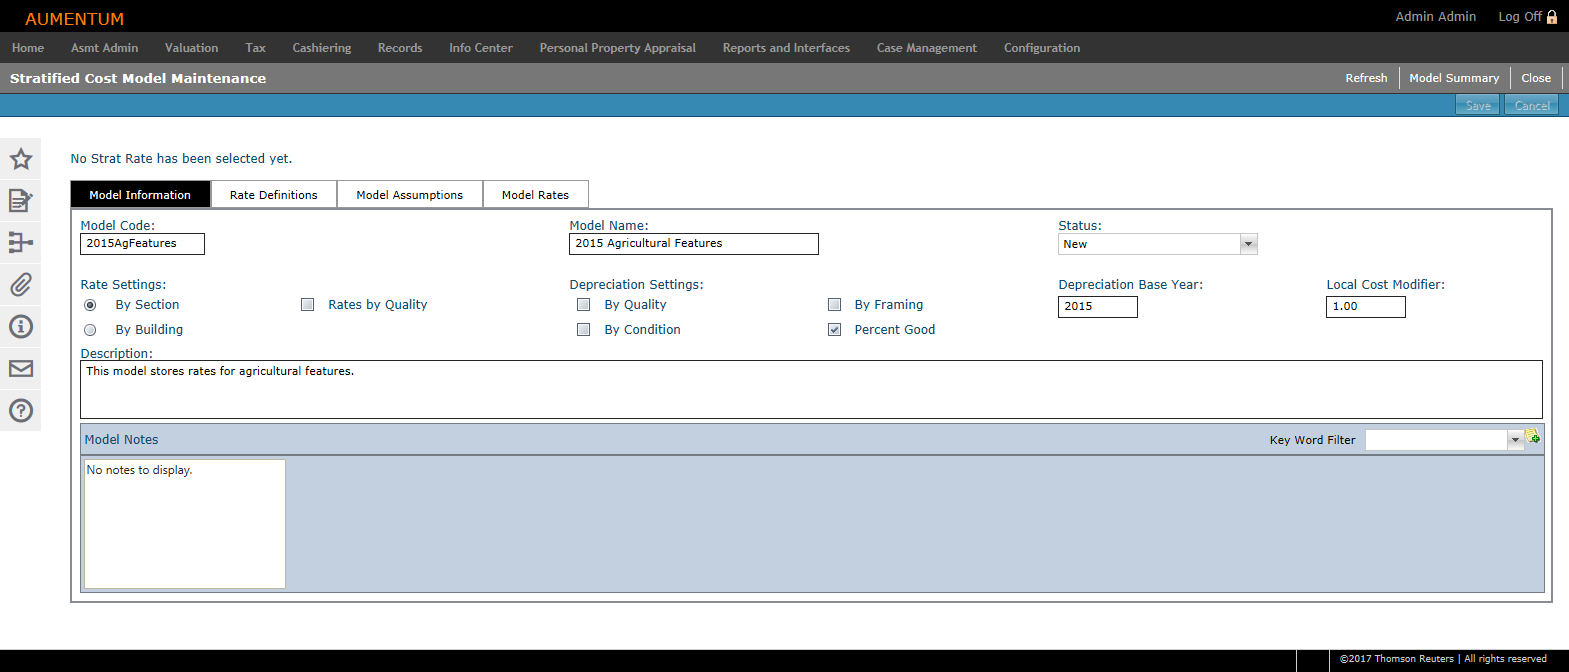
Model Information
Also see the Tips section at the end of this help topic for important information about feature depreciation.
-
On the Stratified Cost Model Summary screen, click the Pencil icon for an item in the grid.
-
On the Stratified Cost Model Maintenance screen, add or edit the model's basic information.
-
Model Code – Enter a code representing the model.
-
Model Name – Enter the name of the model.
-
Status – Select the status of the model. The Status of the model indicates whether or not the model is available for use throughout the system.
-
Rate Settings – Select whether the area of a Section or the area of a Building is used when determining the rate.
-
Rates by Quality checkbox
-
Depreciation Settings– Select how the depreciation is determined.
-
Depreciation Base Year
-
Local Cost Modifier
-
Description – Enter a description of the model.
-
Optionally, click the Add Note icon in the Model Notes panel, which uses standard, Aumentum Notes functionality.
- Click Save.
Rate Definitions
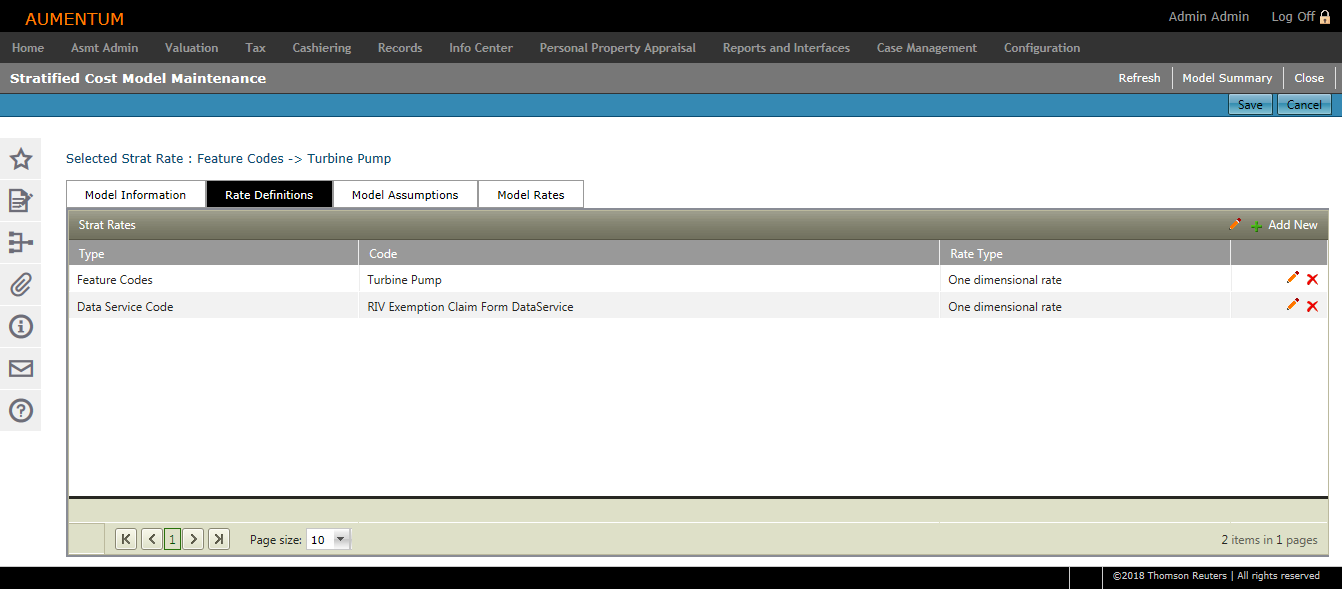
- In the Strat Rates panel, click Add New.
- Make a selection from the drop-down lists.
-
Click the green checkmark to add the new model.
-
Click the red X to cancel adding the model.
- Click Save.
OR
Click the Pencil icon to edit an item in the grid. All lines are active for editing.
Model Assumptions
NOTE: Models can be stratified by quality group. If they are, a Quality Group drop-down list displays at the top right-hand side of the screen. The screen refreshes to display the rates for each individually selected Quality Group, as it is selected from the drop-down list. If the model is not stratified by Quality Group, the drop-down list is not visible.
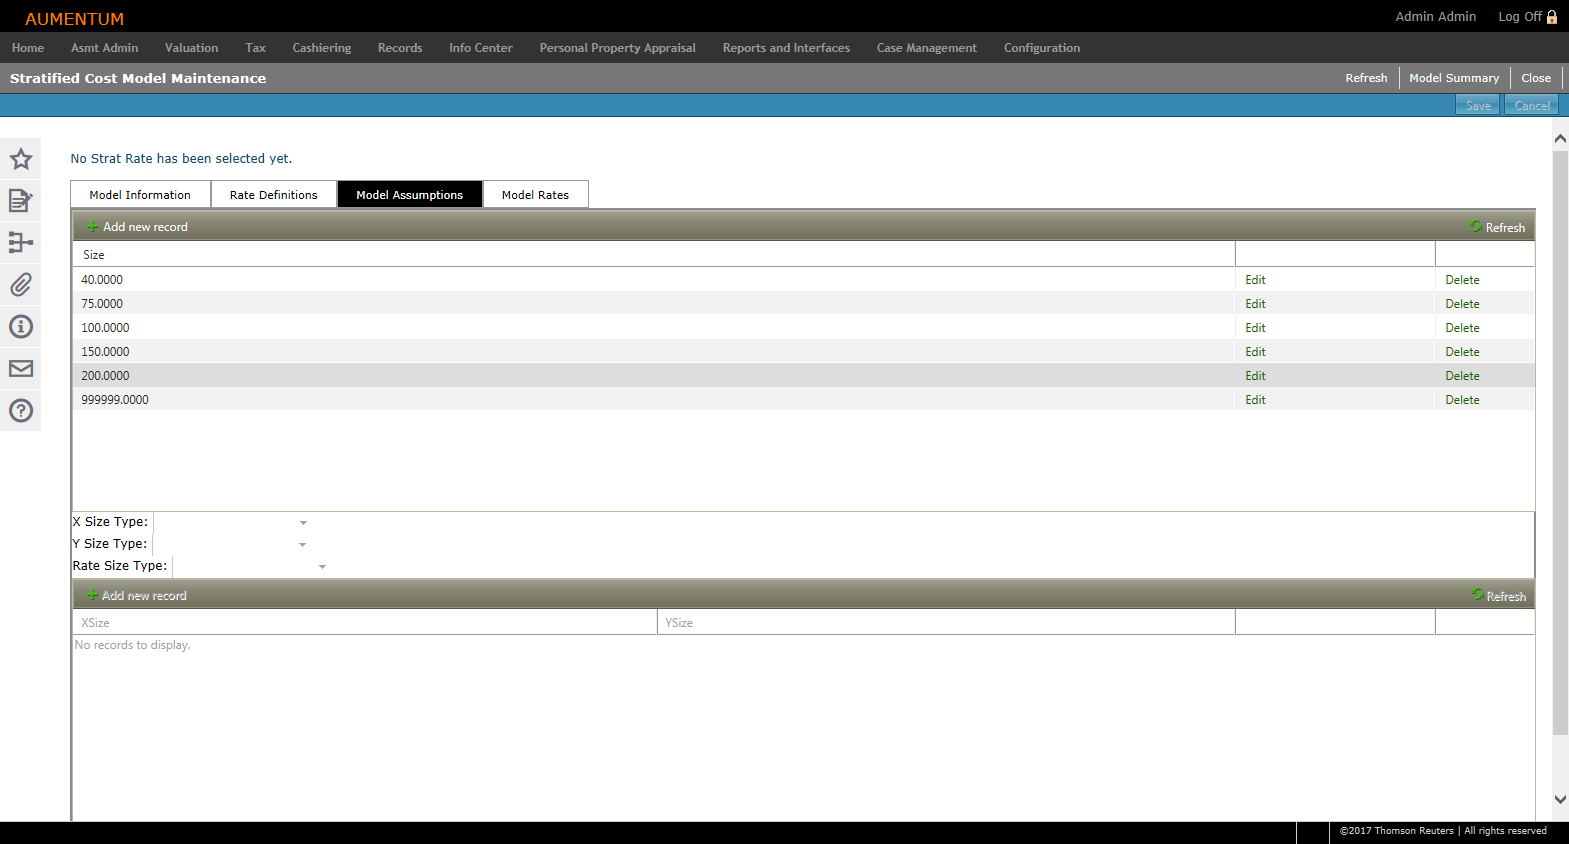
- Click Edit for an item in the grid.
- Enter the size and click Update.
- Or, click Cancel.
- Click Save.
Model Rates
The Model Rates tab contains all of the cost model values that are used by Aumentum's cost algorithm.
Model Rates includes six sub-tabs that contain all of the cost model values that are used by the system's cost algorithm:
Base Model
Create and maintain the rates for improvements and features that are priced on the rate per unit by size type method.
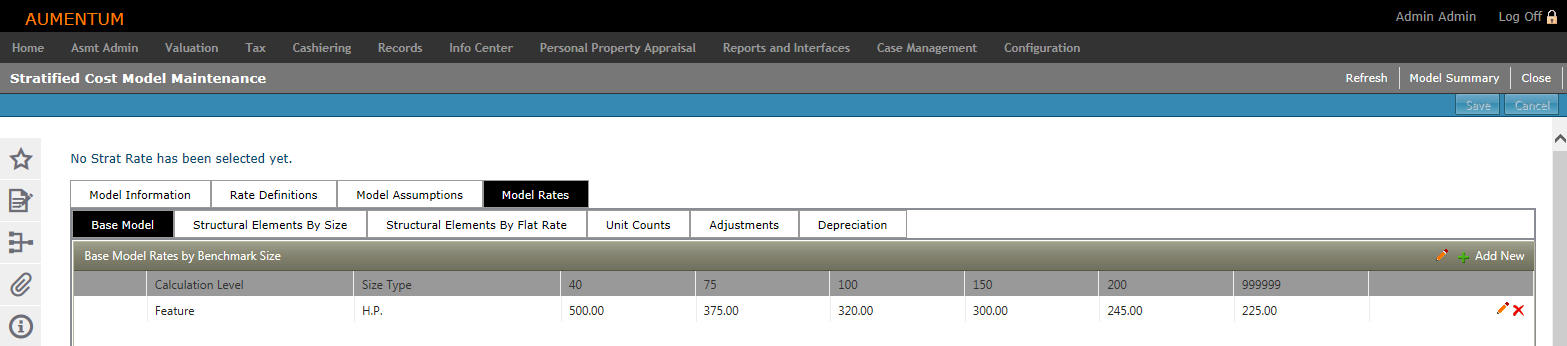
- In the Base Model Rates by Benchmark Size panel, click Add New. A new line is active for editing.
-
Define the model rate.
-
Calculation Level – Select the calculation level by which the adjustment is to be applied.
-
Size Type – The Size Type drop-down list is populated based on your Calculation Level selection.
-
Columns – Enter the rate value of each adjustment.
-
Click the green checkmark to add the new adjustment. Or, click the red X to cancel.
-
Click Save.
-
Click Refresh to clear all selections and refresh the page.
-
Click Model Summary to return to the Stratified Cost Model Summary screen.
-
Click Close to end the task.
-
OR
Click the Pencil icon in the header panel to edit all items in the list, or click the Pencil icon for one item in the grid.
Structural Elements
By Size
Create and maintain base model rates by benchmark size (dollar per square foot adjustments made to the base model rate).

- In the Structural Elements by Benchmark Size panel, click Add New. A new line is active for editing.
-
Optionally, click Export to Excel.
-
Define or edit the Structural Element.
-
Group – Optionally, select a Group by which the model is stratified; or select No Group from the drop-down list.
NOTE: If a rate is set by a group, the Code column displays a value of 0.
-
-
Category – Selections in this drop-down list are based on your Group selection.
-
Code – Selections in this drop-down list are based on your Category selection.
-
Size Type – Select the type of measurement used to measure the model's size.
-
Columns – Enter the rate value of each adjustment.
-
Click the green checkmark to add the new adjustment. Or, click the red X to cancel.
-
Click Save.
-
Click Refresh to clear all selections and refresh the page.
-
Click Model Summary to return to the Stratified Cost Model Summary screen.
-
Click Close to end the task.
-
OR
Click the Pencil icon in the header panel to edit all items in the list, or click the Pencil icon for one item in the grid.
Structural Elements
By Flat Rate Create and maintain model rates for adjustment factors applied to structural elements when the adjustment is the same regardless of the size of the structure.
NOTE: For this type of adjustment, the base rate typically has an adjustment rate of zero. If the model is stratified by quality group, the rates are stratified as such; if the model is not stratified by quality group, one set of values pertain to all qualities being valued.
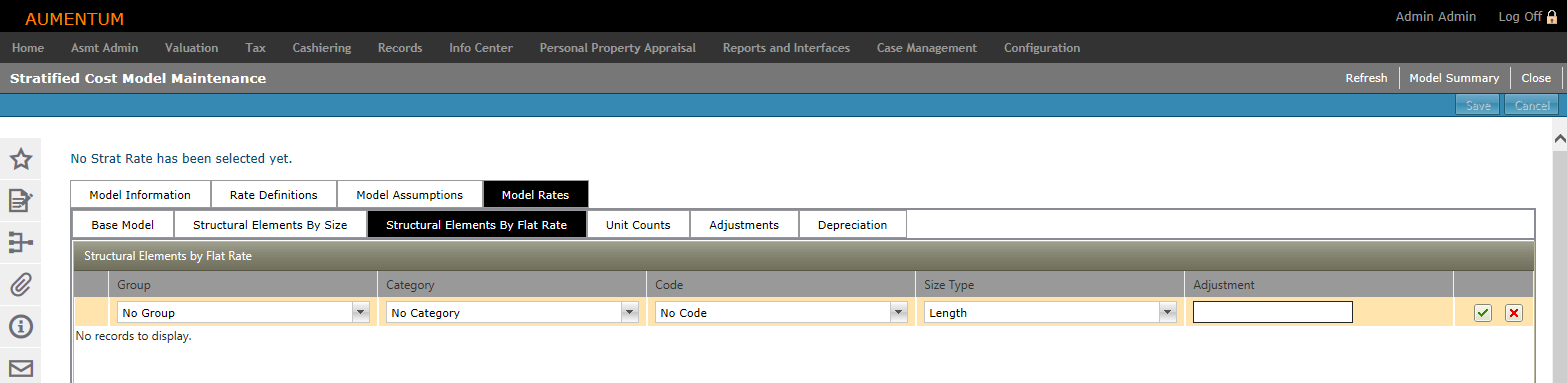
- In the Structural Elements by Flat Rate panel, click Add New (when the adjustment is the same regardless of the size of the structure). A new line is active for editing.
Define or edit the structural element:
Group – Optionally, select a Group by which the model is stratified; or select No Group from the drop-down list.
Category – Select the structural element Category. Available categories populate based on your Group selection.
Code – Selections in this drop-down list are based on your Category selection.
Size Type – Select the type of measurement used to measure the model's size.
Adjustment – Enter the value of the flat adjustment rate.
Click the green checkmark to add the new adjustment.
Click the red X to cancel adding the adjustment.
Click Save.
Click Refresh to clear all selections and refresh the page.
Click Model Summary to return to the Stratified Cost Model Summary screen.
Click Close to end the task.
OR
Click the Pencil icon in the header panel to edit all items in the list, or click the Pencil icon for one item in the grid.
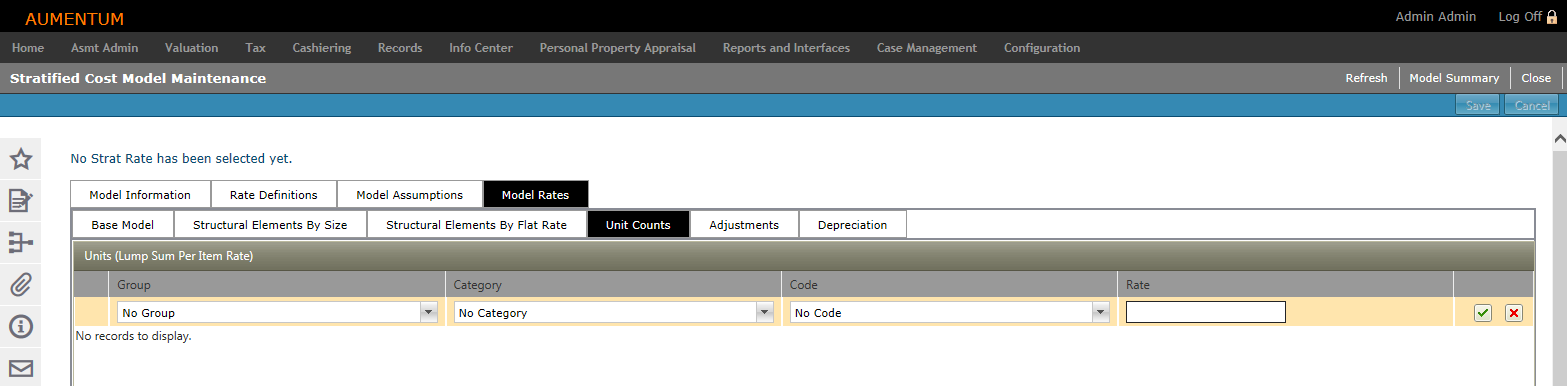
NOTE: If a rate is set by a Group, the Code column displays a value of 0.
- In the Units (Lump Sum Per Item Rate) panel, click Add New. A new line is active for editing.
Define or edit the structural element:
Group – Optionally, select a Group by which the model is stratified; or select No Group from the drop-down list.
Category –Available categories are populated based on your Group selection.
Code – Selections in this drop-down list are based on your Category selection.
Rate – Add the flat adjustment rate value.
Click the green checkmark to add the new adjustment.
Click the red X to cancel adding the adjustment.
- Click Save.
Click Refresh to clear all selections and refresh the page.
Click Model Summary to return to the Stratified Cost Model Summary screen.
Click Close to end the task.
Unit CountsCreate and maintain model rates for adjustment factors applied to Unit Counts.
NOTE: If the model is stratified by quality group, the rates are stratified as such; if the model is not stratified by quality group, one set of values pertain to all qualities being valued.
OR
Click the Pencil icon in the header panel to edit all items in the list, or click the Pencil icon for one item in the grid.
NOTE: If a rate is set by a Group, the Code column displays a value of 0.
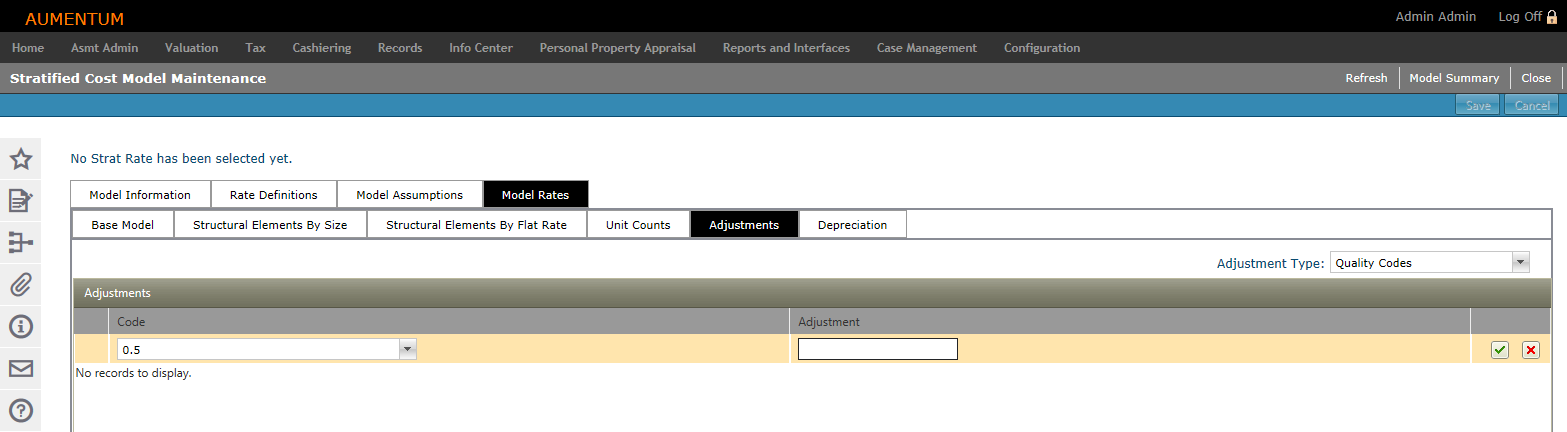
- In the Adjustments panel, existing quality adjustments are displayed in the grid.
- Click Add New. A new line is active for editing.
Define or edit the adjustment:
Code – Enter or edit the quality code.
Adjustment – Enter or edit the adjustment rate.
Click the green checkmark to add the new adjustment.
Click the red X to cancel adding the adjustment.
Click Save.
Click Refresh to clear all selections and refresh the page.
Click Model Summary to return to the Stratified Cost Model Summary screen.
Click Close to end the task.
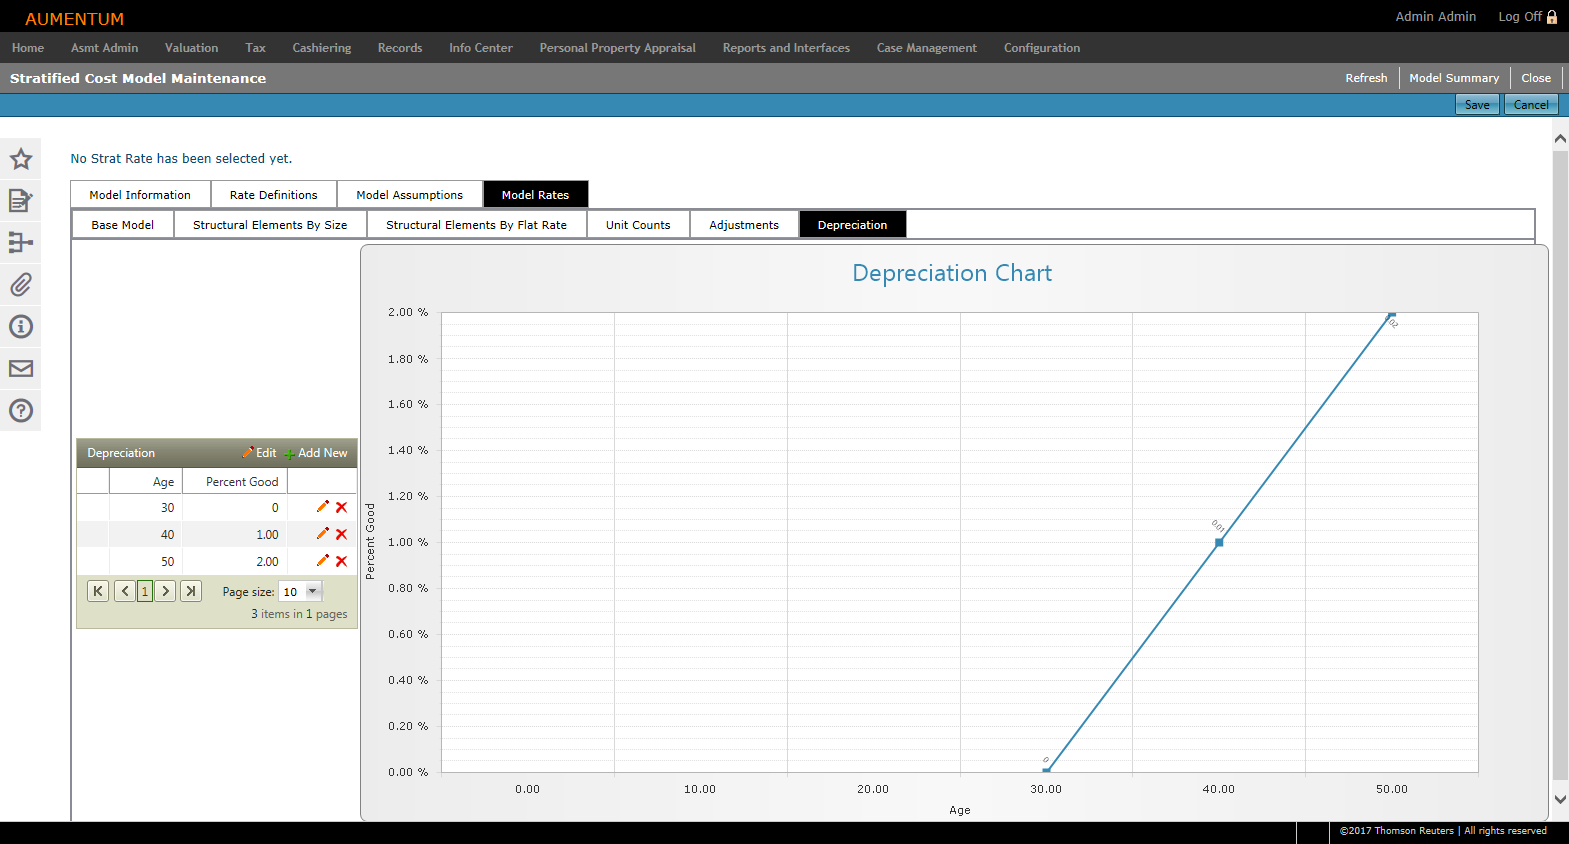
Select a Condition category to view and/or add depreciation values to. Existing depreciation values populate in the Depreciation panel depending on your Condition selection.
- Click Add New. A new line is active for editing.
Define or edit the depreciation:
Age – Enter the age by which a depreciation rate is to be applied.
Depreciation Percentage – Enter the percentage of depreciation for the Age value entered (e.g., after 40 years, an uninhabitable structure depreciates at a rate of 1%).
Click the green checkmark to add the Depreciation.
Click the red X to cancel adding the Depreciation.
Click Save.
Click Refresh to clear all selections and refresh the page.
Click Model Summary to return to the Stratified Cost Model Summary screen.
Click Close to end the task.
Adjustments
Set quality adjustment rates to be used in the model. These adjustments can be made regardless if a model is or isn't stratified by quality group. The quality adjustments on this tab may include qualities that are not included in the base quality group stratification of the model.
OR
Click the Pencil icon in the header panel to edit all items in the list, or click the Pencil icon for one item in the grid.
Depreciation
Create and maintain depreciation rates for various categories (e.g., Improvement Type, Quality, Condition, etc.).
OR
Click the Pencil icon in the header panel to edit all items in the list, or click the Pencil icon for one item in the grid.
NOTE: The Depreciation Chart is a visual reflection of the values listed in the Depreciation grid.
Import Model
Use the Cost Model Import task to import model rates and map those rates to existing model definitions stored in Aumentum.
Model Definition - Contains high-level model definition information (e.g., model number, name, description, notes).
Import Rates - Import a cost model worksheet (CSV file).
Code Mapping - Map imported rates to existing model definitions.
Review Rates - Map Aumentum rate groups that are defined for structural elements to rate groups defined in the imported model.
Model Definition
Add or edit the model's basic information.
Model Type - Select the type of model being imported.
Rate Settings - Select whether the area of a Section or the area of a Building is used when determining the rate.
Depreciation Settings- Select how the depreciation is determined (e.g., by Quality? Condition?, etc.), if applicable.
Model Code - Enter a code representing the model.
Model Name - Enter the name of the model.
Status - Select the status of the model. The Status of the model indicates whether or not the model is available for use throughout the system.
Depreciation Base Year - Enter the year by which depreciation is based.
Optionally, click Add Note to add a note to the model. Model Notes uses standard, Aumentum Notes functionality.
Click Save Note to add the note.
Click Cancel to cancel adding the note.
- Click Save.
NOTE: Depreciation Settings are set according to the Model Type selected and can be changed in the Stratified Cost Model Maintenance task.
Import Rates
Click Select to open your documents and select the CSV file you are importing.
- Optionally click Display Verbose Warnings to prompt Aumentum to display warnings encountered during the import process. These warning messages are informational only.
Click Import Model.
Click Save.
NOTE: The import process can take several minutes to complete. Once the import has completed, the "Select Excel file to import and click Import button" changes to "Import Complete."
Code Mapping
Improvement Types, Features, Structural Elements, Quality, & Condition
Define rate groups to be mapped to structural elements. While this is not a required task, it allows you to define a group of structural elements are valued using the same rate group.
Rate Group Mapping
The Rate Group Mapping tab allows you to map Aumentum rate groups that are defined for Aumentum structural elements to rate groups defined within the imported model. When this mapping is complete, rates are created in the model for the Aumentum defined rate groups having rates that are equivalent to the rate group that they are mapped to on this tab.
Click Populate Cost Model to automatically populate Model Codes. Aumentum automatically maps Model Codes with Aumentum Codes that match in the system upon import. Edit any automatically mapped items, as desired.
Select to map any additional Model Codes to each Aumentum Code object dropbox, as desired. Repeat this process for each of the Code Mapping tabs.
Click Save.
Review Rates
Building and Feature Breakpoint Rates, 2D Rates, Structural Element Breakpoint Rates, & Other Structural Element Rates
Review each of the types of rates definitions from the Review Rates tabs. The information on these tabs is read-only.
Click Refresh to clear all selections and refresh the page.
Click Model Summary to return to the Stratified Cost Model Summary screen.
Click Close to end the task.
Tips
If a feature is attached to a building, it uses the building's calculated depreciation which is the total of each section's depreciation, weighted by the section's value.
If a feature is attached to a building section, it uses the section's calculated depreciation.