Comp Model Maintenance
Navigate:  Valuation > Valuation Management > Comparables > Comp Model Maintenance
Description
The Comp Model View screen displays all of the settings and options that have been configured for the selected model in view. The information displayed on this screen is read-only.
Adding or Editing a Comp Model
-
On the Comp Model View screen, click New in the Command Item bar.
OR
Click New Search.
- On the Advanced Search screen, make a selection from the Comp Model Status drop-down list and click Search.
- Select the checkbox for one or more items in the Search Results panel and click Next.
- On the Comp Model View screen, click Edit in the Command Item bar.
-
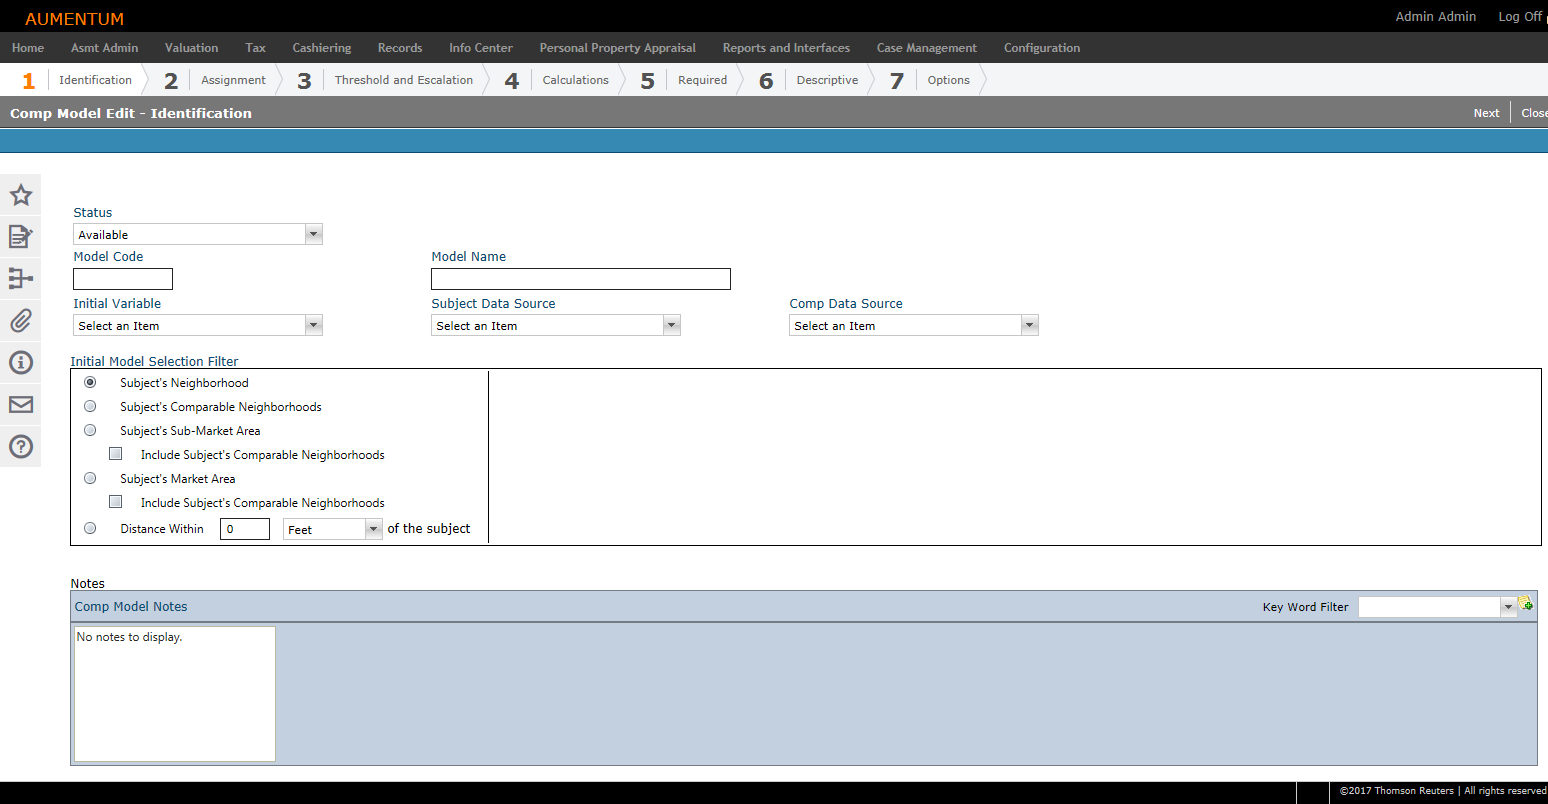
On the Comp Model Edit - Identification screen, enter the model's basic information in the header area.
-
Status – Select the status of the model. This is information is defined by jurisdiction. The status does not affect the model's usability within the system.
-
Model Code – Enter a code representing the model.
-
Model Name – Enter the name of the model.
-
Initial Variable – Select the starting variable to be used in the adjustment process. Additional fields may appear below, depending on your selection.
-
Subject Data Source – Select a data source for the subject. Additional fields may appear below, depending on your selection.
-
Comp Data Source – Select a data source for the comparable model. Additional fields may appear below, depending on your selection.
-
-
In the Initial Model Selection Filter section, select the applicable options that specify where the model will look for comparables.
-
Subject's Neighborhood – Restricts the model's initial search to the subject property's neighborhood, as a starting point.
-
Subject's Comparable Neighborhoods – Restricts the model's initial search to the property's neighborhood, plus all assigned comparable neighborhoods.
-
Subject's Sub-Market Area – Restricts the model's initial search to the subject property's neighborhood and Sub-Market area.
-
Include Subject's Comparable Neighborhoods – When selected, comparable neighborhoods for the subject property's neighborhood are included.
-
-
Subject's Market Area – Restricts the mode's initial search to the property's neighborhood, sub-market area and market area.
-
Include Subject's Comparable Neighborhoods – When selected, comparable neighborhoods for the subject property's neighborhood are included.
-
-
Distance Within – This setting applies the model within a specified distance of the subject property; this is measured using X, Y, Z coordinate data from the application. Enter a numeric value representing the distance and select the value of measurement (i.e., Feet, Miles, Meters, Kilometers).
-
Non-subject sales dates – Enter the number of days that non-subject sales dates can be included prior to and after the valuation date.
-
Optionally, select the Include Subject in Comparables checkbox and enter the number of days that subject sales dates can be included prior to and after the valuation date.
-
In the Included Validity Codes column, click to select an item and use the right arrow to move it to the Excluded Validity Codes column.
NOTE: As of May 1, 2016, leave all codes in the Included Validity Codes column. Do not put any into the Excluded Validity Codes column as this will cause an error upon execution of the model.
-
-
In the Notes section click the Add Note icon on the far right of the panel.
-
Add, edit, or delete a note.
-
-
Click Next.
-
On the Advanced Search screen, search for a model definition assignment.
-
Click Search to retrieve all available object types. Enter search criteria to narrow the results.
-
Use the checkboxes to select one of each object type.
-
Selection Model
-
Index Model
-
Adjustment Model
-
-
Click Next.
-
On the Comp Model Edit - Threshold screen, click the Pencil icon for an item in the panel.
-
Make a selection from the On Success drop-down list (for example, select the CompIndex specified on prior screen).
-
Click the green check mark to save your changes.
-
Click the red X to discard your changes.
-
Selection Model
-
Index Model
-
Adjustment Model
-
Optionally, click on the Definition Thresholds tab to set the number of comps to be returned.
-
Click the green plus sign in the Comp Tests and Thresholds title bar.
- Make a selection from the drop-down lists and enter a threshold value.
-
Click the green check mark to accept your changes.
- Click the red X to discard your changes.
-
Optionally, click on the Escalation Paths tab.
- Click green plus sign in the Comp Escalations title bar to add an escalation path.
-
Escalation Phase – The number of the escalation is the order that the escalations are processed.
-
Target – If this is for the select definition, accept the default.
-
Escalation Process – Make a selection from the drop-down list.
-
Click the green check mark to accept your changes.
- Click the red X to discard your changes.
-
Click Next in the Command Item bar.
-
On the Comp Model Edit - Calc screen, make a selection from the Model Calculation Method drop-down list. The screen refreshes with the relevant information.
-
Enter the optimal number of comparables to be used.
-
Enter the minimal number of comparables to be used. This number cannot be greater than the optimal number.
-
-
If applicable, enter the weight of each comparable. The total must equal 100.
- Select the desired interactive options.
-
Optionally, click on Pencil icon to edit the Subject Value Expression Rules.
-
Click Next.
-
On the Comp Model Edit - Required screen, click the green plus sign in the panel's title bar to add variables.
NOTE: If you are not adding variables, click Next.
-
In the pop-up window, select the checkbox for one or more items in the list and click Apply.
-
Click Cancel to close the window without saving your selections.
-
-
Use Move Up and Move Down buttons to re-order selected variables.
-
-
Click Next.
-
Add variables to the header and/or the footer of the comp report.
NOTE: If you are not adding header or footer variables, click Finish.
-
Click on the green plus sign in the Header/Footer panel's title bar.
-
in the pop-up window, select the checkbox for one or more items in the list and click Apply.
-
Click Cancel to close the window without saving your selections.
-
-
Use Move Up and Move Down buttons to re-order selected variables.
-
-
Click Next.
-
Select Presentation Settings options for the comparable sales data.
NOTE: If no options are to be selected, click Next.
-
Click the Add New icon in the Fields to be Displayed header.
NOTE: This is used when Allow User Selection of Comparables from Definition Generated List is selected on the right.
-
Make a selection from the drop-down list and click the green check mark to save your changes.
-
Click Cancel to cancel selections and close window.
-
Use the Up and Down arrows to change the display order.
-
-
In the Comparable Results section, select or clear each checkbox to add or remove data from the results grid.
-
In the Interaction/Override Options section, select or clear each checkbox to allow certain override options.
-
Options that are grayed out are not available.
-
-
-
Click Finish.
NOTE: Use the Move Up and Move Down arrows to re-order the selections if necessary.
The proper order for Definition Types is:
Cloning a Comp Model
The Clone Comp Model feature allows you to clone the configured settings and calculation methods for a new comp model. This feature is a time-saving tool that allows you to build a new model that may have similar features to another existing model more quickly. Once the model has been applied, you have the ability to edit its configuration settings using the Comp Model editor, just like any other model.
-
On the Comp Model View screen, click New Search.
-
On the Advanced Search screen, click Search to search all available models, or enter criteria to narrow search results.
-
Select the checkbox for the model you want to clone.
-
Click Next.
-
On the Comp Model View screen, click Clone in Command item bar.
-
In the pop-up, enter or select a new Model Code, Model Name, Model Status, and Model Description.
-
Click Apply to clone the selected model.
-
Click Cancel to cancel cloning process and close window.
-