Affidavit Information
Navigate:  Tax >
Excise Tax > Excise Tax Affidavit Maintenance > New Affidavit > Validate Excise Data > Affidavit Information
Tax >
Excise Tax > Excise Tax Affidavit Maintenance > New Affidavit > Validate Excise Data > Affidavit Information
OR
Tax > Excise Tax > Excise Tax Affidavit Maintenance > Search for Affidavit > Select and Next > Affidavit Information
Description
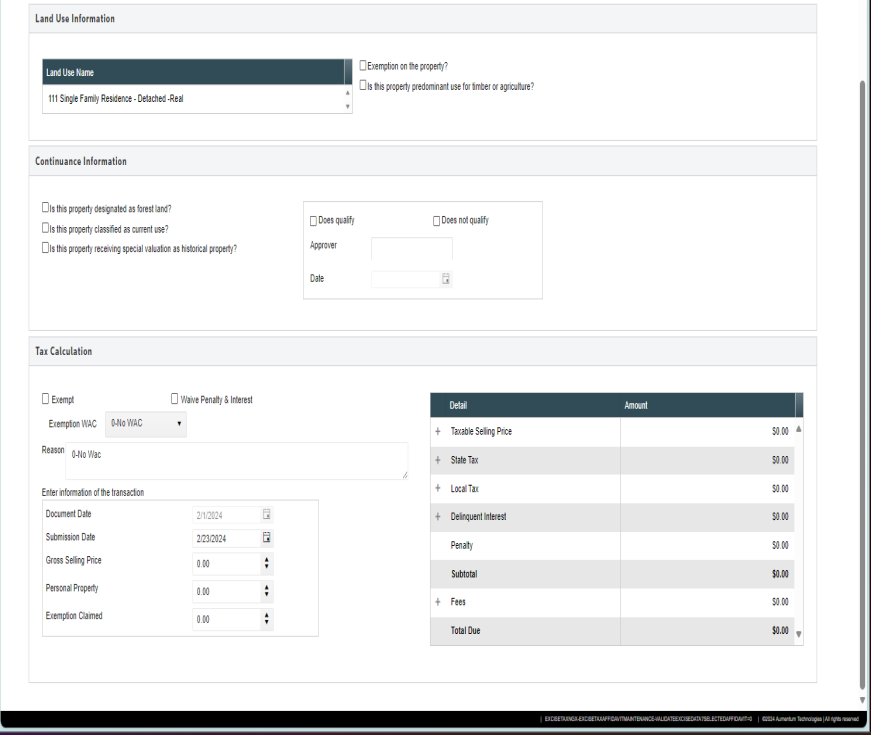
This is a long scrolling page in which all Affidavit Information will be entered. The program will calculate the excise tax, including adding delinquent penalty and interest when appropriate as well as fees. When this page is accessed from the e-File work flow, the data from the affidavit will be entered automatically, allowing the user to simply verify all is correct and if so, to move on the approving, stamping and publishing the results.

Steps
-
Access this page by either searching for a previously approved item on the search page, or by clicking Next from the Validate Excise Data page for a new Affidavit.
- A walk-in affidavit will not be pre-populated and will require the user to enter all applicable information from the Affidavit.
- If this is a e-filed Affidavit, information from the Affidavit should pre-populate the page. The user will need to review and ensure the information is the same as on the Affidavit document before moving forward.
- To access the documents associated with an efiled submission, click on the Numbered link in the "Attachments" column of the workflow item.
- The pop-up box displayed below will appear. Click in the drop-down box at the top of the page and select the Document, then click the "Download Attachment" button. Once that is done, find the document in your downloads folder and click on it to view.
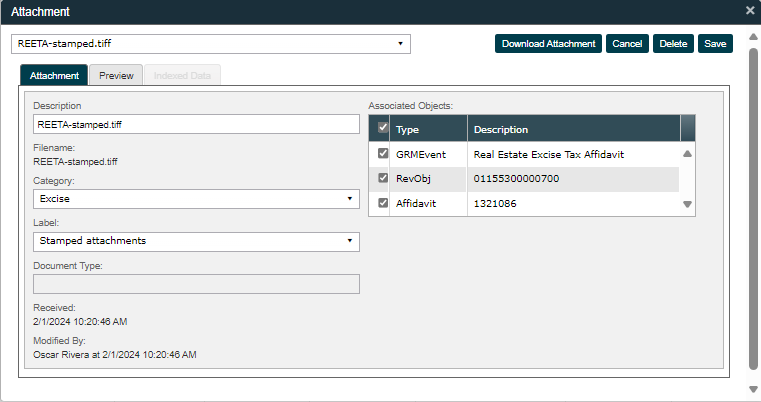
- The XML data associated with the efile, may also be viewed here by selecting the XML file in the drop-down and then clicking on the Indexed Data tab below the drop-down.
- If any of the 3 check boxes in the Continuance Information panel are checked when an e-filed affidavit enters the Aumentum Workflow, then it will automatically be routed to the queue configured for continuance review.
NOTE: There are non-menu security options available to secure the options for continuance so only appropriate users may update this information. Security and User Maintenance > Roles > select Role > Non-Menu Items > Excise Tax > Stamp Information. Contact your system administrator if this needs to be configured.
- The person responsible for reviewing for continuance will access the workflow item from "My Worklist" queue, and review the information provided and determine whether or not the property is or is not qualified for continuance.
- They will then click in the appropriate checkbox for either " Does qualify" or "Does not qualify".
- Next click the Stamp button and then choose the 'X' stamp
 , size and place the stamp on the appropriate box in the affidavit document, then click the signature stamp button
  and size and place it in the appropriate field. DO the same with the Date button
  .
. - Once stamps have been placed, click the Save button
 . Then close the stamp page, this should return you to the 'My Worklist' queue.
- If the Affidavit has an indication that Personal Property is involved, then it will be routed to a queue for a revenue officer or person responsible for researching whether the PP taxes have been paid or not.
- This person will review the affidavit information and research the associated PP
- When everything is verified, click the stamp button and select the Initials stamp
 , size and place the stamp where appropriate.
 - Click the Save button and close the Stamp page, the screen will return to My Worklist.
- If the affidavit doesn't indicate continuance or personal property, then it will be routed directly to the queue configured for the Treasurer. The Treasurer personnel will click the workflow link to access the necessary information and process the affidavit. (Refer to1.b.i-iv for instructions on accessing the documents and XML data for an affidavit).
- The user will review the data populated in Aumentum to ensure it is all correct. Click the PIN link to access infocenter for the PIN if more research is required.
- If the information in Aumentum does not match the information in the Affidavit for an eFile, then the 'Reject' button on the Validate Affidavit page should be used to reject it.
- If the user moved to the Affidavit information page before realizing it should be rejected, then they would need to click the "Back" button to return to the Validation page and reject it.
- A walk-in affidavit will require the user to enter all of the information on the page, starting with the information at the top of the page regarding the type of affidavit, the submission date, and document type and date.
- Enter the PIN number in the PIN field and click the 'Add PIN' button. The PIN will display along with information from Aumentum about that PIN. Validate this information against the affidavit form.
- If everything is correct, then click next. If not, then return the documents to the submitter and cancel out of the validate page.
- Next will display the Affidavit Information page with fields available to enter the rest of the Affidavit information.
- The Buyer and Correspondent information must be populated to move forward in the process. To save time, the 'Same Correspondent' button was added. To use it, enter the information for the Buyer and click the 'Update" button. at this point the "Same Correspondent' button will be enabled. Click it, and the information entered for the Buyer will be copied into the Correspondent fields.
- Continue working down the form, paying close attention to ensure the checkboxes marked on the form are also updated in Aumentum.
- In the Tax Calculation box are options for Exempt and Waive Penalty and Interest, which will modify the amount to be paid. Be sure to select a valid Exemption WAC if the affidavit is truly exempt.
- Enter the Gross Selling Price, Personal Property and Exemption Claimed amounts as they are on the affidavit and verify the amount calculated by Aumentum is the same as the amount calculated on the form.
- Once you have verified that everything on the Affidavit Information page matches the information on the form, click the 'Approve' button. a few things will happen at this point:
- The information displayed on the Aumentum screen is saved in the database.
- The Excise Number is generated and saved with the other data.
- The amounts due for the excise are sent to accounts receivable to create the liability which can then be paid.
- If the
 checkbox is checked, then a notification will be sent the workflow queue configured for the team that manages segregations and Merges.
 - The Taxpayer(s) on the PIN(s) for which the affidavit is being processed are updated to the new correspondent. **NOTE: If the checkbox displayed in the bullet above is checked, then the taxpayer will not be updated.
- If this is an e-filed affidavit, then the "Stamp" button will be enabled. This will allow the user to stamp the electronic documents with the validation stamp indicating the affidavit processing was completed.
- Click the "Stamp" button.
- Click on the Treasurer's Approval Stamp
 . Size and move the stamp to an appropriate place on the document and Save it.
 - Select the next document and repeat the process until all documents are stamped.
- Save and Close the Stamping page.
- After approving a walk-in, the user should note the Excise Number that was generated. Then access the Cashiering page in Aumentum and select the type of Excise from the drop-down at the top of the page. Enter the Excise Number and click the 'Add Bill' button.
- **NOTE: The Cashiering station on which the Excise Payment is processed should be configured with a validation printer connected, so the "stamp" can be printed on the documents.
- Process the payment and validate the documents.
- Once the payment is complete and the documents have been Stamped, the user will scan the documents and return to the Excise Maintenance page to attach them.
- Scan and save the documents to an accessible place on the workstation.
- Access the Excise Maintenance page and search for the Excise number.
- On the Affidavit Information page, click the paper clip icon
 on the left sidebar, then click the Add Attachment button.
 - in the pop-up box, click the "Choose File" button and navigate to where the scanned documents were saved, select them. Add a description, if desired, and then click the checkbox beside the Affidavit Object Type.
- Click the "Attach" button, and the documents will be saved as attachments with this affidavit.
- The final step will be to click the "Publish" button, this will package all of the information that was processed for the affidavit and send them to the appropriate parties.
- eFiled affidavits will send a package back to the submitter indicating the Affidavit was processed. This will allow them to generate a payment file to be submitted the next day with payments for the processed affidavits. (Those files will be processed through Batch Payment Processing in AR, when they are received).
- All Affidavits will also generate a notification to the queue configured for transfer processing, so the responsible parties can process the ownership transfers for those properties.
- The user will review the data populated in Aumentum to ensure it is all correct. Click the PIN link to access infocenter for the PIN if more research is required.