Report Definitions
Navigate:  Tax
> Billing > Setup
> Report Definitions
Tax
> Billing > Setup
> Report Definitions
OR
Asmt Admin > Reports and Extracts > Report
Setups > Report Definitions
Description
Associate custom report (.rpt) files to Aumentum report definitions.
Steps
-
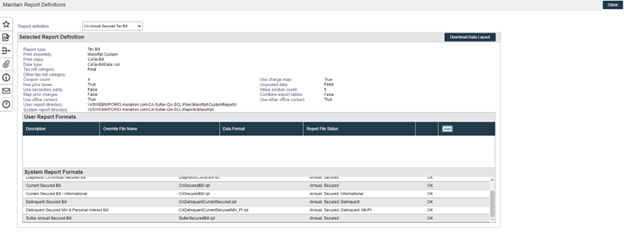
On the Maintain Report Definitions screen, make a selection from the Report definition drop-down list.
- In the Selected Report Definition panel, place your custom report in the folder specified in the User report directory field.
- Optionally, click Download Data Layout and click Open on the confirmation pop-up. You can make changes to the layout, save it, close the Visual Studio screen and return to this screen.
-
In the User Report Formats panel, click Add. A warning message displays if you click Add in the User Reports Formats panel and no user-defined reports are in the user-defined report directory.
-
Enter a description for the report. This is the name that displays when setting up the report options on the Maintain Reports screen.
-
Make a selection from the Override File Name drop-down list that exactly matches the report file name and file extension. Place the file in the location designated by the Framework UNC path to base folder for Aumentum RPT files application setting.
-
Make a selection from the Data Format drop-down list.
- The Report File Status column displays OK if the report is in the correct folder and displays *FILE NOT FOUND* if the file is not in the correct folder.
-
Click Apply to save the user report format.
-
Click Cancel to discard the changes.
-
Click Edit on an existing row to update the data.
-
Click Close to end the task.
Set up an Aumentum Report via Report Setup to define billing dependencies.
Setting Up A Custom Report Definition Format
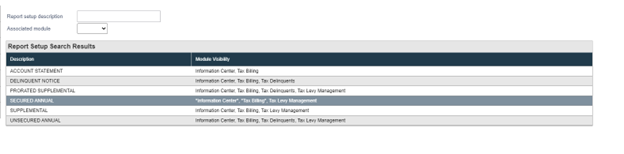
1. Go to Tax > Billing > Setup > Report Definitions
2. Select the Report Definition for which a Custom Format is being created.
3. Note the User report directory. This is where the “custom” report will be placed. Place the custom RPT file in that directory.
4. Once the report is in the User report directory, click the Add button for User Report Formats, fill in the details and click Apply.
-
Description: a unique description so this format can be selected from a list in setup later.
-
Override File Name: the name of the RPT file being uploaded as a custom format for this definition (in this example SutterSecuredBill.rpt). *If the report being uploaded does not appear in the list, you may have to close and come back to the screen.
-
Data Format: The Data Format it should be used for, typically just match the System report that is being overridden.

5. Close Maintain Report Definitions
6. Go to Tax > Billing > Setup > Report Setup and find the Report Setup to be modified to using the custom report (or it could be duplicated it as a new Setup)
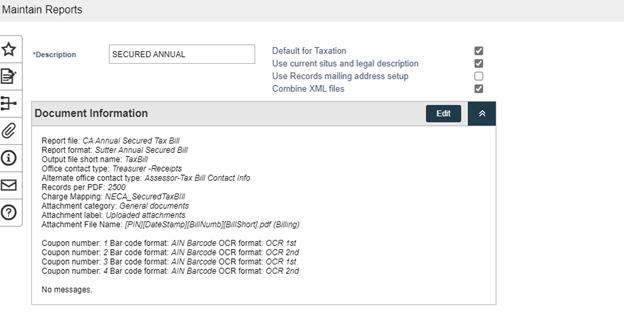
7. Click Edit in the Document Information Panel and update the Report Format to be the new Custom format you just created. Click Previous. Then Click Save
8. Now, when printing a bill when the SECURED ANNUAL bill is selected, it will use the custom RPT that was uploaded instead of the system RPT that gets deployed.