Payment Plan Setup
Navigate:  Tax > Accounts Receivable > Payment Plans > Payment Plan Setup
Description
Use this task to search for existing payment plans to create and maintain payment plans.
Steps
-
On the Set Up Payment Plan screen, click New. Or, click Edit for an item in the Payment Plans panel.
-
On the Edit Payment Plan screen, make a selection from the Plan type drop-down list.
NOTE: Aumentum automatically generates a plan number and populates the Plan number field when you click Save.
- Make a selection from the Plan Status drop-down list.
- Click Configuration > Application Settings.
- On the Maintain Application Settings screen, select Effective Date from the Setting type drop-down list, and select Tax Accounts Receivable from the Filter by module drop-down list.
- Locate Require reason if reinstate payment plan? and click Edit.
- Select the checkbox to set to True. A reason code selection is required when reactivating a defaulted payment plan.
- Clear the checkbox to set to False. No reason code is required when reactivating a defaulted payment plan.
- Click Apply.
- Click Save in the Command Item bar, then click Close.
- Click Configuration > Security and User Maintenance > Roles.
- On the Maintain a Role screen, locate a role and click Edit.
- On the Edit Role Details screen, click to select Tax in the Available Menu Items panel and click Add Selected. (If Tax already appears in the Granted Menu Items panel, skip to step 5.)
- Click Save in the Command Item bar.
- In the Granted Menu Items panel, click Tax > Accounts Receivable > Payment Plans > Payment Plan Setup > Details.
- On the Edit Additional Role Details screen, expand Edit Payment Plan in the Details panel.
- Click to select PlanStatus. In the Rights panel, select the checkbox for each right you want this user to have, then click Set Rights.
- Click Save in the Command Item bar.
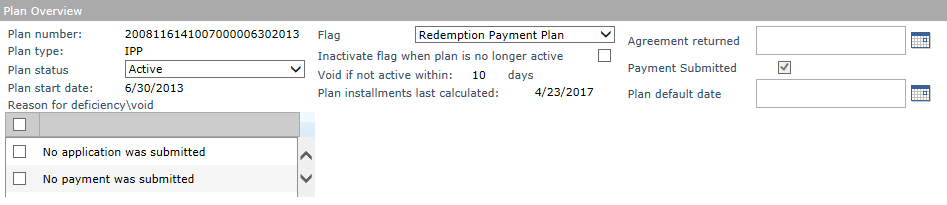
- Enter or select the Plan Start Date.
- Make a selection from the Flag drop-down list, if applicable.
- If selecting a flag, select the Inactivate flag when plan is no longer active checkbox to inactivate the flag when the plan is fully paid and no longer active.
-
If this is a new payment plan, enter the number of days in the Void if not active within X days field to void the plan if not active after the specified number of days (optional).
- The Plan installments last calculated field automatically displays the date the plan installments were last calculated.
-
Enter or select a date in the Agreement returned field if the agreement letter was returned.
-
Select the Payment Submitted checkbox if a payment has been submitted.
NOTE: When a payment is processed against a payment plan, this is automatically selected and disabled. If the payment is reversed, the checkbox is enabled again.
-
If the payment plan is in default, enter or select the Plan Default Date.
-
If applicable, select the Reason for Deficiency/Void.
NOTE: The options available in the Reason for deficiency/void panel are defined by the Payment Plan Deficiency/Void Reason systype category (Configuration > Systypes).
NOTE: Enter search criteria in the Search Filters panel and click Apply Filter to narrow the results in the Payment Plans grid.
NOTE: If you change the status from Defaulted to Active, you can require a reason code upon saving.
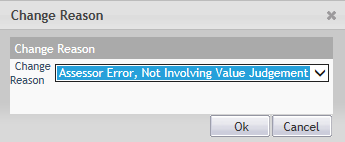
Click here to learn how to require a reason code.
Click here to learn how to set security for
the Plan Status field.
To make this field read-only:
Tabs
-
In the Legal Party Information panel, click Add.
- On the Records Search for Legal Party screen, enter your search criteria and click Search. You navigate back to this screen after selecting an item on the Records Search Results for Legal Party screen.
-
Select a legal party and click Remove to remove it, if necessary.
-
Click Save.
- In the Legal Party Information panel, click Edit for an existing item.
- In the Role column, make a selection from the drop-down list.
- In the Plan Contact column, select the checkbox if this is the point of contact for this legal party.
- Click Apply to save changes, or click Cancel to exit without saving.
-
In the Bills in Payment Plan panel, click Add.
-
On the Payment Plan Bill Search screen, enter a PIN and click Search.
- Click to add a bill to the Bills in Payment Plan panel.
- In the Add Legal Party Tax Bills pop-up, select the checkbox associated with the particular bill to add it to the payment plan.
-
Click Add Selected Bill(s).
-
Click Cancel to cancel the add.
-
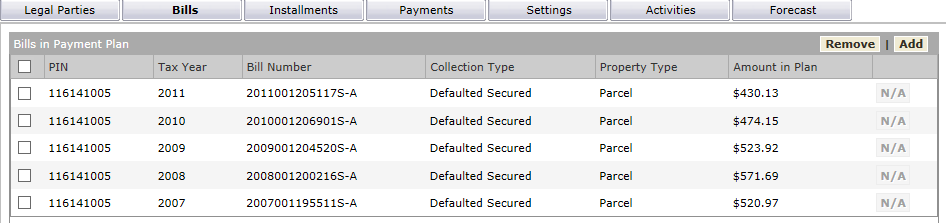
Once added, the Bills panel displays the added bills. Select any checkbox associated with a bill and click Remove to remove it from the plan.
NOTE: Each bill is suffixed with a letter. A bill can have more than one suffix. Designations include:
-
U - Unsecured
-
A - Annual
-
S - Supplemental
-
E - Escape
-
After you add the selected bills, click Add to add bills to this plan on the Search for Bills pop-up.
-
Select the Tax Year.
-
Enter the PIN and/or Bill Number.
-
Click Search.
-
Select the bill(s) from the panel and click Add Selected Bill(s) to close the pop-up and to populate the Bills panel with the selected bills.
-
Click Save.
NOTE: You will need to select the Installments tab and click Calculate to recalculate the installments after adding any bills.
NOTE: Once you click Save, any applicable flags are displayed to the far right in place of the text N/A. Click on the flag icon to open the View Flag Details pop-up to view flag details. For example, any insufficient fund fee (NSF) shows on the bill so that you can decide whether you want to adjust the down payment amount to include the fee.
- Select the Override Plan Schedule checkbox to override plan schedule information. This makes an Edit button available in the Installments grid that when selected allows editing of the Balance Due amount.
- Click Edit and enter the override amount.
- Optionally, override the Due Date, Principal, Plan Interest, and Estimated Additional Penalty/Interest values.
- Click Apply to save changes, or click Cancel to cancel the edits.
- Click the Show Installment Options button.
- In the Down Payment panel, select the Down payment required checkbox, if applicable. The Down Payment panel opens to display additional selections.
-
Select the Override amount checkbox if a down payment amount is required but it was not previously defined on the Edit Payment Plan Type setup screen. Otherwise, the down payment amount, if any, is displayed.
-
Enter the number of grace days for the down payment.
-
Enter a Down Payment Amount if you select the Override Amount checkbox.
-
Select the Other bills must be current checkbox to prevent payment plan payments if other bills are not current. If selected, also enter the Delinquent amount is not greater than value.
-
The Enable plan interest checkbox is selected if defined on the Edit Payment Plan Type screen. Select the Defer standard penalty and interest checkbox to defer penalty and interest in the Interest panel. Define the:
-
Plan interest calculation cycle.
-
Plan interest APR.
-
Accrue plan interest as of date.
-
Non-workday interest date moves to if you want to define the next date to which interest is charged based on any non-working days (for which to not charge interest).
-
-
For any additional fees set up on the Set Up Plan Fee screen (Tax > Accounts Receivable > Payment Plans > Plan Fee Setup):
-
Select the Override checkbox to open the Fee Amount field to accept a value.
-
Enter a value in the Fee Amount field to add a fee amount.
-
-
Select the Plan Fee Method.
-
Select the Plan payments are considered partial payments checkbox if plan payments in your jurisdiction considered plan payments partial payments.
-
-
For Plan Installment Information, make a selection from the Amortization Type drop-down list.
-
Make a selection from the Plan installment cycle drop-down list.
-
Make a selection from the Plan interest calculation method drop-down list.
-
If the Defer Penalty and Interest checkbox was selected when setting up the plan type, all methods are available for selection. Based on your selection, the label on the field to the right changes.
-
If you select Number of plan installments, enter the installment count. Calculations cannot occur until the count is defined.
-
If you select Installment amount, enter the installment amount. If you select this, the Amortization type field becomes unavailable.
-
If you select Last plan installment due date, enter the last due date.
-
Enter the first plan installment due date.
-
Define the Adjust Plan Principal By, as applicable.
-
Select the Plan Payment allocation rule, Payment allocation rule, and Payment allocation rule if plan is defaulted.
-
Select the Surplus Payment Allocation Rule to define how surplus is allocated, if applicable to your jurisdiction.
-
Select the Drop fractional cents checkbox to exclude any fractional cent from the calculations.
-
Select the Move installment to next working day if it falls on a weekend or holiday checkbox to recognize weekends and holidays for payment due dates.
-
Click the Bill Detail button to open the Payment Plan Tax Bills pop-up. Any flags you defined are displayed on the far right. If no flags are defined, N/A is displayed. Click the flag to open the View Flag Details pop-up with flag details.
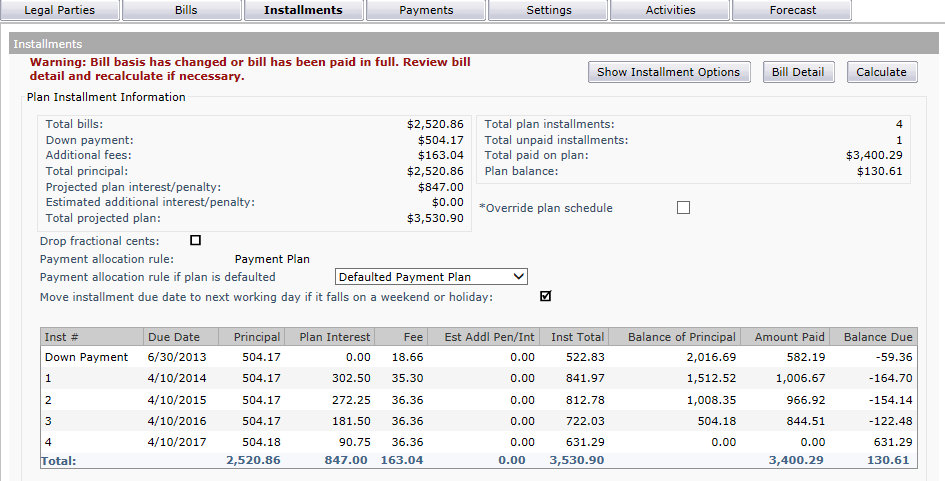
NOTE: In certain jurisdictions a plan basis, such as the Plan Start Date, cannot be altered once a plan starts. Or, for example, if a roll correction has occurred, and the plan basis needs to be updated, a warning message, Warning: Bill basis has changed or bill has been paid in full. Review bill detail and recalculate if necessary displays when you click Bill Detail.
- Click Calculate to perform the payment plan calculations based on the data you have defined. The panel displays the payment installments, including due date, principal, interest, fee (if any), estimated additional penalty/interest (if any), installment total, principal balance after each payment, amount paid, and balance due.
-
Click Hide Installment Options to return to normal display of all values.
-
Click Save.
-
Enter or select a Forecast as of Date.
-
Click Apply. The balance due forecasting information for the defined future date is displayed.
Legal Parties tab

Adding a Legal Party
NOTE: Repeat this step for the Debtor and for the Contact. The first legal party added to the list is automatically defined as the Debtor.
Editing a Legal Party
Bills tab
NOTE: Depending on your jurisdiction, a Surpluses panel also displays from which you can select bills if they include surpluses.
Installments tab
When you first navigate to this tab, the installments are shown if they were already calculated. You can view or change the installment options, and recalculate the values.
If values have not yet been calculated for the plan, the options are displayed automatically and the Show Installment Options button is not available.
Plan Installment Information
Installment Options
Payments tab
Payments received and cashiered via Cashiering > Collect Payments are displayed on the Payments tab. This tab is read-only.

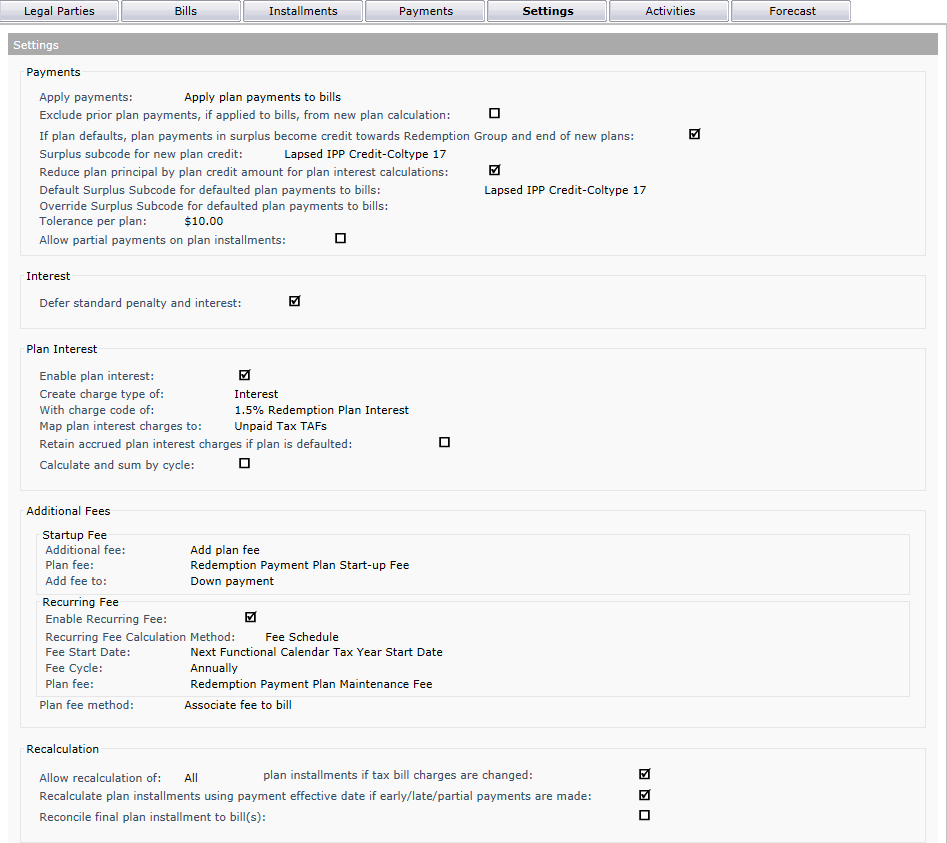
Settings tab
The Settings tab is read-only. Settings defined on the Edit Payment Plan Type screen are displayed here.
Activities tab
The Activities tab is read-only and shows all payment plan activities.
NOTE: Any correspondence you generate for the payment plan is recorded as an event on this tab.

Forecast tab
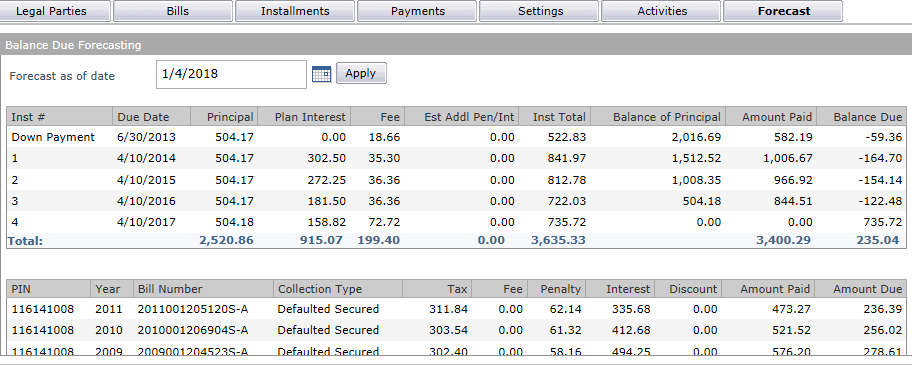
Use the Forecast tab to project amounts due on a Payment Plan for a future date, or for any date defined.
NOTE: The current date and all the associated installment information are displayed by default.
Print Payment Correspondence
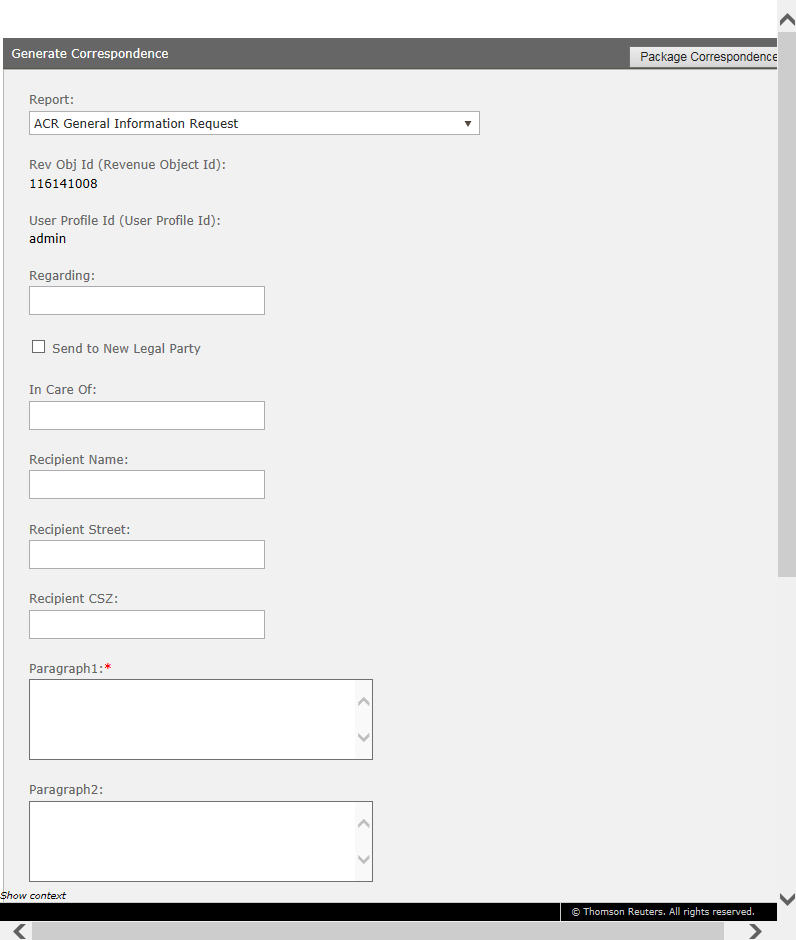
-
Click the Correspondence icon in the sidebar icon to generate context sensitive correspondence.
-
Make a selection from the Report drop-down list. Choices are based on the current screen context, keyword context, and the reports set up in Data Services, Report Setup, and Template Management.
NOTE: You can also click Show Context in the lower left corner of the Correspondence pop-up) to see keywords associated with the current screen. These are initially set up by Implementation. See Data Services for details about keywords.
-
Click the Execute Immediately checkbox to submit the correspondence to the Outbound Document Queue where it is processed immediately. If you do not check this checkbox, you can process the correspondence later.
-
Click Submit to Batch, which submits the correspondence to the Outbound Document Queue where you can search for the batch job and process it at your convenience.
Common Actions
Flag Information – Opens the Manage Flags screen for the purpose of managing payment plan flags.
Tax Detail – Opens the Info Center Tax Information screen for the associated payment plan PIN.
Update Payment Plan – Opens the Update Payment Plan screen for the purpose of updating the payment plan.
Apply Plan Payments – Opens the Apply Plan Payments screen for the purpose of applying plan payments.
Plan Fee Setup – Opens the Set Up Plan Fee screen for the purpose of setting up and maintaining plan fees.
Plan Type Setup – Opens the Set Up Plan Type screen for the purpose of setting up and maintaining the plan type.