Manage Expired Refund
Navigate:  Tax > Accounts Receivable > Manage Payments > Manage Expired Refund
Description
Use this task to add information to a refund when a check has become expired (stale-dated) due to not being cashed or deposited before the check expiration date, typically after 90 days.
This process provides a way to track, review and update the status of the expired refund checks or warrants, and track the names and addresses that have received correspondence related to the refund.
Steps
-
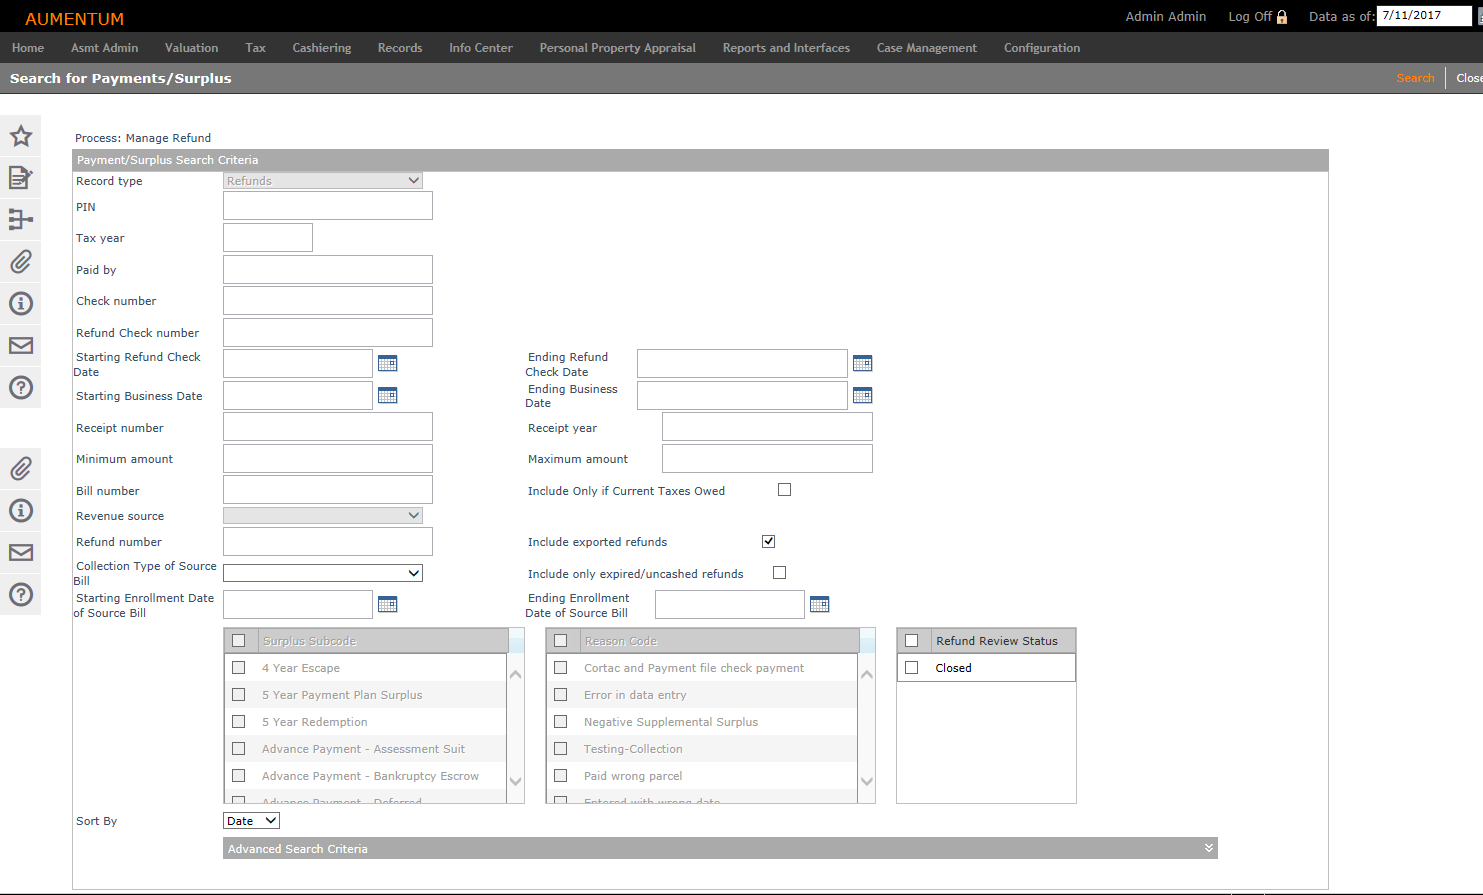
In the Search for Payments/Surplus screen, enter your search criteria and click Search.
NOTE: Select the Include only expired/uncashed refunds checkbox to return only refunds marked Expired/Uncashed Check in the Manage Expired Refund screen.
-
In the Refund Search Results screen, select the checkbox for one or more items and click Next.
NOTE: Combined refunds are displayed on a single row showing the primary PIN and the total amount of the combined refund.
-
On the Manage Expired Refund screen, click on a PIN to open the Tax Information screen.
- In the Refund Correspondents panel, click Add to open the Refund Correspondent Name/Address screen.
- Click Remove to delete a recipient from the panel.
- The Refund Events panel displays the history associated with the expired refunds.
Workflow
If applicable to your jurisdiction, the Post Refund screen can be accessed via the Workflow icon in the sidebar. The screen contains additional buttons, such as Submit to Approve and/or Accept/Reject buttons, depending on your jurisdictional requirements and workflow queue setup.
NOTE: Workflows available for this task vary. Your Aumentum Implementation team sets up each workflow specific to your jurisdiction setup and requirements.
IMPORTANT: When a refund item has an active workflow associated with it, you cannot select it for processing from other tasks. Instead, a warning message displays indicating that the item is in an active workflow. For example, if you are processing a surplus and select an item for workflow processing in the Surplus payment management task, you cannot process a refund for the surplus until the item is no longer in the workflow.
NOTE: The System Administrator for your jurisdiction can configure the Refund Management payment management process to require a workflow for each item via Configuration > Workflow Configuration.
Dependencies, Prerequisites and Setup
Configuration Menu
-
Flag Setup – The flag Refund Created With Outstanding Taxes is created automatically during the deploy process.
-
An application setting called Combine refunds during the refund workflow batch process allows combining of refunds into a single refund when the refund name and address is the same during the refund workflow batch process. To set this up, go to Configuration > Application Settings > Maintain Application Settings, and select the Setting type of Effective Date and the Sort by Module of Tax Accounts Receivable. Select the new application setting and set to True to combine refunds. This application setting may not apply to your jurisdiction.
-
The application setting Flag Type to copy from Surplus to Refund Payment Exportdetermines the flag type (which is a systype called Flag Type) to apply to a surplus to be flagged during payment export, for example, to any refund record requiring warrant pick-up by the Treasurer-Tax Collector’s office (reported on the Auditor’s Report). The flag is initially set on a surplus via the Surplus Management task on the Manage Surplus screen, on which you can add and select the applicable flag type. Then, when managing the refund, if flagged, for example, as requiring warrant pickup, the surplus is not refunded to the account holder but is held for the Treasurer-Tax Collector.
Accounts Receivable
-
See Accounts Receivable for additional setup requirements.