Discovery
Navigate:  Personal Property Appraisal > Discovery
Description
Amended personal property tax returns imported from eGov automatically place an Amended Filing flag on the account. The amended return is initially sent to Discovery where it is assigned to an Appraiser. Assigning the appraiser kicks off an Amended Filing workflow, and a notification is sent to the assigned Appraiser indicating the Amended Filing workflow is ready for review. The appraiser can then select the workflow on the View My Worklist screen.
The worklist and the items on it, including fields and grid heading columns, vary depending on the jurisdiction. Examples include:
IMPORTANT: The NAICS code is applied at the tax year level, not the account level, even though you can define it on the Maintain PPA Accounts screen.
Jurisdiction Specific Information
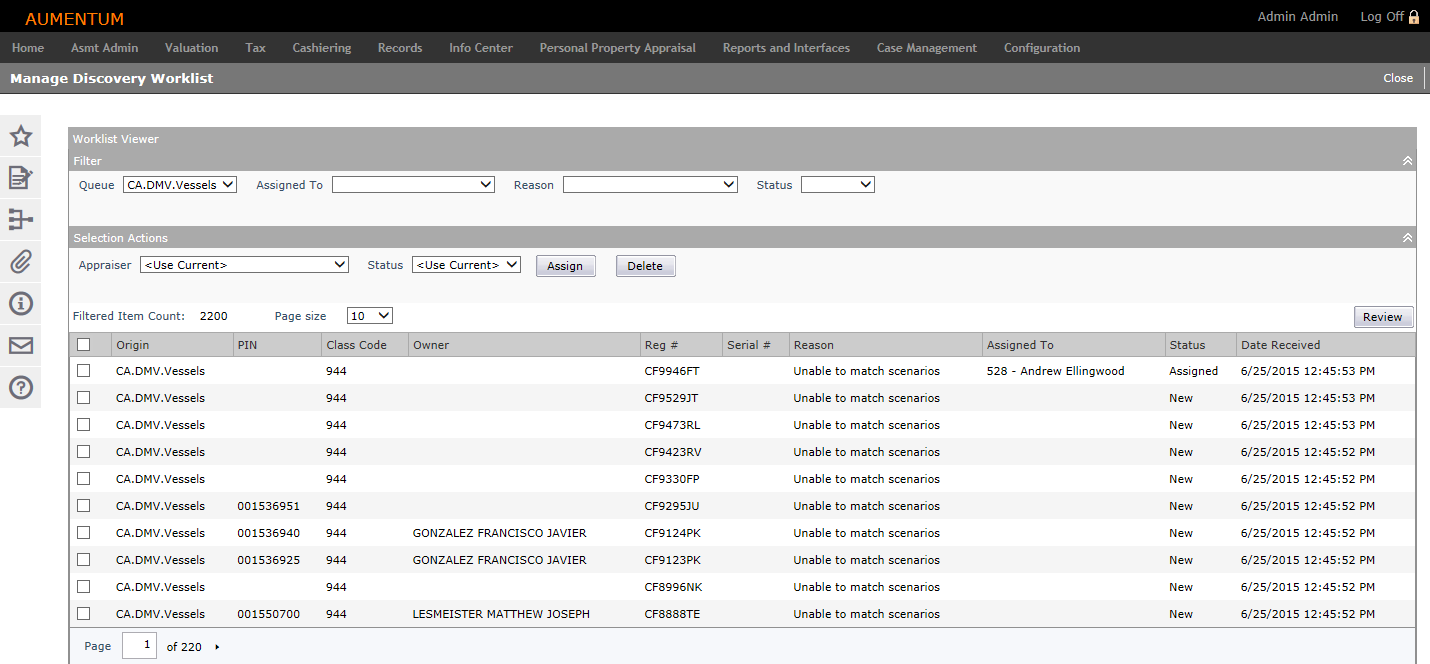
Discovery for Personal Property Appraisal
Use this task to view the exceptions and potential discoveries from the DNR, ATCI and I-File processes and to edit certain information, depending on the type of imported data. Files are first imported via the Schedule Import Unit Loader screen. They are processed in the Schedule Interface Queue Process.
Filtering and sort options are available to make the work list easier to manage.
NOTE: The fields on the worklist vary based on the particular data file in the queue that you are processing. Also, the fields you can edit vary, depending on the data imported. For example, for DNR (watercraft) and ATCI (vehicle registration data), you can add/update legal party, account, and assets as well as manually dispose assets from one account and add to another account.
NOTE: If applicable to your jurisdiction, Lessor Name, if applicable, is also displayed in the worklist.
Steps
-
Click Personal Property Appraisal > Discovery.
- On the Manage Discovery Worklist screen, make your selections from the drop-down lists in the Filter panel.
-
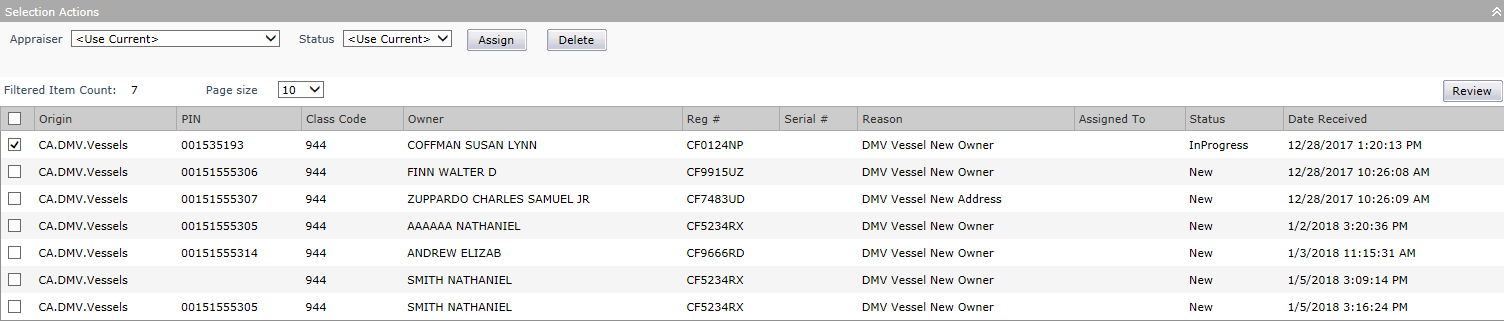
In the Selection Actions panel, make your selections from the drop-down lists.
-
Select the checkbox for one or more items in the grid and click Assign to assign the items to the selected Appraiser, or click Delete to delete the item from the queue.
-
In the Selections Actions panel, select the checkbox for one or more items in the grid and click Review.

-
On the next Manage Discovery Worklist screen:
- Click XML in the Worklist Item Summary panel header to view the XML code, which you can view and copy, but not edit. Click Previous to return to the original Manage Discovery Workflow screen.
- Click Update to refresh the data.
- Click Save to save your changes.
- Click Previous to return to the original Manage Discovery Workflow screen.
- Click Close to end the task.
Discovery for eGov
The ability to review and maintain data for eGov imports in PPA Discovery is also available. You can import, match, and compare data to existing current Aumentum data.
NOTE: This process also supports imports such as DNR and ATCi imports.
eGov sends account and asset data to Personal Property Appraisal when a property owner submits a yearly filing. This submittal is via an XML file or directly into the eGov queue using the PPA API.
When XML files are received, the Import Unit Loader batch task is run first. For either type of submission, the Interface Queue Processor batch process is then run to check in the accounts and send them to Discovery where they are reviewed.
To accommodate this, this process integrates with a Records API for the purpose of legal party, mailing address, situs address, and TAG update validation/resolution. The ability to search for and associate a PIN to a record if an exact match is not found during the initial import is available. Any differences between the data are displayed in the Discovery Workflow Queue.
PIN Search
-
From the account summary screen, click Search in the header area to open the Search for Personal Property Accounts screen.
-
Search for and select the accounts, and click Return to load the accounts and return to this screen.
NOTE: Any information applicable to the eGov account/PIN are displayed in the next panels if defined in the system or in the particular import, including Attributes, Legal Parties, Situs Address Information, Modifiers Information, and any Additional Information
Status and Reassign
-
From the account summary screen, you can select a status if other than the default is displayed.
-
If reassigning the item, select an appraiser from the drop-down list.
-
Click Reassign.
-
Click Update, then click Save.
Steps for Filtering and Editing Asset Information
You can filter assets as well as define and maintain certain data for assets.
Filtering is optional. Not filtering displays all available items. Various additional information is displayed in this panel, including the number of changed assets, the count, acquired cost this/last year, and the ratio difference.
-
Click Filter by to filter the asset list
-
Click Sort by to define the asset display sort option.
-
Define the Number of Assets to Display.
-
Click Update.
-
Click Edit in any asset row to expand the editing options.
-
Select the Verified checkbox if you verify the changes.
-
Select the Entry Code.
-
Define an Asset Description.
-
Define an Acquired Year.
-
Define an Acquired Cost.
-
Enter a Quantity.
-
Click Apply.
-
Click Save.
-
Click Remove on any row to remove the asset from the list of imported assets associated with the eGov account.
Steps for Reviewing Work Items
-
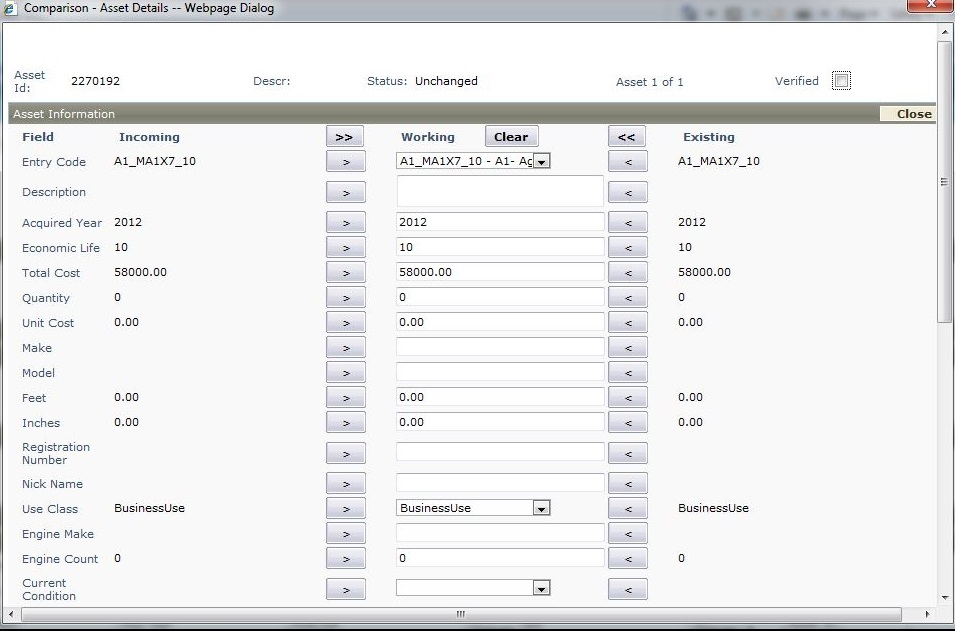
Click Detail on any item in a row to display the Comparison - Asset Details pop-up.
-
Define any data in the Working column and click the single arrow button > to move it to the Existing column.
-
Click the Clear button in the Working column to clear any items from the Working column.
-
Click any single arrow button in the Existing column to move it to the Working column.
-
Click any single arrow button in the Working column to move it to the Existing column.
-
Click the Working column double arrow button >> to move any items to the Existing column.
-
Click the Existing column double arrow button << to move any items to the Working column.
-
When finished defining all data, check the Verified checkbox to indicate you have verified the data.
-
Click Next to advance to the next item in the queue to define and verify data.
-
Click Close to return to the Manage Discovery Worklist screen.
-
Click Update.
-
Click Save.
Steps for Viewing My Worklist
Various actions can create system events that in turn generate a workflow for certain screens, if applicable to your jurisdiction. for example, a system event is created when an online filing is sent to Discovery. If applicable to your jurisdiction, a workflow is created for the event that is available on the View My Worklist screen via the workflow icon on the sidebar of any screen. Depending on your user role and workflow queue, you can select the Online Filing workflow from the workflow list on the View My Worklist screen to advance to the Manage Discovery Worklist screen for the purpose of reviewing and approving or rejecting the online filing.
When accessed from the worklist, the Manage Discovery screen also includes buttons such as Submit for Approval, Approve, and Reject, depending on your jurisdictional setup, workflow queues, and requirements.
-
Click My Worklist from the Workflow section of the left screen panel to open the View My Worklist screen.
-
Optionally, define any or all of the Filter By information to filter the displays of workflow items.
-
Select the Workflow.
-
Select the Status.
-
Select the Queue.
-
Define the Begin Create Date, End Create Date, and enter a description in the Descr field.
-
Click Refresh to apply the filtering.
-
Click to clear filtering.
-
Click the Workflow column, Task column, or Descr column active text hyperlink. For example, if working with the Workflow of Appeals, click any of these three to navigate to the Manage Appeals screen. When finished managing the Appeal, click Previous to return to this screen.
-
Click Detail in any grid row to navigate to the View Work Item Details screen. Here is an example of the screen, which varies depending on workflow item selected.
-
Select the queue to view from the Queue drop-down list.
-
Click Route to route the item to the selected queue. The Queue Id field in the main part of the screen changes to reflect the queue selected.
-
Click Advance to advance the item in a queue. A Ready to Complete pop-up confirmation is displayed. Click to confirm the advance or Cancel to cancel.
-
Click Cancel Item to cancel the item from the queue; or click Terminate to terminate the item from the queue. A warning pop-up confirmation is displayed. Click OK to confirm the cancel or terminate or Cancel to cancel.
Steps for Viewing Log Critical Events and All Information
-
Click the Log tab. The Log tab displays.
-
The default for display is Critical Events. Click the All Info button to change the display to a log of all activities related to the item.
-
Click List to return to the Manage Discovery Worklist screen.
Tips
See Personal Property Appraisal, Personal Property Appraisal Setup, and Discovery for any applicable prerequisites, dependencies and setup information for this task, including role security for the Assign and Delete button functionality.
NAICS codes are business types and are included with certain imports. You can manage the NAICS code in the Property Information panel of the Maintain PPA Accounts screen if your jurisdiction has the Personal Property Appraisal module.
Correspondence
Select the Correspondence (left sidebar) to select context sensitive reports to generate and to view keywords associated with the current screen context. For this particular screen, the keywords are Revenue Object Id (RevObjId) and Tax Year (TaxYear). See Data Services for details about keywords, which are set up by the Aumentum Engineering team and your Aumentum Implementation team.