Audit Administration
Navigate:  Personal
Property Appraisal > Audits > PPA Audit
Administration
Personal
Property Appraisal > Audits > PPA Audit
Administration
Description
Use this task to maintain personal property audit details.
Steps
-
On the Advanced Search screen, enter your search criteria and click Search.
Click here for more details about searching by audit.
-
Optionally, make a selection from the Max results drop-down list.
-
Define any data as applicable on the General tab to narrow the search. For example, you could select the specific Tax Year, and then combine that with any other search criteria, such as the Business Master Number. Or you could simply define Legal Party Name to narrow the search results.
-
Click Search to run your query.
-
Click Clear in the task bar to clear the fields and set the criteria search controls back to their default/empty state.
-
-
Optionally, click Save Query. Enter a name and click Save. Your query displays in the Saved Queries panel.
-
Export to Excel – Select one or more search results and click the Excel button in the panel title bar. Excel opens with your selected results.
-
Export to CSV – Select one or more search results and click the CSV button in the panel title bar. Excel opens with your selected results.
-
Append – Select one or more search results and click Append. The selected results are now available on the Selected Results tab. Perform another search to find more PINs. Click Append to add the PINs to the Selected Results tab.
NOTE: If you click Append, the Next, Save PIN List, export to Excel, and export to CSV buttons are moved from the Search Results tab to the Selected Results tab.
-
Save PIN List – Select one or more search results and click Save PIN List. Enter a unique name for the list and click Save. PIN lists can be viewed via Records > Other Revenue Object Maintenance > Revenue Object Lists, and the lists can be used during any task using Revenue Object Lists, such as Criteria Groups.
- Clear – Click Clear to remove the results from the tab.
Select the checkbox associated with each item you want to include and perform an action with your search results:
Search by Flags
Click the Flags tab to search by flags.
-
-
Scroll to the Search Results panel, select the checkbox for one or more items, and click Next.
-
On the Maintain Audits screen, modify information as needed in the Administration, Audit Findings and Notes tabs.
Administration tab
Administrators can set security rights for several fields on the Administration tab. Users without proper security rights will see the following message.

Click here to learn how to set this security
- Click Configuration > Security and User Maintenance > Roles.
- For the role you want to assign security, click Edit.
- In the Granted Menu Items panel, click to expand Personal Property Appraisal > Audits > Audit Administration > Maintain Audits > Details.
- On the Edit Additional Role Details screen, click to expand Maintain Audits in the Details panel.
- Click to select an item in the list and, in the Rights panel, select the checkbox for the rights you want this role to have.
- Click Set Rights, then click Save in the Command Item bar.
NOTE: if Personal Property Appraisal is not already in the Granted Menu Items panel, locate it in the Available Menu Items panel and click Add Selected. Click Save in the Command Item bar.
-
In the Agent Name area, make your selections from the drop-down lists and click Search.
-
On the Records Search screen, enter your search criteria and click Search.
- On the Records Search Results screen, click to select an item in the grid. You automatically return to the Maintain Audits screen and the Agent Name field is now populated.
-
In the Key Dates panel, enter or select dates as applicable to the audit.
-
In the Actions panel, make your selections from the drop-down lists.
-
Enter or select information for the remaining fields in the column.
- If you have proper permissions, enter or edit project hours and the completion date.
- Request Additional Hours and Request New Completion Date creates another workflow to request additional time.
- Project Time Frame, Audit Size Code, and Audit Category are based on systypes.
- Assessment Response Period specifies how long the taxpayer has to reply to the audit finding letter.
- If the audit has a flag associated with it, a flag icon and description is displayed at the top of the screen.
-
Click on the hyperlink to open the Manage Audit Flags screen. When finished, you return to this screen.
- Optionally, edit or view information in the Attributes and Identifiers panels.
- In the Audit Project Time Summary panel, click Add.
-
Make a selection from the Auditor (if set up and if applicable to your jurisdiction), Role and Task drop-down lists.
-
Enter the time in hour and minute increments and click Apply.
-
Select the checkbox for one or more items in the panel and click Edit to modify information, or click Delete to remove the selected items.
- Click Save in the Command Item bar.
Audit Findings tab
- In the Audit Findings Detail by Location panel, click the chevron to the left of the PIN column. Each year in the audit is displayed.
- Click the caret to the left of the tax year column to expand the Audited Value Differences panel.
- Items in the grid include three links:
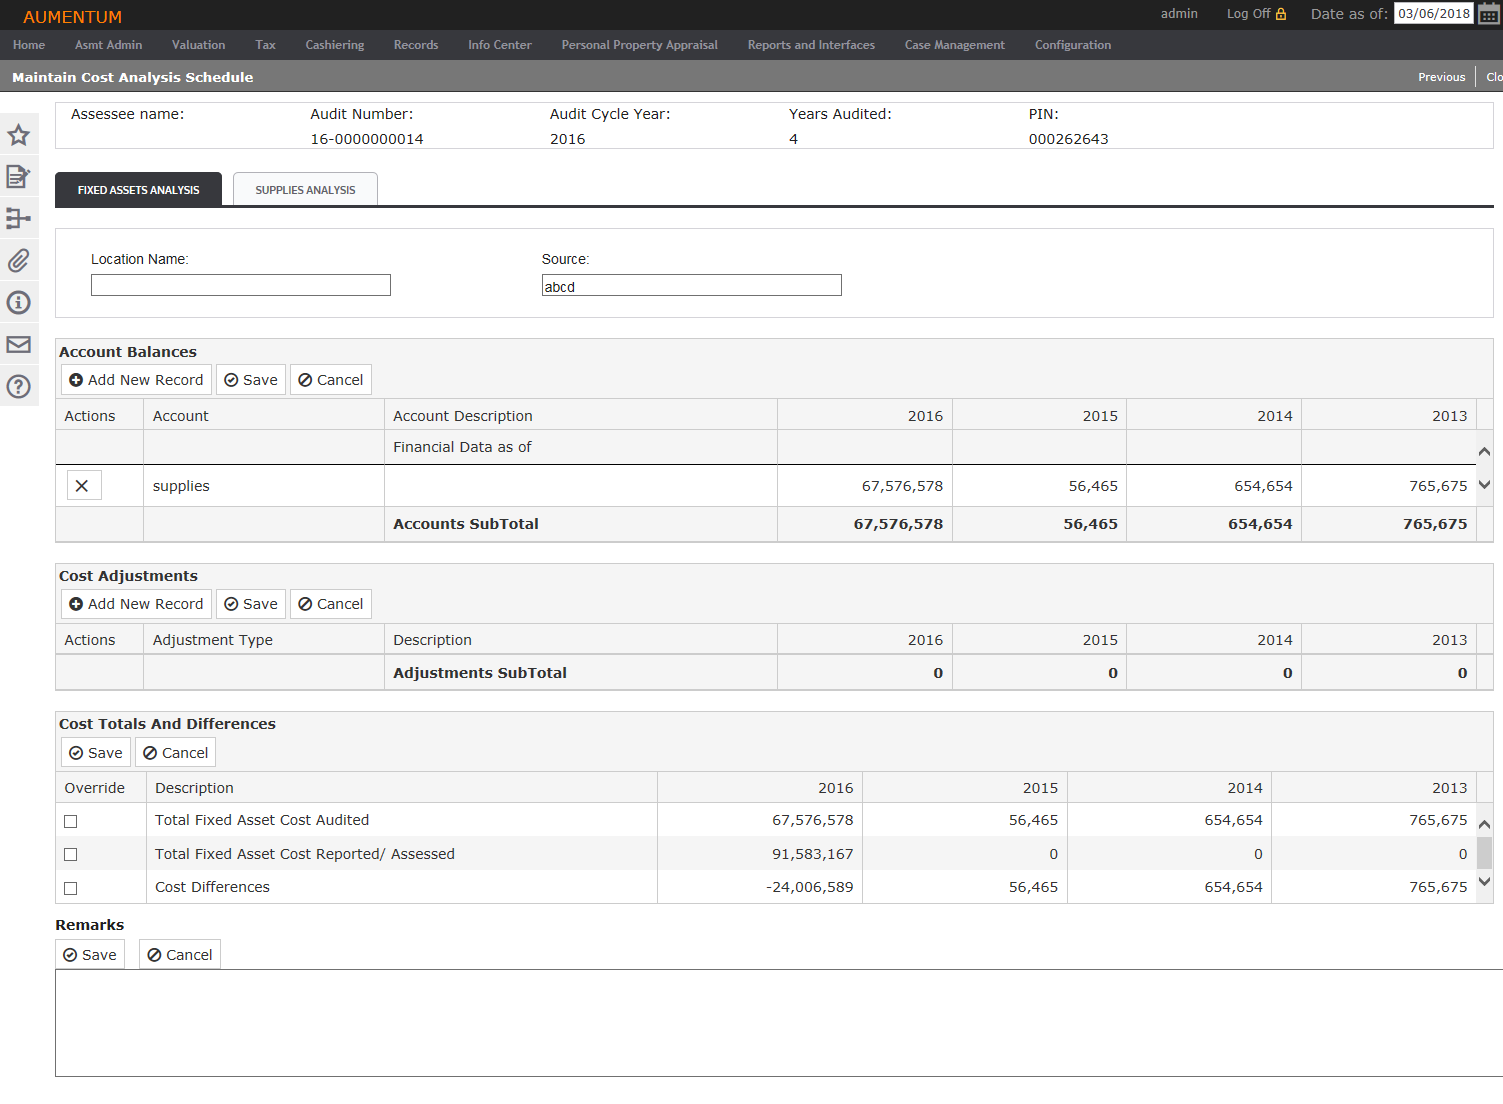
- On the Maintain Cost Analysis Schedule page, the Fixed Assets Analysis tab is displayed by default.
- Review the information in the Account Balances panel.
- Click Add New Record to insert a new line in the grid.
- Click the X at the start of the row to delete the row.
- Click Save. Or, click Cancel to discard your changes.
- In the Cost Adjustments panel, click Add New Record to insert a line for an adjustment type, if necessary.
- Click the X at the start of the row to delete the row.
- Click Save. Or, click Cancel to discard your changes.
- In the Cost Totals and Differences panel, review the information.
- Select the Override checkbox, if necessary.
- Click Save. Or, click Cancel to discard your changes.
- Click the Supplies Analysis tab. As with the Fixed Assets Analysis tab, you can add, edit and delete information as needed.
- Click Previous to return to the Maintain Audits screen.
- Click Close to end the task.
-
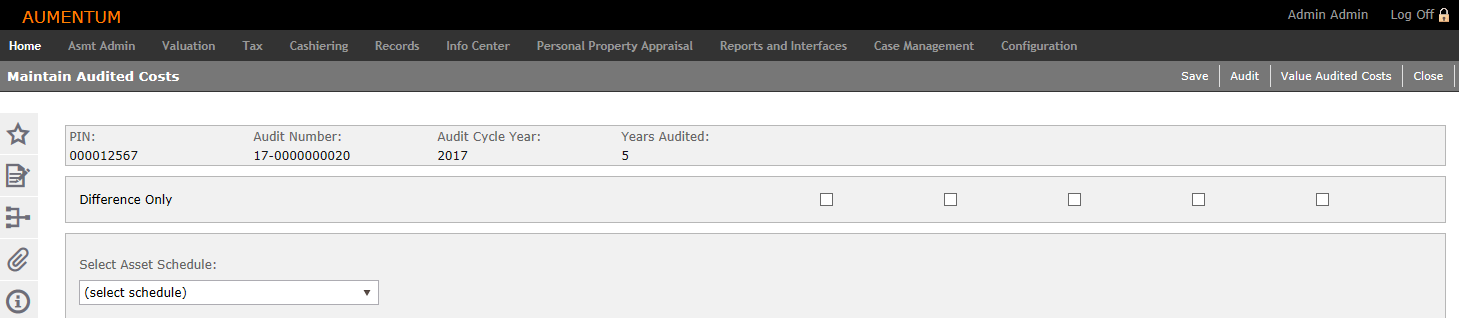
On the Maintain Audited Costs screen, make a selection from the Select Asset Schedule drop-down list.
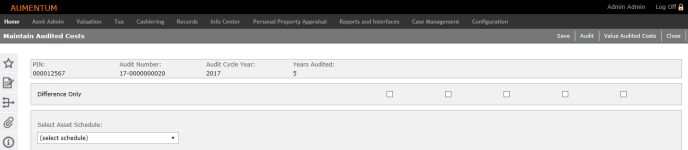
-
Select the Difference Only checkbox to show differences in the calculated results.
-
Click + Add new record in the panel header.
-
Enter the acquisition year (Acq Year), disposal year (Disp year), acquisition cost (Acq Cost), description.
- Select the O/R checkbox to specify original equipment.
-
Click Save in the Command Item bar. Repeat these steps for each item you want to add.
- Click Value Audited Costs in the Command Item bar.
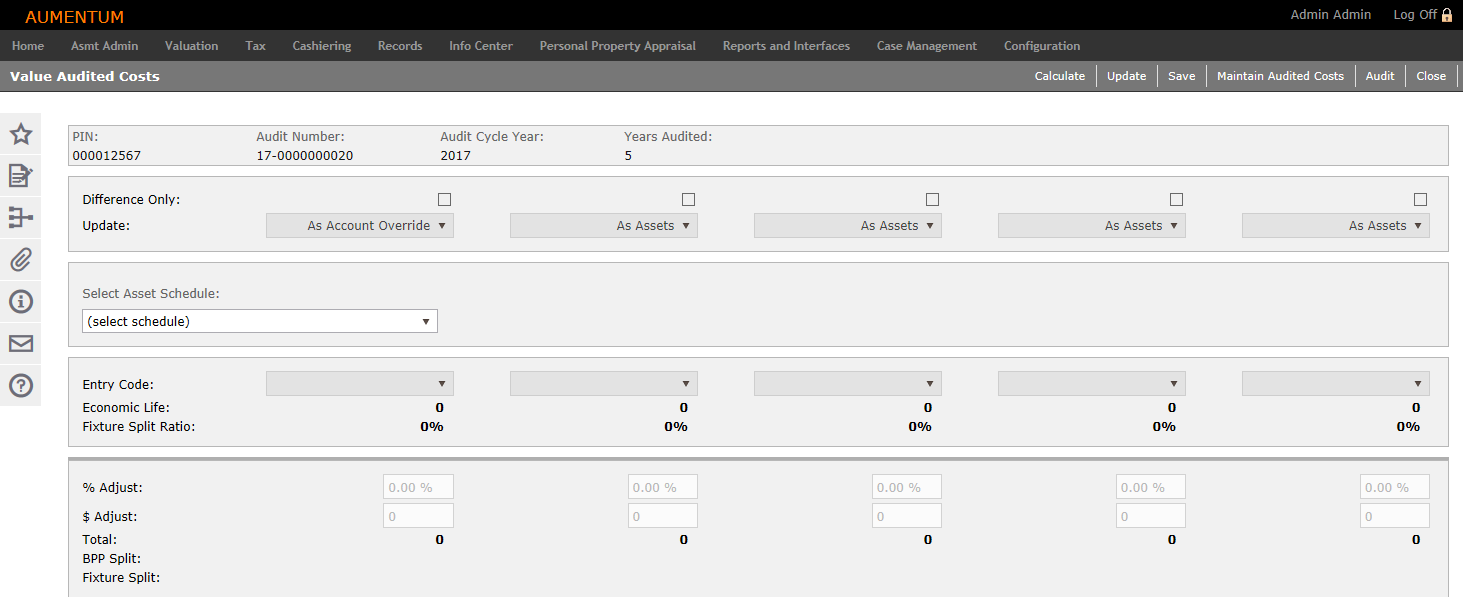
- On the Value Audited Costs screen, make a selection from the Select Asset Schedule drop-down list.
- Select the Difference Only checkbox to show differences in the calculated results.
- Make selections from the Entry Code drop-down lists as applicable to the selected Asset Schedule.
- Click Save.
- Click Calculate to generate the values.
- Click Update to apply the newly calculated values to the asset schedule and asset.
- Click Maintain Audited Costs to return to the Maintain Audited Costs screen.
- Click Audit to return to the Maintain Audits screen.
- Click Close to end the task.
Cost Analysis
This is the first step for an auditor when analyzing the tax payer's filing.
Asset Details
Auditors can use this screen to re-create the return and determine whether or not the reported costs are correct. You can classify equipment to schedules or other groupings. Equipment classification and grouping is an essential component of the audit process, especially if the taxpayer had erroneously classified equipment on the annual filings.
AV Difference
AV Difference page has validation for the fields 'Assessed Value Difference Totals' and Remarks
Notes tab
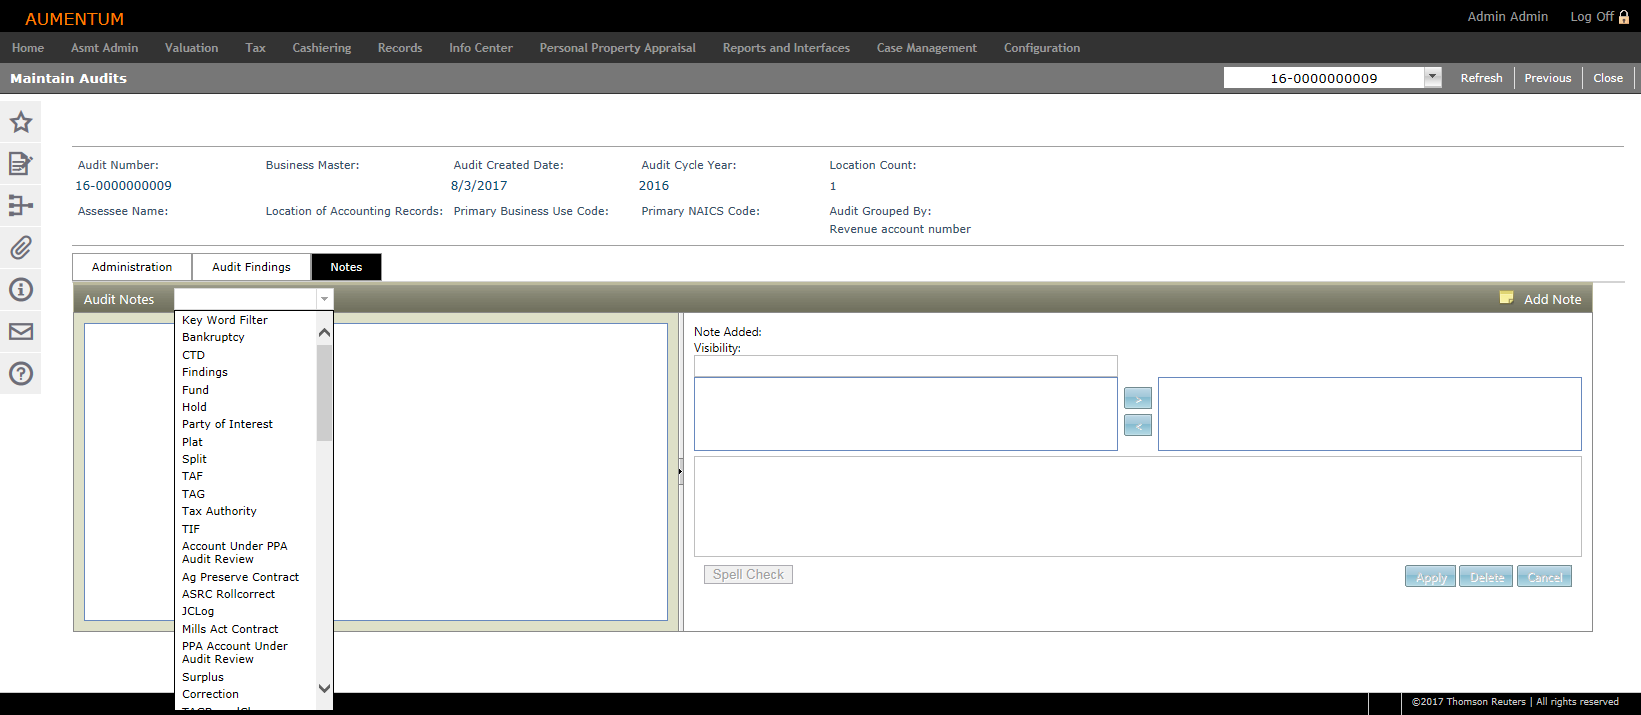
-
Select a keyword from the Audit Notes drop-down list.
NOTE: The Aumentum Implementation team set up keywords, which may be unique for each jurisdiction. -
Define the visibility for each note, either Private use or Public use and then click the right or left arrows to move the note in the applicable use column.
-
Type the note content and click Spell Check, if desired.
-
Click Apply to include the note in the audit record.
-
Click Delete to remove an existing note.
-
Click Cancel to discard the note.
Modifier Update
(This is the Drop-down text)
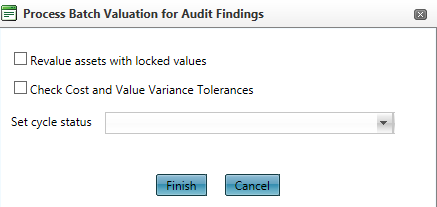
Valuation
Opens the Process Batch Valuation for Audit Findings dialog.
- click Add.
- Enter a PIN and click Apply.
- Click here to learn about PIN messages and warnings
- If the PIN is already part of the audit, the error message "The PIN entered already exists for the audit" appears at the top of the header area and the row is not added.
- If the PIN is invalid, the error message "The PIN entered is not active for the audited tax years" appears at the top of the header area and the row is not added.
- If the PIN does not exist for any of the audited years, the error message "The PIN entered is not active for the audited tax years" appears at the top of the header area and the row is not added.
-
If no value is entered, the error message "The PIN entered is invalid" appears at the top of the header area and the row is not added.
-
If the PIN is included in another audit, the error message "The PIN entered is included in another audit within the audited tax years" appears in the header area and the PIN field is left blank.
Dependencies, Prerequisites, and Setup
Depending on your jurisdiction and setup, security is available for two fields on the Maintain Audits screen:
-
Estimated Preparer Completion Date
-
Estimated Total Project Hours
To set security for these:
-
Click Configuration > Security and User Maintenance > Roles > Maintain a Role.
-
Click Edit on the particular role to advance to the Edit Role Details screen.
-
In the Granted Menu items panel click the Expand (+) button preceding Personal Property Appraisal to drill to Audits > Audit Administration > Maintain Audits.
NOTE: If Personal Property Appraisal is not in the Granted Menu Items panel, select it from the Available Menu Items panel and click Add Selected to move it to Granted Menu Items.
-
Select the following and set the rights as applicable for the role.
-
rdpAudEstCompletion (Estimated Preparer Completion Date)
-
rtbEstTotalHours Estimated Total Project Hours)
-
Click Save and Close.