Assets
Navigate:  Personal Property Appraisal > Assets
Description
Maintaining asset information and calculating asset values is the crux of the Aumentum Personal Property Appraisal (PPA) module. Most of the tasks users perform pertain to asset maintenance.
An asset is any owned physical object (tangible) or right (intangible) having value; a source of wealth, expressed in terms of its cost, depreciated cost, or some other value. In Aumentum, each personal property account equates to a revenue object. The revenue object may have one or many assets associated with it. The value of each asset is summed to provide the total revenue object value.
Steps
- On the Search for Assets screen, enter your search criteria and click Search.
- Click Configuration > Security and User Maintenance > Users.
- On the Select or Add a User screen, find your Login Name and click Edit.
- On the Maintain User Information screen, scroll to the Default Tax Year preference and enter your preferred year.
- Click Save in the Command Item bar.
- Click Close to end this task.
- Click Configuration > Application Settings.
- On the Maintain
Application Settings screen, select Effective Date from the
Setting type drop-down list, and select Personal Property from the Filter by module drop-down list. - Locate Personal Property Class Type and click Edit.
- In the Setting Value field, make a selection from the drop-down list and click Apply.
- Click Save in the Command Item bar.
- Click Close to end this task.
- Click Configuration > Systypes.
- On the Select Systype screen, enter or select an Effective date.
- In the Systype Category drop-down list, start typing Personal Property Class Codes and click to select it. In the grid, click on the systype to open it.
- On the Edit a Systype screen, select the checkbox for each systype you want to include from the Associated Systypes panel.
- Click Save in the Command Item bar.
- Click Close to end this task.
- In the Search Results panel, click to select an item in the grid.
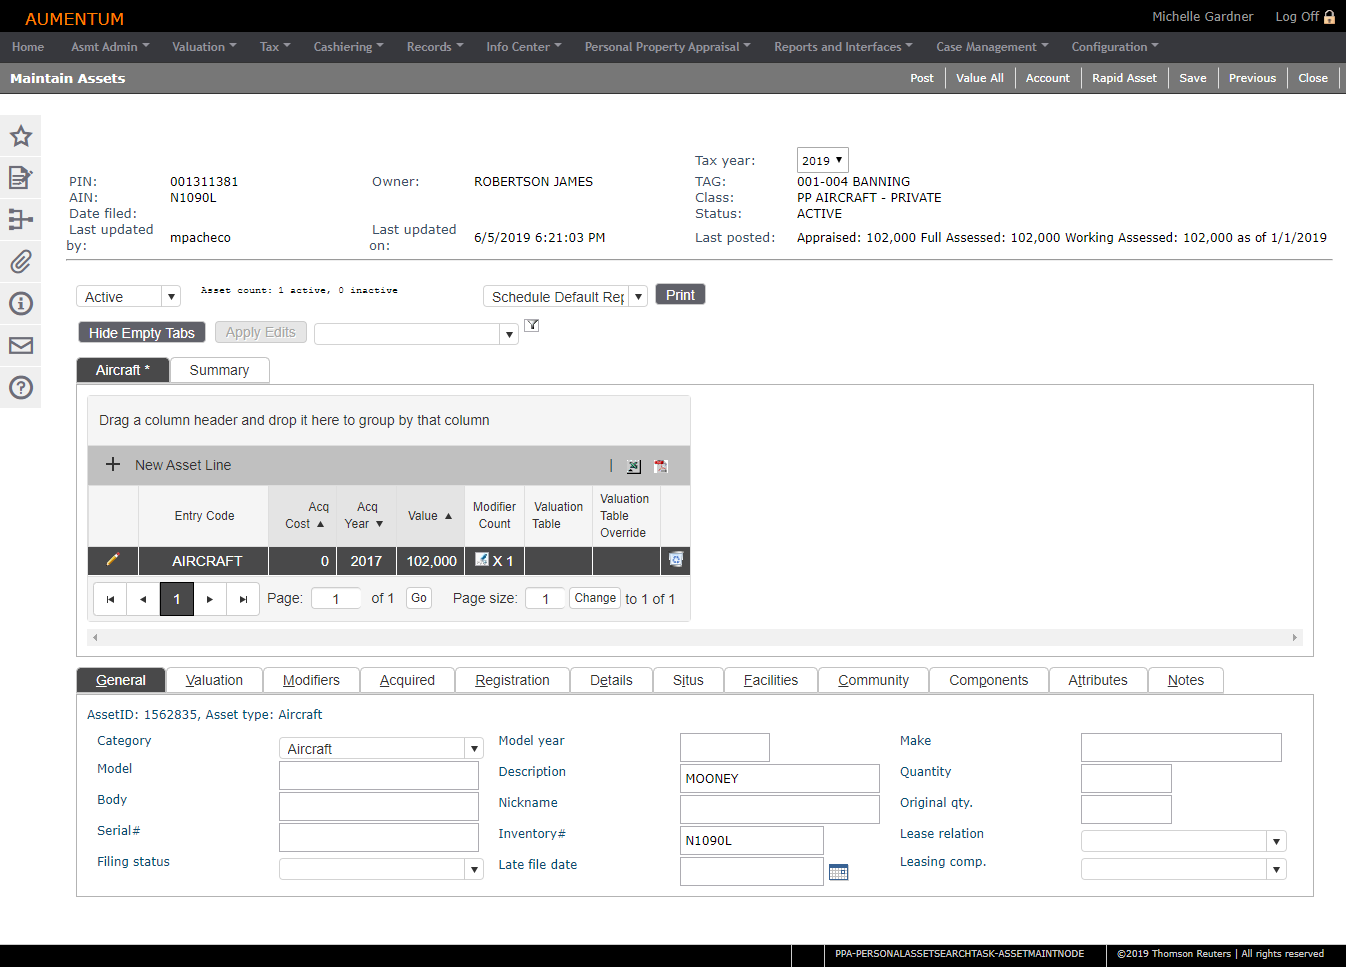
- On the Maintain Assets screen, you can:
-
Flags – Flags indicate conditions such as bankruptcy or NSF (non-sufficient funds). Different flag colors are used to denote different priorities, such as red (critical), yellow (high), blue (medium), and green (low). Up to five flags can display in the header area of the personal property screens. Click on a flag to open the Tax Detail screen where you can click Common Actions > Manage Flags to view, add, remove, activate, and inactivate the account's flags.
-
PIN – The unique identifier of the filing revenue object.
-
AIN – The alternate identifier number, if available.
- Date Filed – The last date the owner filed a return for the account.
- Last Updated By – The user who last updated the record.
- Owner – The name of the legal party who owns the personal property.
- DBA, AKA, FKA – If defined and if applicable to the account type, the Doing Business As (DBA), Also Known As (AKA), or Formerly Known As (FKA) is displayed below the owner name.
- Business name
- Last Updated On – The date that the most recent user last updated the records.
- Tax Year – Corresponds with the year you entered on the Search
for Assets screen. You are viewing the account information for
the year specified in this field; however, you can
select a different tax year from the drop-down list.
IMPORTANT: The Tax Year field is security enabled; your user role must include privileges to set this field. Your Admin typically assigns user roles. -
TAG – The tax authority group to which the account belongs. TAGs are specific to your jurisdiction.
NOTE: When a TAG is unassigned, the field displays Unassigned TAG in red.
-
Class – Class codes are used to group or categorize revenue objects and are specific to your jurisdiction. They are maintained in the Revenue Object Sub-Type systype.
- Status – The status of the account, active or inactive.
-
Last Posted – The account's appraised value at the time of the tax year you are viewing (see Tax Year field). The appraised value is the the sum of all associated asset values.
NOTE: When an asset or account has never been posted, the Last Posted field displays Account has never been posted.
-
Asset status drop-down list – Active is the default.
-
Asset count – Shows the number of active and inactive assets.
- Report selection drop-down list and Print button – May not be available in your jurisdiction. Select a report and click Print.
-
Hide Empty Tabs/Show Empty Tabs – Hides or displays tabs that have no information.
NOTE: Tab names are customized by your Aumentum Implementation team to accommodate your jurisdiction's requirements.
Click here to learn how to set a Hide/Show default
Click Configuration > Security and User Maintenance > Users.
On the Select or Add a User screen, locate your name and click Edit.
On the Maintain User Information screen, locate Asset Schedule Tabs Default Display in the Preference column and make a selection from the drop-down list.
Click Save, then click Close.
-
Apply Edits – Applies the action selected from the drop-down list to the right.
NOTE: When updating assets, select all assets to be changed, and then select an action from the drop-down list. Depending on your selection, a pop-up where you define further data.
-
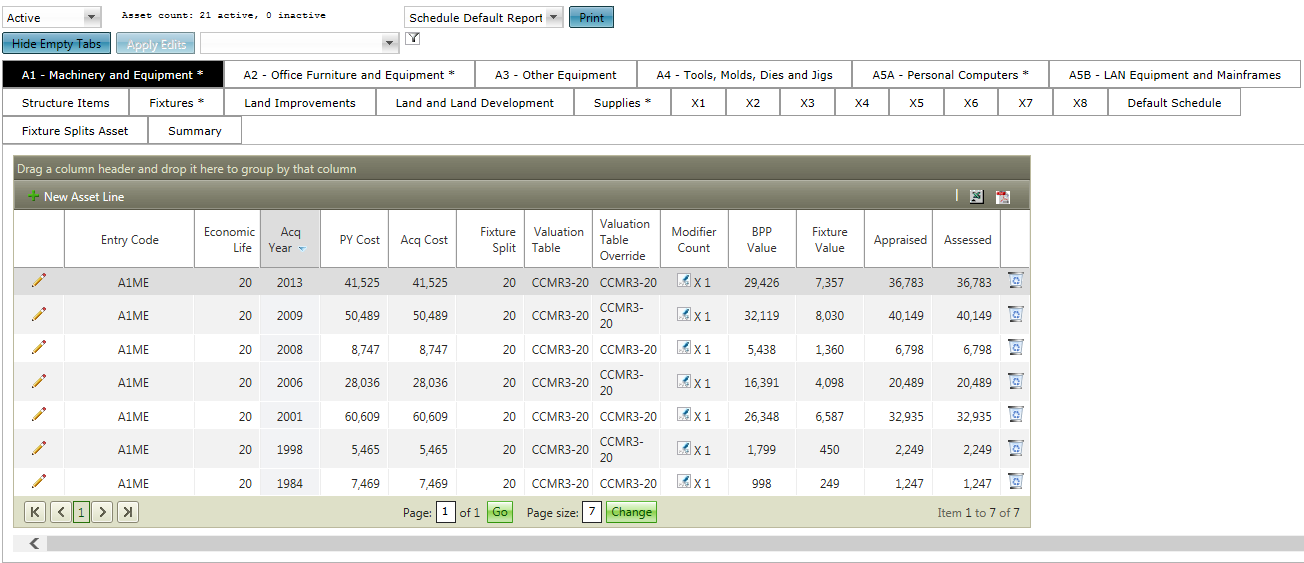
Click on the column header name to sort all rows by that header.
-
Click to the right of the column header name until the cursor changes to arrows and hover help says Drag to group or reorder. Move the entire column header name right or left to change the column sort order.
-
Click and drag a column header to the top of the grid (above the New Asset Line button) to group by the selected column. The column you select is displayed at the top.
-
While grouped, you can collapse groups by clicking on the down arrow to collapse that particular group and display the remaining groups.
-
Click and drag the column heading back to the grid to remove the grouping.
-
Click New Asset Line.
OR
Press Ctrl+Y on your keyboard to highlight the New Asset Line panel, then press Ctrl+I to insert a new line.
-
Make a selection from the Entry Code drop-down list.
OR
Start typing an entry code, and press Enter when it is highlighted in the drop-down list.
-
Click in each of the fields then enter the necessary information.
OR
Use Tab on your keyboard to advance to the next field.
-
Click the green check mark to insert the new asset row, or click the red X to cancel.
OR
Press Enter on your keyboard.
-
Click the Pencil icon on the asset row you want to edit.
-
Edit the fields as needed.
-
Click the green check mark to update.
NOTES: When the Assets are re-valued, the Appraisedand Assessed fields are updated for the account. If an asset cannot be saved or valued, ensure that no fields are blank, or that the valuation schedules are defined for the Tax Year being processed. These exceptions are included in the Confirmation Detail Report.
-
Click Save.
-
Select the asset Category. The list of asset categories corresponds to those categories configured for your jurisdiction and are based on the class code of the personal property account. Only those asset categories applicable for the current account display for selection. Example categories are motor vehicle, aircraft, business personal property, watercraft, and mobile home. Asset category information can be viewed or edited on the Maintain Asset Categories screen.
-
Select or enter information as necessary.
-
Click Apply Edits to apply the edits to the general details for the particular asset.
NOTE: The Apply Edits button is disabled unless there are multiple asset rows in edit mode. -
Click Save to save the asset information.
- Valuation data from the ABOS Marine Blue Book can be imported
and interfaced with marine personal property data for the purpose
of cost estimating. Aumentum uses taxpayer responses from Form
576-D as criteria to search attributes in ABOS data and uploads
the data into established Aumentum tables. ABOS Marine Blue Book
data is imported into Aumentum via ABOS Import. A valuation method
was created for ABOS Marine Blue Book valuation data that is imported
into Aumentum. Valuation of watercraft assets is determined in
Aumentum by looking up the values in the previously imported ABOS
tables. After import, Aumentum Personal Property Appraisal uses
vessel characteristics specific to Form BOE-576-D to look up the
appraised value in the ABOS tables. Because the ABOS data resides
in different tables based on boat type, seven unique valuation
types were created, one per major boat class for the purpose of
retrieving the appraised value. Category types include: 1.) BT
(boat trailers), 2.) IO (stern drive boats); 3.) OB (outboard
boats); 4.) OM (outboard motors); 5.) PH (pontoons/houseboats);
6.) PW (personal watercraft), and 7.) SB (sailboats). Any items
not processed are indicated with an error in the Confirmation
Detail report.
The Valuation tab shows value levels for ABOS of MSRP (Manufacturer's Suggested Retail Price), Low, High, and Retail, and whether the valuation was adjusted for a trailer. The Components tab of the Maintain Assets screen shows the details of trailer adjustment, if any. In addition, a new systype called Boat Trailer Adjustment (systype category of Component code) was created for the purpose of displaying trailer information on the Maintain Assets screen. - Setup: Go to Personal Property Appraisal > Setup > Value Methods > Maintain Value Methods. Click New (lower half of screen) and select the type from the Type drop-down field in the Value Method panel. A Value Level drop-down displays. Selection options reflect value levels as indicated by ABOS for a given vessel, representing varying levels of trade, including 1.) Manufacturers Suggested Retail Price, 2.) Low range of used trade-in/wholesale price, 3.) High range of used trade-in/wholesale price, and 4.) Average resale/retail price. An additional panel called ABOS Options displays with selections of Value Type and Trailer value adjustment with the ability to select either: 1.) Do not consider trailer (default)(Ignore ABOS trailer values in determining Aumentum value); 2.) Exclude trailer (Trailer value should always be excluded from vessel’s assessed value); 3.) Include trailer (Trailer value should always be included in vessel’s assessed value). The selection determines whether a trailer value is considered in determining vessel assessed value. Go to Configuration > Systypes > Select or Add a Systype. Select the systype category of Component code. Set the Effective Date. Click on the Boat Trailer Adjustment systype to navigate to the Edit a Systype screen and define the details as applicable.
-
Click the Valuation tab.
-
Select the Do not revalue checkbox if you do not want the property revalued.
-
Select the Roll appraised checkbox only when the asset is being valued using the valuation type of Value Basis, Less Depreciation (ValueBasisLD). When selected, a new value basis is set for an asset based on the prior year appraised value. When not selected, the value basis is set to zero.
-
Select the Value method. This identifies the valuation method used to calculate the asset value.
NOTE: The methods that display for selection are dependent on the asset category you select. When the asset category is configured, one or more valuation methods are selected for the category. If more than one method is configured, the order in which the methods are executed is also defined. This list and order of processing is represented by the Configured option, which is the default. You can use the default or select a different method. -
Select the Industry code. This may not apply to your jurisdiction. This code is set up and maintained on the Maintain Value Schedule screen.
-
Select the asset Use Class, such as business, personal, or exempt (required) from the drop-down list. This field is required. The list of values that displays for the user are maintained in the systype, PPA-Asset Use Class.
-
Enter a Value basis.
-
Select the Recommended Maximum Override checkbox to use the maximum override defined.
NOTE: The ability to establish the maximum equipment index factor used to value equipment is available to accommodate the Recommended Maximum Index Factor if the age of the asset is greater than its economic life. The formula is as follows: 1.) If the age of the asset > economic life, then multiply the economic Life by 125% to find the computed age; 2.) If the age of the asset > computed age, then use the computed age against the normal value factor table to determine the factor; and 3.) If the age of the asset < computed age, then use the age against the normal value factor table. A new Recommended Maximum Factor application setting with the default of 1.25 was created to define the factor. This checkbox, when checked, overrides the recommended maximum override; a Computed Age column was added to the asset grid Summary panel to show the computed age. Setup: Go to Configuration > Application Settings > Maintain Application Settings. Select the setting type of Effective Date and the filter by module of Personal Property Appraisal. Click Edit on the Recommended Maximum Factor application setting and set as applicable. -
(Kansas only): For 16/20M truck valuation, select the State value code from the drop-down list, which contains State Value Code systypes. The systype is customer-specific, so the field remains empty if not used in your jurisdiction or if you do not use the Kansas 16/20M truck valuation method.
-
Select the Valuation Code, for example, Exempt, Industrial, Oil & Gas, etc.
-
Enter the asset Retail cost when new (RCWN). This field is only required for assets that are valued using the Retail Cost When Established, Less Depreciation (RCWELD) valuation type. If any other valuation type is used to value the asset, this field is informational only.
-
Enter the asset Replacement cost new (RCN). Currently, this is informational only.
-
Enter a numeric value in the Economic life field to define the economic life of the asset.
-
The Full Appr (full appraised) value, Working Appr (working appraised, the amount including any overrides or prorated amounts) value, the Valuation Method, and the Percent Good display after valuation has occurred for the asset.
-
Assign a Fixture split ratio to a property statement schedule. Assets that qualify are based on preconfigured criteria. The fixture split percentage can be manually edited on the individual account as necessary. Default property statement schedule factors, economic life, and fixture split can be set based on business type fixture split ratio.
NOTE: Fixture split ratio may not apply to your jurisdiction. The ability to assign a fixture split ratio to a property statement schedule is available. Assets that qualify are based on preconfigured criteria. The fixture split percentage can be manually edited on an individual account if necessary. Default property statement schedule factors, economic life, and fixture split can be set based on business type. To accommodate this, the Maintain Asset Categories screen includes a Fixture Split Ratio field for the purpose of entering the fixture split ratio percentage. This value can be overridden on the Maintain Assets screen. The Maintain Assets screen includes a Split Ratio column that shows the split ratio percentage; and the Valuation Tab includes a Fixture Split Ratio field for defining the ratio (1 to 100), an Economic Life field for defining the economic life, and a Valuation Method field for displaying the valuation method.
SETUP: A parent asset can have 1 or no child assets. To define the child asset category, go to Configuration > Application Settings > Maintain Application Settings. Select the setting type of Effective Date and the filter by module of Personal Property. Click edit on the Fixture Split child asset category Id application setting and enter the asset category ID number for the fixture split child. When creating the split ratio asset, the new asset's values are based off of the Cost of the Input Asset and the F/S Ratio.
The Personal Property Appraisal Fixture effective date boolean application setting Fixture Split Enabled displays fixture split asset data in the Fixture Split Summary Group field on the Valuation tab when set to True if the asset category is also configured as fixture split. Also, when fixture splits are enabled, depending on your jurisdiction, additional account level override fields display. -
Disabled until Override Type is selected
-
Contribute to Override Appraised Total field
-
Represents total of all Component Override Appraised fields
-
Formatted as numeric, read-only field
-
Check the Value Override checkbox to override the calculated value, select the Reason for the override from the drop-down list, and enter the Override Amount.
NOTE: if there is a prorated amount, it is displayed in the Prorate amount field.
NOTE: The list of reasons is a systype category called PPA-Asset Appraised Override Reason that you can maintain. Set this up via Configuration > Systypes > Select or Add a Systype. Set the effective date and select the systype category of PPA-Asset Appraised Override Reason. Click any of the existing systypes to edit them or click New to create a new systype for the systype category on the Edit a Systype screen.
NOTE: The asset’s appraised value is updated in the asset tree, and the total appraised and prorated amounts are also updated in the year summary line for the account. Additionally, the account's working appraised and working assessed fields are updated on the Maintain Personal Property Accounts screen.
- Check the Prorate Override checkbox and enter the proration Duration in months to override the proration. When checked, the duration entered is used instead of the date to calculate the prorated value.
-
Click Apply Edits and Save (top of screen).
IMPORTANT: The default is unchecked for a new asset, which means the proration duration is calculated from the first established date and disposal date. The prorate fields are grayed out for assets that cannot be prorated, which is based on the Asset Category. If a Prorate Method is selected on the Asset Category, the asset can be prorated. Click Save. The same rule for calculation now applies for batch valuation and for any imports that calculate values that require proration. If an override proration duration is entered, the program does not check the first established date, and an error is displayed if it is missing. -
With an asset already selected (highlighted) in the grid row, click the Modifiers tab.
-
Click New Modifier Definition, or click the Pencil icon to edit an existing modifier.
-
Make a selection from the Modifier drop-down list.
- Enter or select information for the other fields.
-
Click the green check mark to update the modifier, or click the red X to cancel the edits without saving.
-
Click Save in the Command Item bar.
-
If applicable, enter a Related Asset Id or click Search to open the Search for Assets screen. When your search is complete, you return to this screen automatically and the field is populated with the Related Asset Id.
-
Enter a Property Description and an Additional Description.
-
Click Apply Edits, then click Save.
-
Enter or select the acquired date. This is the date the owner acquired the asset and must be within the last 30 years. Future dates are not allowed.
-
Enter or select information for the other fields.
- Click Configuration > Systypes.
- On the Select or Add a Systype screen, set the effective date and select PPA-Asset Acquisition Type from the Systype category drop-down list.
- Click on an existing systype or click New to open the Edit a Systype screen.
- Edit or enter a short description and description, specify a display order for the drop-down list, and select the checkbox to make the item selectable.
- Click Save in the Command Item bar.
-
Enter or select the First est. date, which is used for proration and to determine the number of months or days for proration. It is required for all prorated assets.
-
Enter or select the Moved in date, which is the date the asset came into your jurisdiction. Typically, the established date and the moved in date will be the same. Currently, this field is informational only and can be left blank.
-
Enter the acquired hours, which is typically used for assets that involve machinery.
-
Enter the asset miles, if applicable for a motor vehicle.
-
Click Save in the Command Item bar.
- Click Configuration > Application Settings.
- On the Maintain Applications Settings screen, select Effective Date from the Setting type drop-down list, and select Personal Property from the Filter by module drop-down list.
- Locate DMV - Realtime transmittals enabled and click Edit.
- Select the checkbox in the Setting Value column to set the value to True (the Personal Property Appraisal module sends the transmittal when it is created).
- Click Apply.
- Also, locate DMV Shared Secret and click Edit to define the DMV Web Service password.
- Click Apply.
- Click Save in the Command Item bar.
- Enter the registration number and date.
- Enter or select information for the other fields.
- Click Configuration > Application Settings.
- On the Maintain Application Settings screen, select Effective Date from the Setting type drop-down list, and select Personal Property from the Filter by module drop-down list.
- Locate Origin Code - Required and click Edit.
- Select the checkbox in the Setting Value column to set this item to True, then click Apply.
- Click Save in the Command Item bar.
- Locate Origin Code - Default and click Edit.
- Make a selection from the drop-down list. then click Apply.
- Click Save in the Command Item bar.
-
Enter the Height, Width and Length (feet and inches).
NOTE: The unlabeled text box to the right of the Length field is for inches (e.g., for boats). Click Calc to calculate the unit quantity, which is then displayed in the Unit Qty field. The label for unit quantity may differ, depending on the unit of measure selected for the asset category.
- Enter or select information for the other fields.
-
Select the Disposed date and Disposed type fields when the owner sells or scraps the asset, or if the asset moves out of your jurisdiction.
-
Make a selection from the Active BEL drop-down list. BEL (Basic Equipment List) is a term used in certain jurisdictions that include business personal property assets in accounts.
-
Click Save in the Command Item bar.
-
Click Search to open the Search for Situs Address screen.
-
Enter your search criteria and click Search.
- As needed, click Add as Situs.
-
Click Finish in the Command Item bar.
-
Make a selection from the Located group type and Located at drop-down lists.
-
Enter the block and lotnumber.
-
Click Save in the Command Item bar.
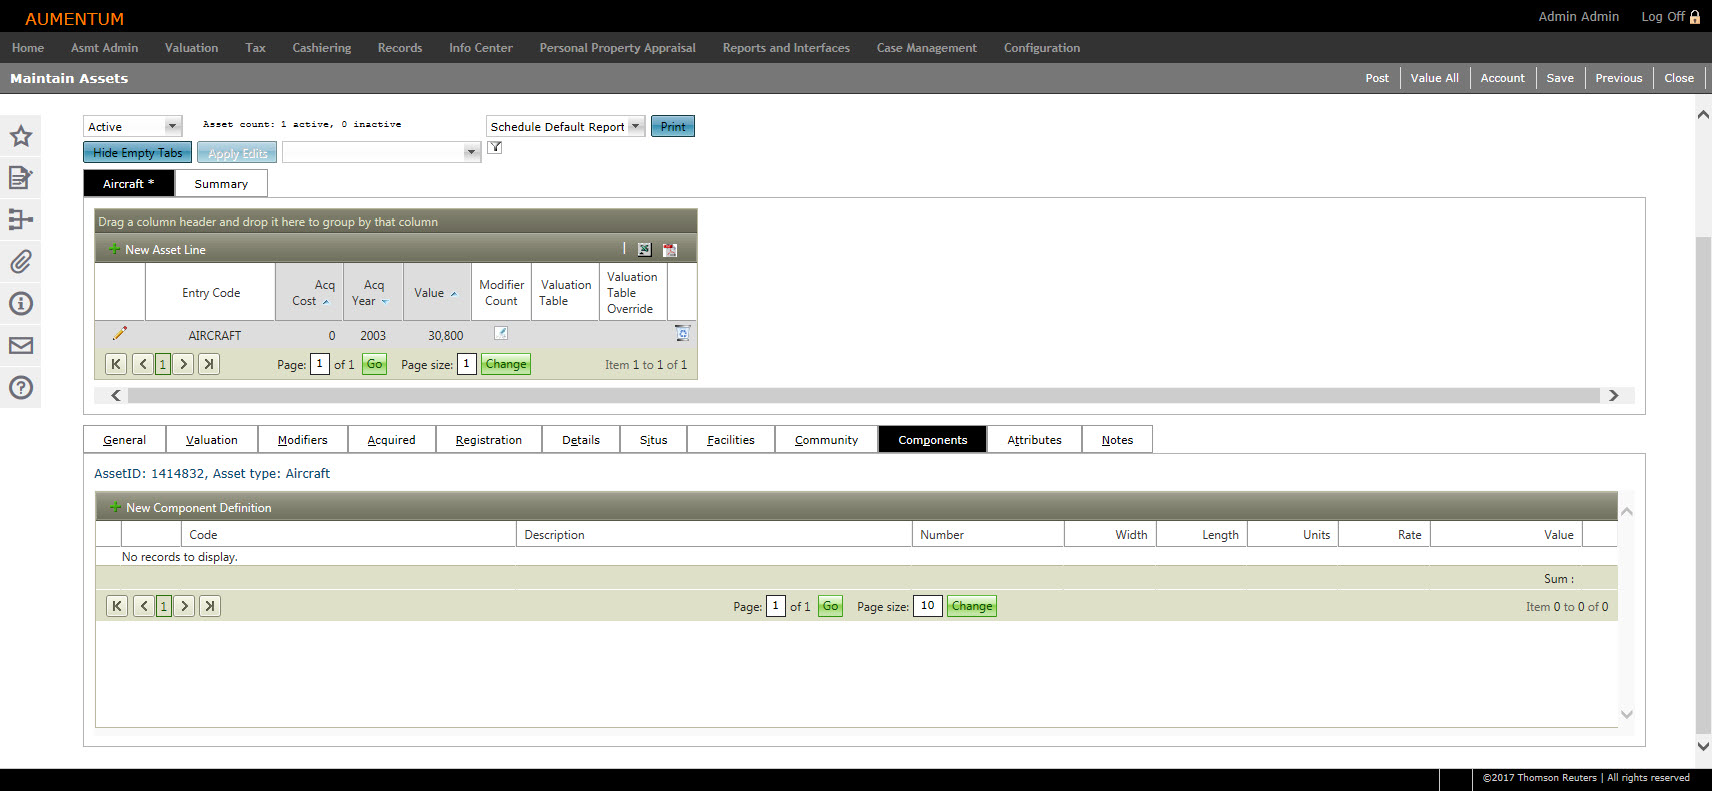
-
Click New Component Definition, or click Edit to open an existing component.
-
Make a select from the Code drop-down list.
-
Enter a description of the component.
-
Enter the component number, which can be used to uniquely identify the component.
-
Enter the width and length dimensions of the component.
-
Enter the units, such as the quantity, component total square feet, a fixture #, or something meaningful that applies to the component.
-
Enter the rate, which is typically a cost value per unit.
-
Enter the value, + or -, of the component. This would be the value added or subtracted from the overall value of the manufactured home. It could even be zero.
-
Click Apply to save your changes.
-
Click Cancel to close the editable fields without saving.
-
Click Delete to remove the component.
-
Click Edit to modify an existing component.
-
Repeat the previous applicable steps for each asset component you want to add to the asset.
-
Enter the total value of all components in the Total component value field.
-
Click Apply Edits.
-
Click Save.
-
Enter or select the action date. The note you create is added to the account or asset as of this date.
-
Enter the text for your note in the Note Text field.
-
Make a selection from the Privacy type to define the availability of the note contents based on user security.
-
Optionally, select up to three keywords to associate with the note.
- Make a selection from the Filter notes by keyword drop-down list.
-
Click Save in the Notes panel and in the Command Item bar.
- Click Configure > Security and User Maintenance > Roles.
- On the Maintain a Role screen, click Edit for a role.
- On the Edit Role Details screen, click Personal Property Appraisal in the Available Menu Items panel and click Add Selected.
- Click Save in the Command Item bar.
- In the Granted Menu Items panel, click Personal Property Appraisal > Assets > Details.
- On the Edit Additional Role Details screen, in the Details panel:
- Click Maintain Assets > btnPassValue
- Click Maintain Assets >rcbValSource
- Click Maintain Assets > rcbValStrata
- In the Rights panel, select the checkbox for each applicable item and click Set Rights.
- Click Save in the Command Item bar.
- Click Close to end the task.
-
Click Value All to calculate a value for the account. Messages display at the top of the screen to indicate if the account was valued successfully. An appraised value is calculated for each asset, and the year summary line and asset lines are updated in the asset list.
-
On the View Post Personal Property Values screen, enter or select the effective date of change in the Post Personal Property panel.
-
Make a selection from the Reason drop-down list.
- Select the checkbox for one or more items in the Statutory References panel.
- Add notes, if desired.
-
Click Post. A Completed Successfully message displays when posting an account to indicate posting was successful and complete.
-
If the account being posted is a motor vehicle, the On-Demand Summary page displays. If the account is not a motor vehicle, the value conclusion is posted and made available to the Aumentum Assessment Administration (AA) module. When posting is complete, a Posting successful message displays at the top of the screen.
-
Click Previous to return to the Maintain Personal Property Accounts screen or Maintain Assets screen.
-
The ability to assign a fixture split ratio to a property statement schedule is available. Assets that qualify are based on preconfigured criteria. The fixture split percentage can be manually edited on an individual account if necessary. Default property statement schedule factors, economic life, and fixture split can be set based on business type. To accommodate this, the Maintain Asset Categories screen includes a Fixture Split Ratio field for the purpose of entering the fixture split ratio percentage. This value can be overridden on the Maintain Assets screen. The Maintain Assets screen includes a Split Ratio column that shows the split ratio percentage; and the Valuation Tab includes a Fixture Split Ratio field for defining the ratio (1 to 100), an Economic Life field for defining the economic life, and a Valuation Method field for displaying the valuation method. You can also:
-
Allocate the assessed value for certain classes of business personal property between resulting BPP value and Fixture value.
-
Override the otherwise determined fixture allocation on individual assets, and the fixture value as a whole, when overriding the full account value.
-
The Components tab is used to define aircraft components. The systype of Aircraft Component (Configuration > Systypes) was created for selection for this purpose to define aircraft components.
-
A REVIEWPERSONALACCOUNT workflow is generated for the particular personal property account when you set a Review Flag on the account. To set this up:
-
First create a flag via Configuration > Flag Setup. Enter a flag description, such as Review Property Statement. Save.
-
Next, select the flag via Configuration > Systypes > Select or Add a Systype.
-
Enter the Effective Date and select the Systype Category of Flag Type.
-
Select the Flag Type (the flag you created), and select the Associated Systypes grid checkbox. Save.
-
Open the particular Personal Property Account to which you want to apply a review flag and generate a workflow via Personal Property Appraisal > Accounts > search/select account > Maintain PPA Accounts.
-
Use the Manage Property Flags Common Actions from the left panel on the Maintain PPA Accounts screen to apply the flag you created to the account. Save.
-
If you have the applicable rights, first set the workflow item to the appropriate queue by clicking the Details active text on the item in the workflow.
-
Select the applicable queue from the Queue drop-down list.
NOTE: The queues available are specific to your jurisdiction.
-
If you are the individual who reviews and approves the account, the workflow item is then available in your queue and upon selection, you navigate to the Maintain PPA Accounts screen. Actions you can perform on the screen include:
-
Roll Account
-
Deactivate/Reactivate (account)
-
Post (account)
-
Save (account)
-
Assets (to navigate to the Maintain Assets screen)
-
Close (after Save if any changes are made to the account)
-
-
Valuation data from the ABOS Marine Blue Book can be imported and interfaced with marine personal property data for the purpose of cost estimating. Aumentum uses taxpayer responses from Form 576-D as criteria to search attributes in ABOS data and uploads the data into established Aumentum tables. ABOS Marine Blue Book data is imported into Aumentum via ABOS Import.
-
A valuation method was created for ABOS Marine Blue Book valuation data that is imported into Aumentum. Valuation of watercraft assets is determined in Aumentum by looking up the values in the previously imported ABOS tables.
-
After import, Aumentum Personal Property Appraisal uses vessel characteristics specific to Form BOE-576-D to look up the appraised value in the ABOS tables.
-
Because the ABOS data resides in different tables based on boat type, seven unique valuation types were created, one per major boat class for the purpose of retrieving the appraised value. Category types include:
-
BT (boat trailers)
-
IO (stern drive boats)
-
OB (outboard boats)
-
OM (outboard motors)
-
PH (pontoons/houseboats)
-
PW (personal watercraft), and
-
SB (sailboats).
-
Any items not processed are indicated with an error in the Confirmation Detail report.
-
The Maintain Assets screen (Personal Property Appraisal > Assets > Search/select asset(s) > Maintain Assets) shows value levels on the Valuation tab of MSRP (Manufacturer's Suggested Retail Price), Low, High, and Retail, and whether the valuation was adjusted for a trailer.
-
The Components tab of the Maintain Assets screen shows the details of trailer adjustment, if any. In addition, a new systype called Boat Trailer Adjustment (systype category of Component code) was created for the purpose of displaying trailer information on the Maintain Assets screen.
The tax year defaults to the year specified by the personal property functional calendar.
Click here to learn how to set your own tax year preference.
Click here for information about some of the search criteria available.
Asset Id – Aumentum automatically assigns a unique Id when an asset is added to a personal property account. If you enter a partial asset Id, a list of search results is displayed; however, if you enter the full asset Id, the Maintain Assets screen opens.
Status – Specify active or inactive.
Description – Enter a whole or partial description of the asset.
Identifier – Identifiers are user-defined for your jurisdiction. An example is a vehicle identification number (VIN), which is often an asset identifier for motor vehicle assets. Enter the VIN number in the identifier field, and select VIN in the Type field.
Type – Displays active asset identifiers that were previously defined on the Maintain Attributes screen.
Sum grp – A summary group is a reporting classification for the asset. This drop-down list is maintained in the PPA-Asset Category Summary Groups systype.
PIN and Status – You can enter only a portion of the PIN and use the status field to narrow the search.
Category – Asset categories are configured on the Maintain Asset Categories screen. Example asset categories include motor vehicles, recreational vehicles, trailers, boats, aircraft, mobile homes, and business property. Each jurisdiction defines its own asset categories during implementation.
AIN – The alternate identification number uniquely identifies the asset, similar to the PIN. You can enter a portion of the AIN.
Lease RefNmbr – Lease Reference Number may not apply to your jurisdiction
Class code – All assets with the selected class code are displayed in the search results. NOTE: You must specify an application setting and systype for Class Codes; otherwise, an error is displayed when you perform a search.
Click here for Application Setting information
Click here for Systype information
Legal Party Name – Enter the asset owner legal party name, which is defined when setting up the legal party in the system. You can enter all or a part of the first or last name. NOTE: If you use both a last name and a first name in your search, enter the name exactly as it was created in Records Legal Party Maintenance. A legal party in Aumentum Records is also referred to as an owner.
Lease Contract – Lease Contract may not apply to your jurisdiction.
Well Name – Enter the well name for the oil or gas well. This may not apply to your jurisdiction.
Legal Party Ident – Enter the legal party identification, which is defined when setting up the legal party in the system. The identifier is an ID, such as SSN or state reporting code, that has been defined for the legal party.
Type – Defined when setting up the legal party in the system.
Well Number – Enter the well number for the oil or gas well. This may not apply to your jurisdiction.
Situs address
Type
Registration month – Use this field to search for motor vehicles by month of registration, which is specified in the asset's plate expiration field on the Maintain Assets page. Registration month must be used in combination with other criteria. NOTE: Registration month may not apply to your jurisdiction.
Mailing Address
Show page – Select how you want the results displayed. Currently, the only option is the asset summary page.
Sorted by – Select how you want the search results sorted.
Revenue account – Revenue objects are associated with a revenue account in the system. The account number is system assigned when setting up the revenue objects and associated PINs.
Acquired Date Range From ... To
Make
Model
Model Year
NOTE: If there is only one item matching your search criteria, the Maintain Assets screen opens automatically.
The header area displays basic information about the personal property account; fields vary depending on the type of asset. This information is displayed on various personal property account and asset screens.

NOTE: When an asset or account is inactive, action buttons are not available.
Maintain and add assets.
This table shows icons available on the screen.
Icon
Icon/Button Name
Description
![]()
Filter
Applies the filter you define. For example, if you select Single Row Action from the drop-down list preceding this icon, and then click this icon, the Single Row Action filter is applied.
![]()
New Asset Line Button
Adds a new row to the panel grid that accepts data for a new asset.
![]()
Excel/PDF
Exports the list of items in the panel to the selected file type.
![]()
Edit
Activates the currently selected asset to accept edits to various pieces of data, such as the Entry Code, Acquired Cost, Quantity, and Unit Cost.
NOTE: When selecting Edit Multi Row for the row action, editing is enabled for all asset rows.
![]()
Update/Cancel
Click the green check mark to update the asset data you edit in the row; or when adding a new asset, to insert the row in the grid after you define the applicable data.
Click the red X to cancel the asset data entered or remove the new asset row.
![]()
Trash Can
Deletes the asset row. A
pop-up confirms the action before proceeding.
NOTE: When selecting the Active
asset count button and choosing the blank option from the drop-down list
and then deleting the item, the asset row still displays but is
gray and inactive.
![]()
Modifier
Shows the number of modifiers applied to the particular asset.
![]()
Page Scroll
If multiple pages, the left/right arrow single buttons move one page back/forward. The arrow/bar scroll button moves to the beginning/ending pages.
![]()
Go to Page
If multiple pages, enter the Page number and click Go to go to it.
![]()
Page Size Change
Defines the number or rows to display per page. Enter the number of rows in the Page Size field and click Change.
Column Width
Change the column width of any column by hovering over the line separating the columns until you see the cursor change to arrows and hover help says Drag to Resize. Click on the line separating the columns and drag left to reduce column size, or drag right to expand column size.
Sorting
You can apply various sorting options to the rows.
Grouping
You can group assets by a specific column.
NOTE: You can click and drag more than one column header. For example, you could group first by Entry Code and then sub-group by Value.
Adding Assets
Editing Assets
This tab is displayed by default and allows you to maintain general information about assets. Use this tab to further define asset detail general information, such as make, model, serial number, etc., for assets such as vehicles, boats, etc., and to maintain leasing information.
NOTE: When selecting Lessor as the Lease Relation and entering values into the Property Description and Additional Description fields on the Leasing tab, upon Apply Edits and Save, the data displays in the Asset Maintenance (General) grid.
The data in this section displays the fields that predominantly affect valuation.
NOTE: The valuation process includes an indicator for the processing steps grid on the Maintain Value Schedules screen to indicate which steps are optional and which are required, depending on your jurisdiction. If optional, the step is skipped. If required, and data is missing, the process then reverts to the applicable alternate valuation method if one is configured. For required steps, a message that includes the PIN and asset Id is displayed during processing if data is missing so the particular assets can be easily identified in the Confirmation Detail Report.
Jurisdiction
Specific Information
California
Maintaining a Valuation
The behavior for the above fields is the same as for the BPP and Fixture field, which is:
Override Appraised Total field:
IMPORTANT: You must also define the asset category for Fixture Split assets via Personal Property Appraisal > Setup > Asset Categories. See the Personal Property Appraisal topic on Statutory Valuation for details about setup, processing, and valuation of Fixture Split assets.
Define modifiers that affect the value of the asset.
NOTE: This panel may not apply to your jurisdiction.
NOTE: This panel may not apply to your jurisdiction.
For business personal property with leased equipment, a Leasing tab is displayed when you create and save assets with categories 53 and 54 (leased equipment).
Define leasing information for leased equipment, including Related Asset Id, property description and any additional description. The information you define on this screen is displayed on the General tab after you apply edits and save.
IMPORTANT: The asset acquired date and economic life determine the time frame the asset displays in the asset list. This information, in conjunction with the tax year you are working with, determines whether the asset is included in the list. The asset only displays for the tax years the asset is owned.
NOTE: The Prior acq. cost field is display only.
The Acq. type drop-down list is user-defined.
Click here to learn how to customize this list.
IMPORTANT: Each personal property class code is associated with a specific functional calendar. For valuation methods that use depreciation schedules, the functional calendar determines the first year the asset is taxable. The first taxable year, in conjunction with the acquired date, determines the age of the asset for valuation.
The information pertains to registered assets, such as motor vehicles and watercraft.
For jurisdictions that use DMV transmittal, real-time transmittals must be enabled.
Click here for application setting instructions
OR
Clear the checkbox in the Setting Value column to set the value to False (transmittals are queued for pickup by the DMV transmittal batch process).
Click here to learn how to assign origin codes for the DMV import.
When adding a new asset on the Registration tab, the default defined for the Origin Code - Default application setting is displayed. Upon import, if Renewal is selected, only the Renewal origin codes are transmitted. When processing the batch DMV transmittal, the Confirmation Detail Report shows the details of the DMV transmittal. When attempting to process renewals, if the Origin Code is set to anything other than Renewal, an error is shown on the Confirmation Detail Report.
Enter and track asset attributes, such as the unit quantity, size, and make of the asset. Enter any information you know. For example, your Details tab might show a Length field that might be in inches or feet, depending on how it was configured for your jurisdiction.
NOTE: Avg. Price and Avg. Flow are display fields only.
Update and add situs addresses. Situs addresses are not used for valuation at the asset level. The asset assumes the situs address of the revenue object unless a situs address is defined at the asset level.
If relevant, you can view facilities information on this tab.
Identify the mobile home community, block, and lot where a home is located.
NOTE: This may not apply to your jurisdiction.
If you selected the Show Components checkbox on the Maintain Asset Categories screen, this panel is displayed; however, this panel may not apply to your jurisdiction.
These fields are specific to each jurisdiction and are user-defined asset-level fields.
IMPORTANT: When updating an Attribute numeric value with blank, the value does not update. Instead, enter a zero (0) in the field instead of leaving it blank for numeric values for Attributes.
Enter or select values for any applicable attributes and identifiers if you know them.
IMPORTANT: Asset attribute and identifier changes are stored in the database by tax year and roll to subsequent tax years. For example, assume Permit Number is an asset identifier and a user enters value 12345 in tax year 2008 for an asset. The 12345 value is stored as the asset's Permit Number beginning in tax year 2008 and forward until it is superseded by a different value in the future. If the Permit Number changes to 67890 in 2009, the value that displays to users will vary depending on the tax year in which the asset is being viewed.
When viewing the asset in tax year ...
The Permit Number value displays as:
2007
blank
2008
12345
2009
67890
2010
67890
2011+
67890
Optionally, you can add or edit a note to the asset.
IMPORTANT: Notes are controlled by user role security.
The header contains read-only information about the asset.
Click here to learn how to set security rights for this tab.
In the Alt Values tab, the Value Sources Entries panel is available and based on the selections made in the Configure Alternate Values screen (Personal Property Appraisal > Setup > Configure Alternate Values).
Click Calculate Values to calculate the corresponding vertical entries for each item in the Value Source Entries panel and Value Source Adjustments panel.
Band of Value panel
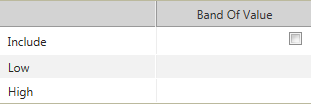
When the Adjusted Source Values panel is populated with calculated values, the low and high Band of Value (BOV) is also calculated (when selected).
Adjusted Source Values panel
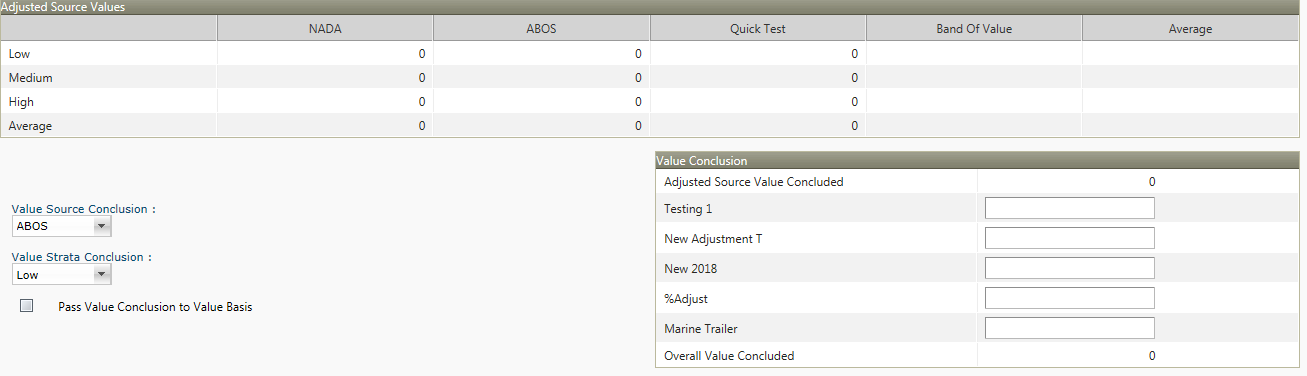
In addition to the Value Source Entries and Value Source Adjustments panels, you can use the Band of Value panel to include low and high values.
Value Conclusion panel

Aumentum calculates averages from the Value Source Entries panel and Value Source Adjustments panel. The first row in the Value Conclusion panel is based on the Default Value Source Conclusion and Value Strata Conclusion drop-down lists.
NOTE: If no defaults for an Asset Category are established, then the average comes from the Adjusted Source Values panel.
Click Calculate Values.
Overall Averages panel
Overall Value (check checkbox to override) panel
View the default value
schedule for the assets
Click the Default Schedule tab to view the value schedule for the assets.
Click the Summary tab to view a summary of the assets.
When you are finished maintaining all the data, click Save in the Command Item bar
IMPORTANT: If you are editing an asset, always click Save before attempting to value the account.
A personal property account value is the sum of its assets. If the asset has an override value, it is used; otherwise, the asset's appraised value is used. The account's total values, working appraised and working assessed, display on the Maintain Personal Property Accounts screen. These fields are updated each time the account or one of its assets is valued.
To calculate the value for a personal property account:
NOTE: If the asset value is being prorated, the Prorate checkbox in the Maintain Valuation panel is selected already, and the Duration and Prorate amount display. You can adjust the duration and calculate a new prorate amount.
Buttons
Previous – Return to the previous screen.
Close – End the task.
Save – Save changes made on the screen.
Post – Post the asset values to the account.
Value All – Value all assets.
Account – Opens the Maintain PPA Account screen for the account associated with the asset.
Click Post to post values, which are displayed on the Post Personal Property Values screen.
Steps
IMPORTANT: You must value all assets belonging to the personal property account in the current tax year before posting. If the account has one or more assets that have not been rolled forward to the current tax year, those assets are bypassed and not included in the posting. Also, if Aumentum could not calculate a value for an asset but an override value was entered for the asset, the override value is posted.
This date defaults to the first day of the month from the asset's plate expiration date for all motor vehicle assets. The plate expiration date can be seen on the Maintain Assets screen. For non-motor vehicle assets, the default is the first day of the current tax year. A date is required to post the account.
NOTE: Values in the drop-down list are maintained in the Valuation Change Reason systype via Configuration > Systypes. They are filtered by class code, so only those change reasons that pertain to the account's class code display for selection. The association of value change reasons and class codes is set up using a script; there is no user interface for this function.
NOTE: If applicable to your jurisdiction, select the PPA Value change reason. The items available from the drop-down list pertain to Department of Motor Vehicles (DMV) and jurisdictions that import/export DMV files. Hence, the systypes available in the drop-down list all begin with the prefix MV to differentiate the value change reason for MV from the Value change reason field.
Jurisdiction
Specific Information
California
SETUP: A parent asset can have 1 or no child assets. To define the child asset category, go to Configuration > Application Settings > Maintain Application Settings. Select the setting type of Effective Date and the filter by module of Personal Property. Click edit on the Fixture Split child asset category Id application setting and enter the asset category ID number for the fixture split child. When creating the split ratio asset, the new asset's values are based off of the Cost of the Input Asset and the F/S Ratio.
NOTE: Fixture split ratio may not apply to your jurisdiction.
Riverside, California
The REVIEWPERSONALACCOUNT workflow is then generated and is available via the Workflow icon in the left panel on any screen.
Tips
While on the Maintain Assets screen click the Aumentum logo and click the Page Properties tab. The ClassCd and BusUseCd information is displayed in the State Variables panel, which specifies how correspondence reports are filtered.
Common Actions
(From the Maintain Assets screen)
Context Reports
Tax Detail
View Posting History
Error Log
Manage Flags
Appeal History
Info Center - Review Related Revenue Objets
Copy Asset
Move Asset
Aircraft Blue Book
Dependencies, Prerequisites, and Setup
Personal Property Appraisal Module
-
Value Methods have been created.
-
Value schedules have been entered and are available for the years of data to be entered.
-
Asset Categories have been created.
Configuration > Application Settings
Much of the asset maintenance and associated tabs on the Maintain Assets screen are configured specifically for your jurisdiction via both the Personal Property Appraisal > Setup menu as well as via Configuration > Application Settings. This configuration must be accurate and complete for the Personal Property Appraisal module to value property appropriately. Contact your Aumentum Support representative for details. Refer to the Personal Property Appraisal topic for details about application settings that affect assets and asset maintenance.
Configuration > Security and User Maintenance
IMPORTANT: Security is available to control asset category maintenance on the Maintain Assets screen, controlled by user role. To set this up:
-
Click Configuration > Security and User Maintenance > Roles.
- On the Maintain a Role screen, click Edit for a role.
-
On the Edit Role Details screen, click the Expand (+) button preceding Personal Property to drill to Maintain Assets and select it to advance to the Edit Additional Role Details screen.
-
Select RadComboBox_Category control and set rights as applicable to the role.
-
Click Save and Close.
Click here for more security settings and behaviors.
When posting values for an account, the Post and Submit buttons on the Maintain PPA Accounts and Maintain Assets screens are displayed or hidden depending on security settings.
- Click Configuration > Security and User Maintenance > Roles.
- On the Maintain a Role screen, click Edit for the desired role.
- On the Edit Role Details screen, ensure that Personal Property Appraisal is displayed in the Granted Menu Items panel. If not click to select it in the Available Menu Items panel and click Add Selected, then click Save in the Command Item bar.
- Click Personal Property Appraisal > Accounts and/or Assets (individually) > Details.
- In the Details panel, click to expand View Post Personal Property Values.
- Individually, click to select PostBtn_CurrentYear, PostBtn_PreviousYear, and SubmitBtn_PreviousYear.
- In the Rights panel, select the checkbox for each right you want to allow and click Set Rights.
- Click Save in the Command Item bar.
The following table explains the expected behaviors based on your security settings.
| PostBtn_CurrentYear | PostBtn_PreviousYear | SubmitBtn_PreviousYear | Expected Behavior | Buttons Displayed |
|---|---|---|---|---|
| All rights | All rights | Blank | User can Post in any tax year |
Post button is available for any tax year Save button is available for any tax year |
| All rights | Blank | All rights |
User can Post in current tax year User can Save or Submit for previous years |
Post button is available for current tax year Submit button is available for previous tax years Save button is available for previous tax years |
| Blank | All rights | Blank |
User can Post in previous tax years User can Save in current year |
Post button is available for previous tax years Save button is available for current tax year |
| Blank | Blank | All rights |
User cannot Post in any tax year User can Save in current year and previous tax years User can Submit in previous tax years |
Post button is not available for current tax year or previous tax years Save button is available for current tax year and previous tax years Submit button is available for previous tax years |
| Blank | Blank | Blank |
User can cannot Post in any tax year User can Save in current year and previous years User cannot Submit in previous tax years |
Post button is not available for any tax years Submit button is not available for any years Save button is available for current and previous tax years |
Edit Checks
Depending on your jurisdiction and setup, certain fields and screens in the Personal Property Appraisal module are configured for Edit Checks, meaning when specific data is changed, the system performs an edit check to verify the data defined is correct.
For example, let's say a rule is defined for the Override fixture appraised field on the Maintain PPA Accounts screen that states that if an amount is entered in that field greater than the total appraised fixture value amount, the account cannot be saved, and a message displays to that effect when attempting to enter an override amount in that field greater than the total fixture value and clicking Save on that screen.
Rules can be defined for the following screens in Personal Property Appraisal, such as for:
-
Maintain PPA Accounts
-
Maintain Assets
-
Manage Discovery Worklist
Set these rules via Configuration > Edit Checks.