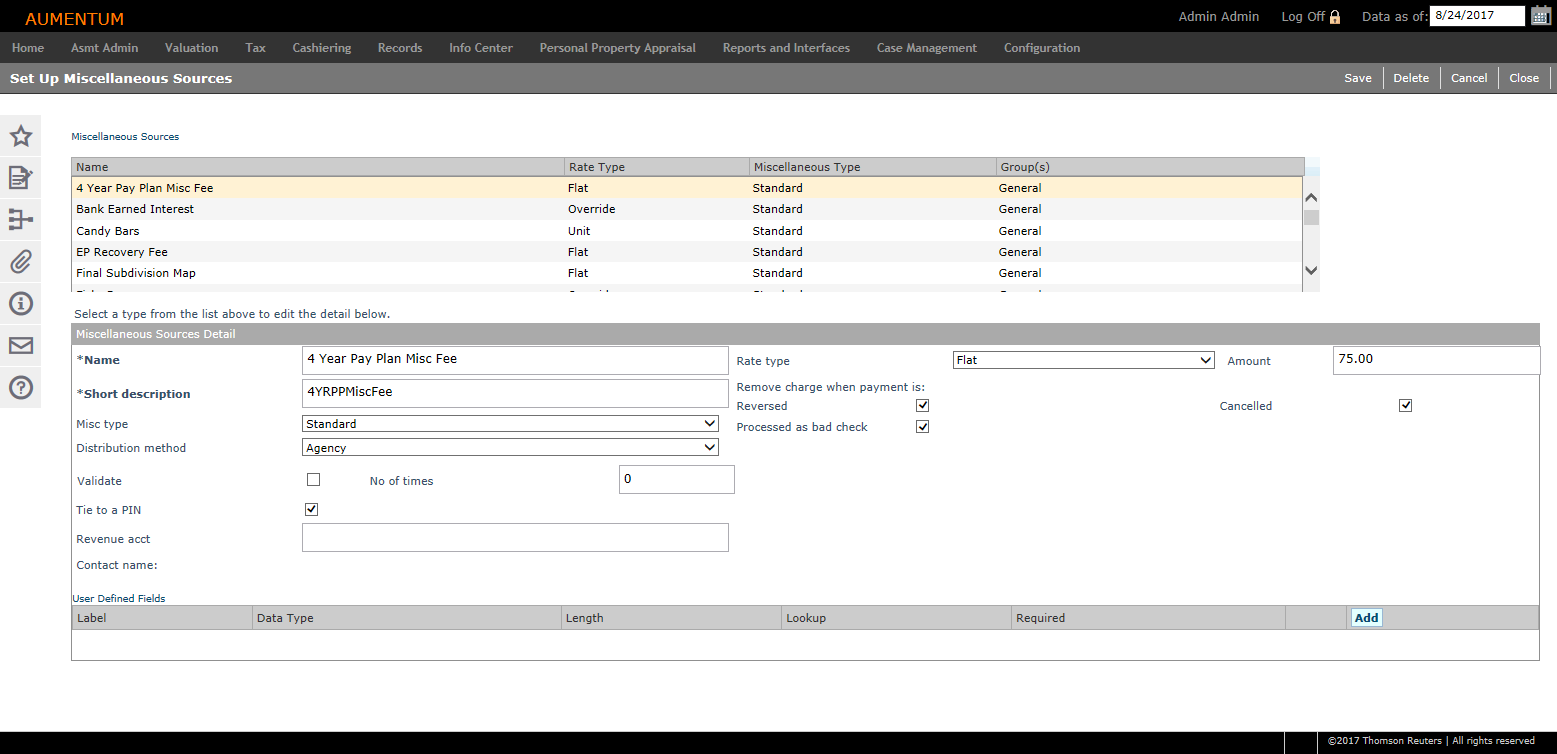
Miscellaneous Sources
Navigate:  Cashiering > Setup > Miscellaneous Sources > Set Up Miscellaneous Sources
Description
Create and update various cashiering sources which are outside of the usual Aumentum cashiering sources. For example: copy fees, parking permits, passes, and report fees. By setting these up as sources, the money collected for them will be available for Aumentum Distribution. The tasks you can perform on this screen include:
-
Enter miscellaneous source detail
-
Select Payment by Tender Type (may not apply to your jurisdiction)
-
Create User Defined Fields (UDF) (optional)
-
Create Universal Payment Posting (UPP) fields (optional, may not apply to your jurisdiction)
-
Delete miscellaneous source
SETUP: See Cashiering and Cashiering Setup for any applicable prerequisites, dependencies and setup information for this task.
Jurisdiction Specific Information
Riverside, CA
-
When redevelopment pass-through amounts are returned to the county by the RDAs, they are reallocated to the tax authorities that contributed to the RDAs. Since these amounts are not tied to a specific PIN they require a method for redistributing them to the contributing TAF.
-
The Secondary Rule List panel on the Manage Distribution Rules screen was created specifically for the district net apportionment amount (prior year secured).
-
Set up Cashiering Miscellaneous Sources via Cashiering > Setup > Miscellaneous Sources. Select Payment in lieu of taxes from the Misc type drop-down list and TAF from the Distribution method drop-down list.
-
The CA Distibution Rule Allocation Report (Distribution Reports > SRS Distribution Reports) includes the secondary schedule defined.
-
If amounts are adjusted you should see them in SubDistDetail where the SecondaryDistCalcRuleId != 0 for your DistHeaderId.
-
Those amounts match the amount shown on the report for the secondary rule in the bottom section of the report. The top section shows the Pre-Distribution data that qualified for the Secondary Rule.
-
A new distribution rule collection called TAG Area and four new distribution calculation rules were added to accommodate tax distribution to specific TAFs within a TAG using predetermined percentage breakdowns for:
-
Racehorse Tax
-
Non-commercial Aircraft Tax
-
Highway Rental
-
TAG/TA - City
-
TAG/TA - Schools
-
TAG/TA - Supervisor Road District
-
TAG/TA - Road
IMPORTANT: You will also need to set up TIF Adjustment Limits via Distribution > Setup > TIF Adjustment Limits > Maintain Redevelopment Limits.
Racehorse Tax is configured as a miscellaneous source in Aumentum cashiering. When setting this up on the Set Up Miscellaneous Sources screen, the Misc Type should be Standard, the Tie to PIN checkbox must be checked, and the Rate Type should be Certified.
Aircraft tax is configured as a tax type in Aumentum and is used in distribution rule collection criteria to identify non-commerical aircraft tax payments. Incorporated TAGs used to cashier racehorse and non-commercial aircraft have been configured to include at least one city tax authority withat least one general fund.Unincorporated and incorporated TAGs used to cashier racehorse and non-commercial aircraft have been configured to include at least one school tax authority with at least one general fund. Incorporated TAGs used to cashier highway rental have been configured to include at least one supervisory road district tax authority with at least one general fund.Unincorporated TAG’s used to cashier highway rental have been configured to include at least one road tax authority with at least one general fund.
To use the TAG Area rule collection and associated rules, you will need to configure six new distribution rules, one each for incorporated and for unincorporated for racehorse tax, non-commercial aircraft tax, and highway rental on the Edit Calculation Rule screen (Distribution > Setup > Distribution Rules > Manage Distribution Rules > Edit Distribution Rules > [Add/Edit – Calculation Rule List panel] > Edit Calculation Rule > [Add/Edit]).
NOTE: Also see Sample Distribution Rule Calculation and Rule Configuration for TAG Area in the Edit Calculation Rule topic.
Steps
-
On the Set Up Miscellaneous Sources screen, click New in the Command Item bar to enter information in the Miscellaneous Sources Detail panel.
OR
Click to select an existing item in the Miscellaneous Sources panel. Its information is displayed in the Miscellaneous Sources Detail panel and is editable. -
Enter a name and short description (both are required fields).
- Make a selection from the Misc type drop-down list.
-
Make a selection from the Distribution method drop-down list.
-
Agency – The funds are distributed to a single agency, which is mapped in the Distribution setup of Agency Mappings for Miscellaneous Sources.
-
Manual – The manual charges do not have a pre-mapped tax authority or tax authority group (TAG). A list of the manual charges from Collect Payments is passed to Aumentum Distribution, where the allocation of each payment is determined individually.
-
Tax Authority Group – The funds are distributed to a Tax Authority Group (TAG). In Collect Payments, the miscellaneous source is attached to a revenue object, and the revenue object is already associated with a TAG.
NOTE: For distribution by TAG, also select a Charge allocation rule, Rate type, and Rate value type, so that A/R can properly assign charges to the tax authorities and tax authority funds (TAFs) of the TAG based on either a charge-weighted or rate-weighted allocation, and be able to include or exclude special assessments from the allocation. -
TAF (Tax Authority Fund) – By configuring the miscellaneous source to use the distribution method by TAF, the Payment In Lieu of Taxes Criteria pop-up on the Cashiering Collect Payments screen accepts entry of amounts by TAF when using Miscellaneous source as the type of payment on the Collect Payments screen. When amounts are cashiered using this method, resulting FnclDetail transaction rows (for both the charge and payment rows created by the miscellaneous source) contain a TAF Id, meaning the miscellaneous source does not need to part of the distribution mapping list for miscellaneous sources that require mapping to an agency. The TAF Id maps to an agency instead.
-
-
Select the Validate checkbox and enter the number of times to validate it.
-
Depending on your selection from the Misc type drop-down list, the Tie to a PIN checkbox is automatically select. Fiscal disparity, payment in lieu of taxes, or tax forfeiture are not associated with a bill and will not appear in Info Center unless associated with a PIN. The PIN is entered during cashiering on Collect Payments.
-
Enter the default revenue account number associated with the miscellaneous source. The cashier has the opportunity to attach the revenue account (of an item already in the cashiering grid) to the miscellaneous source being collected. The contact name for the revenue account displays when you tab out of the field.
- Make a selection from the Rate type drop-down list and enter the amount to use for the rate (a flat rate, number of units, or override amount).
-
Determine whether to remove a charge when a payment is in any of three conditions.
Since miscellaneous sources are not billed items, there are no charges in the system to offset the payments written into financial details. So at the time the payment is taken, the charge records and pay records are created at the same time. Select a checkbox if you want the charge to be removed in Accounts Receivable for a given condition.
-
Reversed – If a payment was taken in error, you may want to reverse it. The payment is reversed and the charge is removed.
-
Cancelled – When the payment is cancelled, the charge is removed.
-
Processed as bad check – Do not select this option if this is an item the party should be billed for if the check bounces.
EXAMPLE: This could be used if the bad check was for merchandise to keep it as a due item in financial details. However, if the miscellaneous source is not associated with a revenue account, it will not be billed, but the charge will remain.
-
- Select the Allow creation of new misc source from Collect Payments checkbox in order to create a new source on the Collect Payments screen; select Miscellaneous, and then click the plus sign next to the Misc type drop-down list.
- Select the Allow miscellaneous source free form fund mapping checkbox in order to select GL fund/account information on the Collect Payments screen when creating a new source. This setting also provides the ability to select the GL Fund/Account information on this screen.
-
Web Service URL. Enter the Web Service URL site address.
-
Secondary Web Service URL. Enter the secondary Web Service URL site address.
-
Select the Use charge code mappings checkbox to use the charge code mappings associated with the web service and set up on the Maintain General Ledger Mappings screen.
- Click Configuration > Application Settings.
- On the Maintain Application Settings screen, select Effective Date from the Setting type drop-down list, and select Cashiering from the Filter by module drop-down list.
- Locate Enable secondary web service URL and click Edit.
- Select the checkbox in the Setting Value column and click Apply.
- Locate Universal miscellaneous sources web service URL and click Edit.
- Enter the address in the Setting Value column and click Apply.
- Click Save in the Command Item bar.
-
Select the credit and/or debit fund and account from the Credit Fund, Credit Account, and the Debit Fund and Debit Account drop-down lists.
NOTE: The Application Setting for Tax Accounting called Summary Level – Payment Debit determines whether or not the Debit Fund and Debit Account fields are enabled. If that setting includes any reference to Bank Account (i.e., Bank Account, Bank Account – Tender Type, Bank Account – Location;, Bank Account – Location, or Tender Type) then the debit fields are disabled. The debit side of the equation is then controlled by the bank that is associated to the Till on the Maintain Tills screen.
- Check the applicable checkbox in the Allow Payment by Tendered Type panel for each tender type allowed for the particular transaction type.
- Enter up to ten User Defined Fields (UDFs), if needed, to identify additional data you want captured when the payment is collected. For example, if the miscellaneous source is used for permits, you may want to capture the permit number, or a contact name, or an expiration date, etc.
-
Click Add to add a new field, or click Edit in the grid row of an existing field to change it.
-
Enter or select the field information.
-
The Label to display next to the field on the Collect Payments screen.
-
The Data type allowed for entry in the field: numeric (whole numbers only), date, or character (can contain letters, numbers, and symbols).
-
The Length (number of characters) allowed for entry in the field.
-
The Lookup checkbox.
NOTE: When adding UDFs, the Lookup checkbox determines whether the UDF is displayed as an entry field that accepts data entry. The data is then searched and retrieved from an external source. For example, if retrieving data from an external invoicing system, the Invoice Number is an example of a field that could be marked as Lookup.
NOTE: When entering a decimal for any UDF rate fields, enter percentages as in the following examples:
-
3.17% would be entered as 0.00317
-
50% would be entered as 0.5
-
Click Apply to save the field.
-
Click Cancel to discard your changes.
- Click Delete in the grid row of a field you want to remove and click OK on the confirmation message.
-
Click Save in the Command Item bar.
For example, in certain jurisdictions, Relocation decals are not billed, and they are handled as miscellaneous. However, they should be associated with the same revenue account as the tax bill.
NOTE: If you do not know the revenue account number, click Common Actions > Attach Revenue Account to search for an account using the Revenue Account Contact Information task.
NOTE: If you select Fee rule, a grid appears where you can select the specific rule. Use the Common Action > Set Up Rules and Rates to add a new rule, if needed.
IMPORTANT: The ability to associate each Miscellaneous Source to distinct GL Fund/Account information is available, depending on your state/jurisdiction. This allows the GL Export to include the Miscellaneous Source transactions mapped to the appropriate GL Fund/Account when exporting.
To enable this functionality, select two checkboxes on the Set Up Global Cashiering screen:
NOTE: Certain sites may use their own server, an external web service, or a combination. If so, one or multiple of the following three fields are available:
Click here to learn how to enable these services
NOTE: This feature may not apply to your jurisdiction.
You can also define certain tender types, depending on the transaction type. For example FRVIS payments can be set up to allow only cash collection as the tender type.
NOTE: The fields defined here will appear in Collect Payments in the bill details section of the screen where the cashier can enter the additional data. The first two user-defined fields will display in Receipt Management, and all user-defined fields will print automatically on the receipt.
IMPORTANT: Miscellaneous Source payments cannot be made on the Collect Payments screen until all UDFs are defined for any UDFs created with the Required checkbox selected on the Set Up Miscellaneous Sources screen.
Create Universal Payment Posting Fields
The Universal Payment Posting (UPP) Fields indicate data elements that are sent back from Aumentum to an external system via the web service after a payment is made. You can enter up to 10 Universal Payment Posting Fields.
NOTE: These fields may not apply to your jurisdiction.
-
Click Add.
-
Enter a label, for example, ReceiptNumber.
-
Make a selection from the Data Field drop-down list.
NOTE: The only data elements available are the ones defined from the Data Field drop-down list, currently Business Date, Receipt Number, and User ID.
-
Click Apply to save the field.
-
Click Cancel to discard your changes.
- Click Delete to remove an item and click OK in the confirmation pop-up.
Delete a Miscellaneous Source
-
Click on a miscellaneous source in the Miscellaneous Sources panel.
-
Click Delete in the Command Item bar..
-
Click Cancel to remove the changes without closing.
-
Click Close to end the task.
Common Actions
Attach Revenue Account – Accesses the Revenue Account Contact Information task in Records where you can search for an account to associate with the source if you don't know the account number.
Set Up Rules and Rates – Opens the Maintain Rules and Rates screen in Distribution where you can add a new fee rule to use with this source.
Add Miscellaneous Groups – Opens the Set Up Miscellaneous Source Groups screen where you can set up new miscellaneous source groups.