Global Cashiering
Navigate:  Cashiering > Setup > Global Cashiering
Description
Set up the global cashiering information as required for your jurisdiction. Cashiering-specific settings defined on the Set Up Cashier screen override the same settings made globally on this screen.
Steps
-
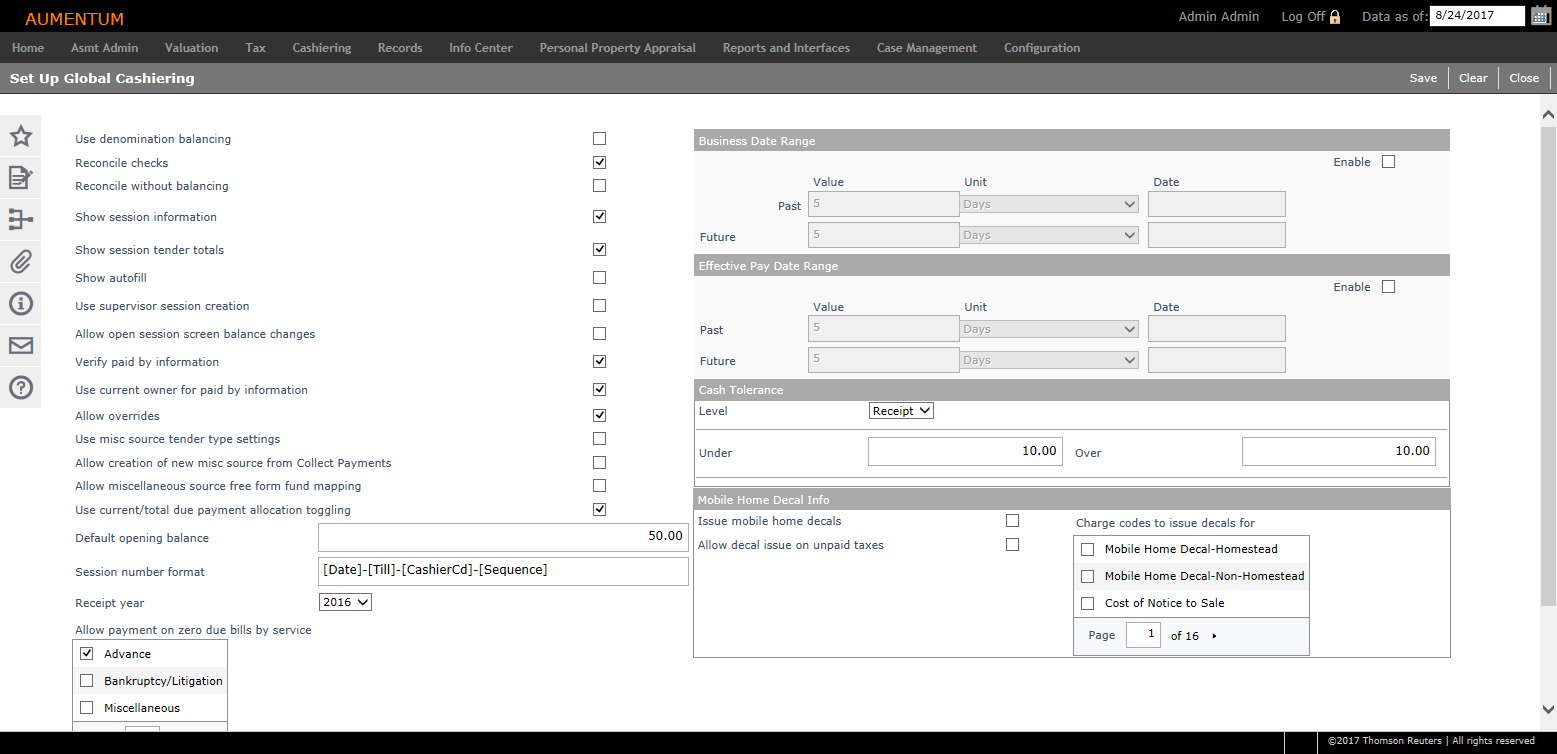
On the Set Up Global Cashiering screen, select each checkbox as needed to turn various features on; clear the checkbox to turn it off. Available checkboxes may vary by state and jurisdiction.
Click here for descriptions of each checkbox
-
Use Denomination balancing – Requires you to key the quantities for bills and coins in your balancing process. Select this checkbox to display the Details text next to the Cash field in the Session Amounts panel on the Session Reconciliation screen.
-
Reconcile checks – Requires the reconciliation of checks to complete the reconciliation process. Select this checkbox to display the Details button next to the Check field in the Session Amounts panel on the Session Reconciliation screen, and that is the access point for the check reconciliation process. You will be allowed 10 key entries of checks in the drawer (like running a tape on checks).
-
Reconcile without balancing – The sessions are not required to balance before processing the reconciliation. When selected, it automatically creates a till balancing entry that can be tracked through general ledger. It is recommended that you do select this option.
-
Show session information – Displays the individual session information to the cashier before reconciling. Information includes the session amounts for cash, check, etc. If you do not want the cashiers to know what the count of cash and checks should be when balancing their drawer, then do not select this option.
-
Show session tender totals – Enables display of tender totals for each tender type, such as cash, check, or credit card in the Tender Type Totals field on the Reconcile Sessions screen.
-
Show autofill – Allows cashiers to see the tender information before balancing. Use only if you do not want to take the time to count register drawers, letting the bank find the errors.
-
Use supervisor session creation – Requires the supervisor to create each day's sessions. When using this option, the cashiers will still select a session to Set as Current, but the supervisor is the one that actually creates all of the sessions. If not using this option, the cashier will open a new session via Cashiering > General > Sessions.
-
Allow open session screen balance changes – Enables/disables the ability of the cashier to change the opening balances.
-
Verify paid by information – Requires the cashier to check a box verifying the paid by information while accepting payments in Collect Payments.
-
Use current owner for paid by information – Prints the current owner as the Paid by on the receipt.
-
Allow overrides – If this global option is selected, overrides can be selected on the Cashier setup screen. When Collect Payments displays a pop-up for a username and password to allow the override, only the users with the Allow Override setting turned on at the Cashier level will be allowed to complete the override.
IMPORTANT: The ability to associate each Miscellaneous Source to distinct GL Fund/Account information is available, depending on your state/jurisdiction. This allows the GL Export to include the Miscellaneous Source transactions mapped to the appropriate GL Fund/Account when exporting. To enable this functionality, select the next two checkboxes.
-
Use misc source tender type settings – Enables the ability to specify valid tender types for each miscellaneous source.
-
Allow creation of new misc source from Collect Payments – When selected, this provides the ability to create a new source on the Collect Payments screen; select Miscellaneous, then click the Plus sign next to the Misc source type drop-down list.
-
Allow Miscellaneous Source free form fund mapping – When selected, this provides the ability to select the GL fund/account information on the Collect Payments screen when creating a new source. It also provides the ability to select GL fund/account information on the Set Up Miscellaneous Sources screen and on the Collect Payments screen when creating a new source.
-
Use current/total due payment allocation toggling – Used to toggle between allowing current due/total due payment allocation when adjusting an allocation. This consistently toggles between the 1st installment amount due and the total amount due for the bill, regardless of whether the bill is past the 1st installment due date. This toggle is intended primarily for customers with 2-installment billing; however other customers can use this feature, with toggling occurring only between the 1st installment and the total due.
EXAMPLE
-
If making a payment (payment effective date) before the 1st half due date with the default allocated amount as the 1st half amount due, the toggle switches between how much is owed for just the 1st half and how much is owed for the total bill.
-
If making a payment (payment effective date) after the 1st half due date with the default allocated amount as the total amount due, the toggle switches between how much is owed just for the 1st half (including any penalty/interest) and how much is owed for the total bill (including any penalty/interest).
-
If making a payment (payment effective date) after the 2nd half due date with the default allocated amount as the total amount due, the toggle switches between how much is owed just for the 1st half (including any penalty/interest) and how much is owed for the total bill (including any penalty/interest).
-
-
-
Enter the default opening balance if the opening balance is generally the same each day. This can be overridden at the individual till level as needed.
-
Enter the session number format to determine how sessions are automatically numbered. The session number can contain one or more tags that must be enclosed in square brackets and can appear in any order, with any character except a bracket as a delimiter. This information is stored in the database and a parser verifies that the tags are valid. These are the available tags:
-
[Date] = The business date of the session
-
[Sequence] = A sequential number
-
[Till] = The till number of the selected till
-
[User] = The assigned user id
-
[CashierCd] = Session Id cashier code
- [User]-[Date] or [User]-[Sequence] - if users are likely to have more than one session per date.
-
Make a selection from the Receipt year drop-down list, which affects the receipt numbers assigned, and numbering starts over when the receipt year is changed. This is also the receipt year used for batch collection imports receipts.
-
Enter the payment allowances.
-
In the Allow payment on zero due bills by service panel, select the appropriate items for your needs. When selected, a PIN or bill can be retrieved into the Collect Payments screen when there is no balance due. Choose the services for which it will be true. If not selected, then bills with zero due will not be available in Collect Payments.
-
-
In the Business Date Range and Effective Pay Date Range panels, enter the business and/or effective pay date ranges, if applicable, to prevent users from using dates outside the defined ranges. You can set a range around a specific date or set a dynamic range of a certain period of time around the current date. These settings can be overridden at the till level.
The Business Date Range is the date range of the session. Setting a date range is used to prevent errors of opening a session for a business date that is balanced or closed out.
The Effective Pay Date Range is recorded during cashiering as the date when the payment takes effect. The effective pay date affects the discount and interest date. Setting a date range prevents back dating payments beyond the range.
-
Select the Enable checkbox for a date range type to enable the fields for entering the range. If a date range is not enabled, any date will be acceptable.
-
Define the beginning of the range by entering in the Past row the number of units (days, weeks, or months) that are valid before a specified date, or the current date, if the date is left blank.
-
-
In the Cash Tolerance panel, make a selection from the Level drop-down list for both the bill and receipt levels.
-
Enter the maximum dollar amount under the amount due which will be accepted as full payment. The shortages are applied to the last tax bill paid, and if no taxes were paid, then it applies to the last item in the cashiering screen. If a payment has to be cancelled later and a refund issued, the amount of the shortage will not be refunded.
If my receipt total is 100, and I only have 99, and if my tolerance for under is set for a dollar, then it can be paid short. A transaction is created that looks like 99 tendered, and 1.00 tendered short, so the bill is paid in full.
-
Enter the maximum dollar amount over the amount due which will be accepted without creating a refund. The surplus that is created this way will be flagged differently, so that it is not automatically eligible for refund. It can be tracked in general ledger and funneled to the tax commissioner over/under account.
-
-
In the Mobile Home Decal Info panel, select the Issue mobile home decals checkbox if decals for mobile homes are provided by cashiering when payments are received.
-
Select the Allow decal issue on unpaid taxes checkbox if you allow decals to be provided when no payment is received for mobile homes.
-
Select the checkbox for one or more items in the Charge codes to issue decals for grid.
-
-
Click Save in the Command Item bar.
-
Click Clear to delete any changes and begin again. You will see a warning that all unsaved changes will be lost. Select OK to continue to delete the current changes and clear the screen.
-
Select Close to end the task.
-
EXAMPLE
The supervisor is able to maintain this value on the Maintain Sessions by Supervisor screen and on the Open Session by Cashier screen.
IMPORTANT: Jurisdictions that use Active Directory must include the cashier code [CashierCd] in their session Id in the Session Number field on the Open Session by Cashier screen or on the Maintain Sessions by Supervisor screen rather than their cashier name.