Cashiers
Navigate:  Cashiering > Setup > Cashiers
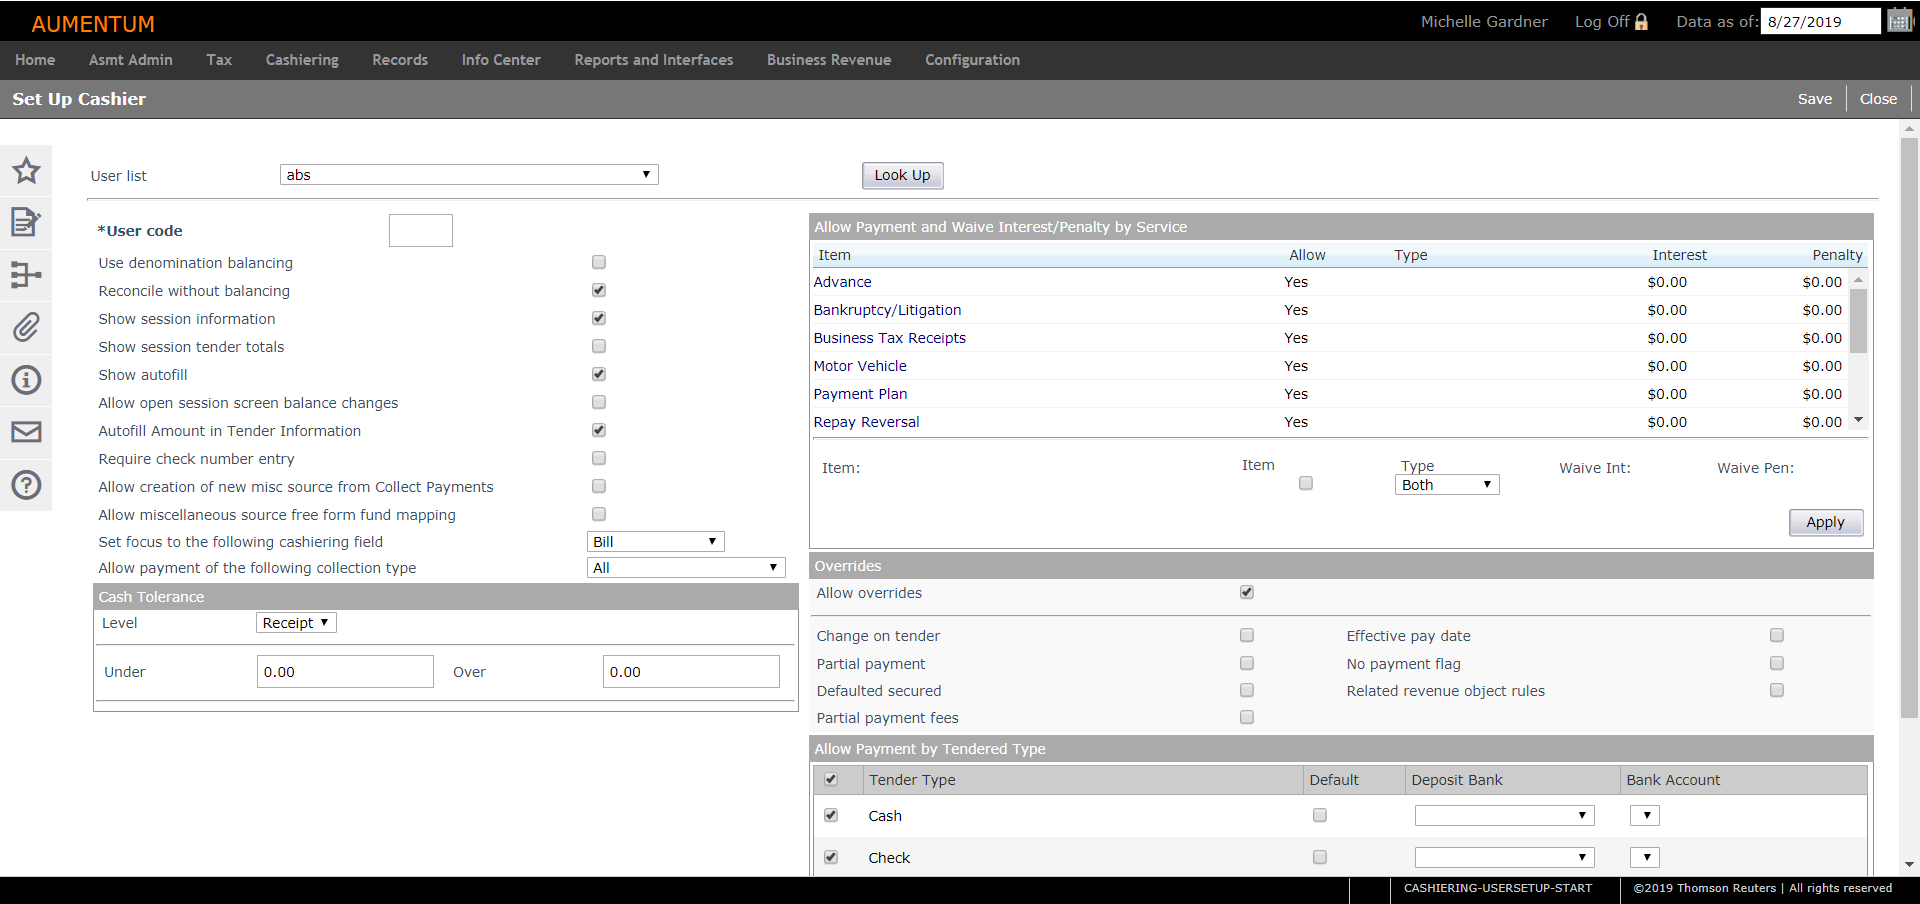
Description
A manager or supervisor can determine their own settings, and settings for individual cashiers in the office (via Configuration > Security and User Maintenance > Users). Payments that a specific cashier can accept are defined by tender type and by service. Changes may be made at any time for each cashier.
NOTE: Some Cashier settings will default from Global Cashiering, and can be modified. Cashier settings will override Global cashiering settings.
Steps
-
On the Set Up Cashier screen, make a selection from the User list drop-down list and click Look Up. If there are current settings for the user, the information displays on the screen.
-
Enter the user code that is assigned to the cashier.
-
Select or clear each checkbox to turn features on or off.
Click here for brief descriptions of each checkbox.
-
Use denomination balancing, if selected, requires you to key in the quantities of the bills and coins in your balancing process.
-
Reconcile without balancing, if selected, means the sessions are not required to balance before processing the reconciliation.
-
Show session information, if selected, displays the individual session information to the cashier before reconciling. For example, a supervisor may want to use this option but have it turned off for cashiers.
-
Show session tender totals, if selected, displays tender totals for each tender type, such as cash, check, or credit card in the Tender Type Totals on the Reconcile Sessions screen.
-
Show autofill, if selected, allows cashiers to see the tender information before balancing. Like the previous example, a supervisor may want to use this option but have it turned off for cashiers.
-
Allow open session screen balance changes, if selected, allows the cashier to change the opening balances.
- Autofill Amount in Tender Information, if selected, will display the sum of all the allocated fields for the available bills in the Tender section on the Payment Collection screen. If not selected, the amount in the Tender section defaults to 0.00.
-
Require check number entry, if selected, requires a check number to be entered when the tender type is Check. The purpose of this is to match up check numbers to see if any are missing if used in your jurisdiction.
-
Allow creation of new misc source from Collect Payments, if selected, lets you create a new source on the Collect Payments screen by selecting the type of Miscellaneous, and then clicking the Plus sign next to the Misc source type drop-down list.
-
Allow Miscellaneous Source free form fund mapping, if selected, lets you select the GL fund/account information on the Collect Payments screen when creating a new source. It also lets you select GL fund/account information on the Set Up Miscellaneous Sources screen and on the Collect Payments screen when creating a new source.
-
-
Make a selection from the Set focus to the following cashiering field drop-down list to specify what the first data entry field will be on the Collect Payments screen.
-
Make a selection from the Allow payment of the following collection type drop-down list to specify the collection type for which the cashier can collect.
Click here for a brief description of the choices.
-
All
-
Secured. When a single Defaulted Secured bill is loaded in the Collect Payments screen, all other defaulted secured bills with unpaid charges for that property are automatically displayed in the grid as well.
-
Defaulted Secured. Certain defaulted secured bills can be removed from the Collect Payments screen if in Override mode as defined by security rights. All defaulted secured bills can also be removed from the set. However, a payment transaction cannot be completed with only some defaulted secured bills in the set unless in Override mode
-
Unsecured
NOTE: Secured/Unsecured may not apply to your jurisdiction, in which case accept the default of All. This setting must be set by the administrator who configures Cashiering. If your jurisdiction restricts which cashiers can collect payments for certain types of bills based on collection type, select the collection type allowed for that cashier. Otherwise set to Alland set the Cashiering application setting Treat all unpaid Defaulted Secured bills as a set to true.
-
-
In the Cash Tolerance panel, make a selection from the Level drop-down list. These are the payments amounts over or under the amount due for which a bill or receipt can be considered paid in full.
-
In the Allow Payment and Waive Interest/Penalty by Service panel, click to select the item that the cashier is permitted to apply payments and penalty/interest against.
NOTE: A positive number must be entered here in order to use the waive interest or waive penalty features in Collect Payments. The cashier will then have the responsibility of deciding whether to use the waive interest option when accepting a short payment. The allocations must also be set up, for the allocation when waiving interest only, when waiving penalty only, or when waiving both penalty and interest.
-
If the service has multiple levels, click the Plus sign to expand the tree view to see the children. Click again to collapse the tree.
NOTE: When you allow access to a parent service, its children are set to be allowed also, but their individual settings can be changed as needed.
- In the bottom half of the panel, select the checkbox in the Allow column to allow the cashier to collect payments for the service.
-
For some services, you can also set the type of charges accepted for this cashier: current, delinquent or both.
-
If applicable, enter amounts in the Waive Int (interest) and Waive Pen (penalty) fields.
-
Click Apply, then click Save in the Command Item bar.
-
In the Overrides panel, select the Allow overrides checkbox if this cashier is authorized to make changes to certain options when in Collect Payments.
When you attempt to override one of these settings, a pop-up asks for a user name and password. To proceed, Allow overrides must be selected and you must belong to a security role with rights to this non-menu item. The non-menu item Allow Override must be set to ON for the person logged on and attempting to perform an override. See Edit Non-Menu Item Role Details for information about setting the override as well as for setting the Override Receipt Setup role setting, which allows you to override the receipt number schema even if receipt already exists for a given year.
-
Change on tender – Cashier can make change for all tenders.
-
Effective pay date – Cashier can change the effective pay dates outside of their set range.
-
Partial payment – Cashier can post a partial payment to a revenue source which does not allow partial.
-
No payment flag – Cashier can load an item into the grid and accept payment, for something that currently has a flag defined as do not allow payment.
-
Defaulted Secured – Cashier can override and allow payment of a single Defaulted Secured bill even if there are multiple Defaulted Secured bills
-
Partial payment fee – Cashier can override partial payment fee amounts on the Collect Payments screen.
-
-
Select the Tender Type in the Allow Payment by Tender Type panel by selecting each applicable checkbox, or click the Tender Type checkbox to include all tender types. This is the tender type that this particular cashier is allowed to accept.
For each tender type selected, optionally select the Deposit Bank and Bank Account. Bank accounts are set up in Tax Accounting.
NOTE: You can select the Default checkbox next to a tender type to use it as the default on the Collect Payments screen if it is used most often by this cashier.
-
Click Save to finalize all changes.
-
Click Close to end the task.
Tips
To add a new cashier, go through the Users task of the Configuration menu.
The allowed tender types also can restrict a cashier from accepting certain tender types. The tender types authorized for a cashier are listed in the drop-down list on the Collect Payments screen. If no tender types are selected, then the drop-down list will be blank.
A different cashier can have a different default for the most common tendered type.
When using forfeiture, set the service options for the cashier to receive forfeiture payments.
When accepting taxpayer ACH payments, set the cashier for ACH payments. This cashier is needed as a parameter of ACH Processing Setup in Accounts Receivable.