Receipt Management
Navigate:  Cashiering
> General > Receipt Management
Cashiering
> General > Receipt Management
Description
Use the Receipt Management task to perform inquiries on existing receipts, print receipts, and reverse receipts.
Steps
- On the Inquire on Receipt screen, enter the receipt number and receipt year, and click Look Up to retrieve the receipt information.
- If you do not know the receipt number or year, click Common Actions > Advanced Receipt Inquiry to search by additional criteria.
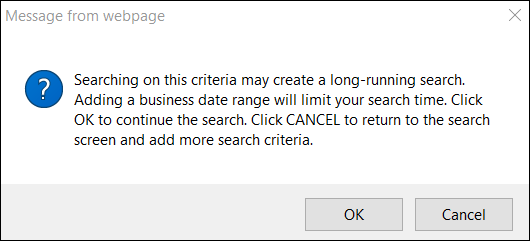
- On the Advanced Receipt Inquiry screen, enter information that you know. Some of the search criteria, if used alone – such as tax year – could return a large amount of data. A warning message appears:
- If more than one receipt is found using the advanced inquiry feature, the Advanced Receipt Inquiry Results screen displays.
-
Take any of the following actions:
-
Click Note in the Command Item bar to enable the Note panel.
-
Enter the note text.
-
Select the Print checkbox to include the note when you print the receipt.
-
Click Save to save the note, or click Cancel to discard your changes.
-
Click Delete to remove an existing note from the receipt.
-
In the Reverse Payments panel, make a selection from the Reason drop-down list and add a comment to reverse the receipt.
-
Click Reverse.
NOTE: All payments on a receipt are reversed. An individual payment within a group of payments may not be reversed.
IMPORTANT: If a flag was inactivated as a result of a payment, reversing the payment does not reactivate the flag. To reactivate the flag, click Info Center > Tax Detail to search for and select the property and display it on the Tax Information screen. Click Common Actions > Manage Flags. On the Manage Flags screen, select the Associated Flag checkbox in the Flags panel and click Activate.
NOTE: The ability to reverse previously posted transactions from FRVIS as well as in Aumentum is also available in some jurisdictions. Click Configuration > Applications Settings > Maintain Applications Settings, select Cashiering from the Sort by module drop-down list, set the effective date, select the application setting Send universal misc source reversals to web service and set to True.
-
Click Print Receipt to print all of the receipt information.
-
If you only want to print portions of the receipt, select specific items the Tax Revenue Information and Miscellaneous Revenue Information panels before you click Print Receipt. If no items are selected, all items print.
Enter a note
Reverse payments
Payments may be reversed before the session has gone through Back Office Reconciliation, when payments are posted to A/R. Reverse a payment if some sort of error was made, for example, if you paid on the wrong property. You can then collect the payment on the correct property, and transactions will display showing the reversal.
NOTE: if you need to reverse a payment after posting, use the Cancellation - Create Surplus task on the Accounts Receivable > Manage Payments menu so that a refund can be issued to the taxpayer.
Print a receipt
Print an on-demand credit voucher
Click Print Notices to print an on demand credit voucher for receipts with a surplus amount, if applicable.
After you are done with this receipt, look up or search for a new receipt. Click List to return to the Advanced Receipt Inquiry Results screen to select another receipt if the advanced inquiry was used and more than one receipt met the criteria. Or, click Close to end the task.
How Receipt Management Processes Tax Sale Purchase Payment Reversals
When a Tax Sale purchase payment (a payment reversed for a purchase) is reversed in Cashiering, the certificate reverts to an agency certificate, and all data for the receipt on the Advanced Receipt Inquiry screen reverts to the pre-purchase state (agency certificate, no buyer payment checkbox, assigned to agency checked, etc.) prior to the Tax Sale purchase payment being applied (and then reversed).