Print Mass Receipts
Navigate:  Cashiering > General > Mass Receipts
Description
On the Print Mass Receipts screen, you can print receipts en masse for lender or remittance processor files, or as needed. You can print receipts by:
- List
-
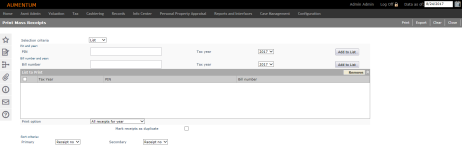
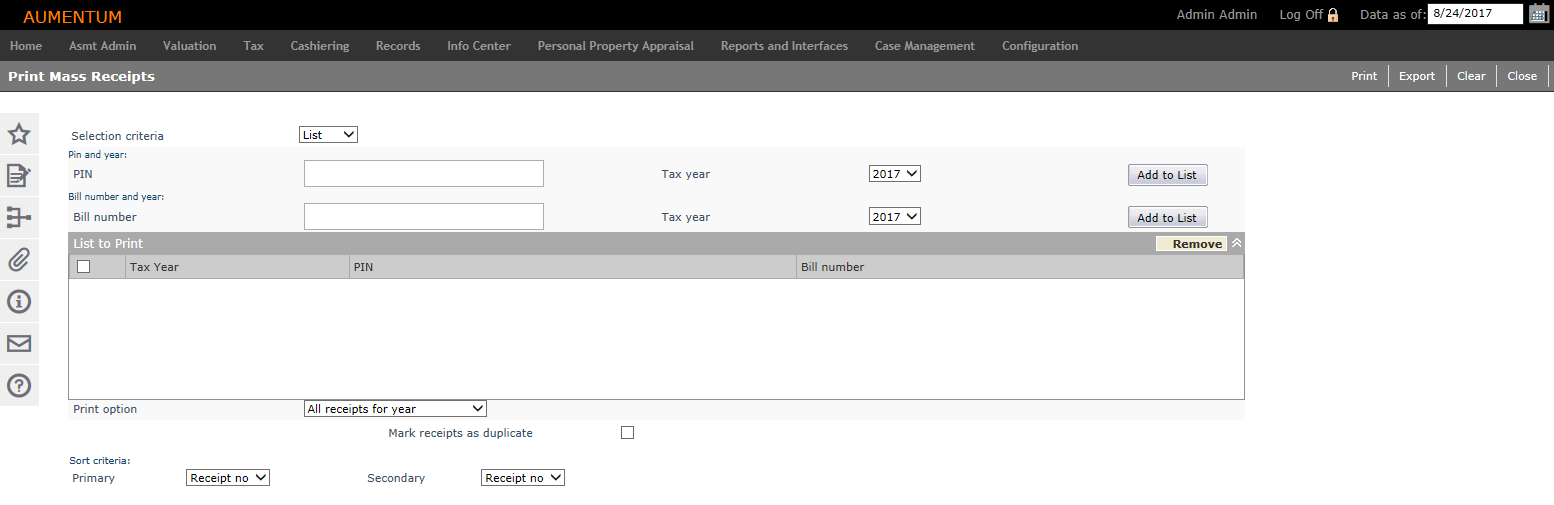
Select List from the Selection criteria drop-down list.
-
Enter the criteria to determine which receipts to print.
-
Enter a PIN or bill number, and select the tax year of the receipt for the PIN or bill.
-
Click Add to List to add your entry to the List to Print panel.
-
Repeat these two steps for all items that you want to add to the list for printing.
-
Click Remove for the selected items in the List to Print panel to remove them from the list.
-
Make a select from the Print option drop-down list.
-
Select the Mark receipts as duplicate checkbox to print 'Duplicate' on the receipt.
-
To specify sort criteria, make a selection from the Primary and Secondary drop-down lists, which sorts the receipts in the PDF file.
-
Click Print in the Command Item bar to begin the batch process.
-
Click Export to generate an XML file.
-
- Range
-
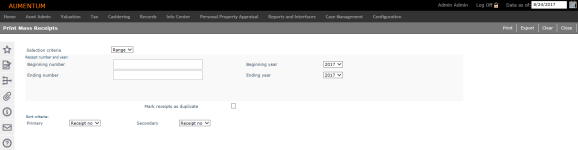
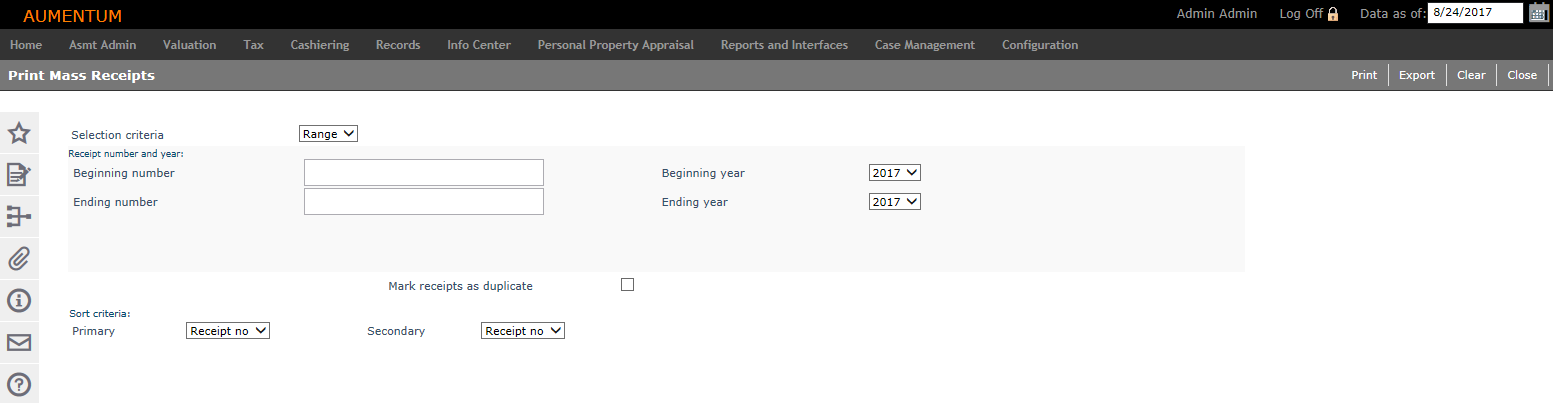
Select Range from the Selection criteria drop-down list.
-
Enter a range of receipt numbers and/or tax years.
-
Enter a beginning number and an ending number for receipts.
-
Select a beginning and ending tax year.
-
Select the Mark receipts as duplicate checkbox to print 'Duplicate' on the receipt.
-
Select the Print single transactions to form receipt checkbox if your jurisdiction is configured to use form receipts. This prints payments to a single tax bill and prints to a form receipt rather than to the default 8-½ x 11 receipt.
-
-
To specify sort criteria, make a selection from the Primary and Secondary drop-down lists, which sorts the receipts in the PDF file.
-
Click Print in the Command Item bar to begin the batch process.
-
Click Export to generate an XML file.
-
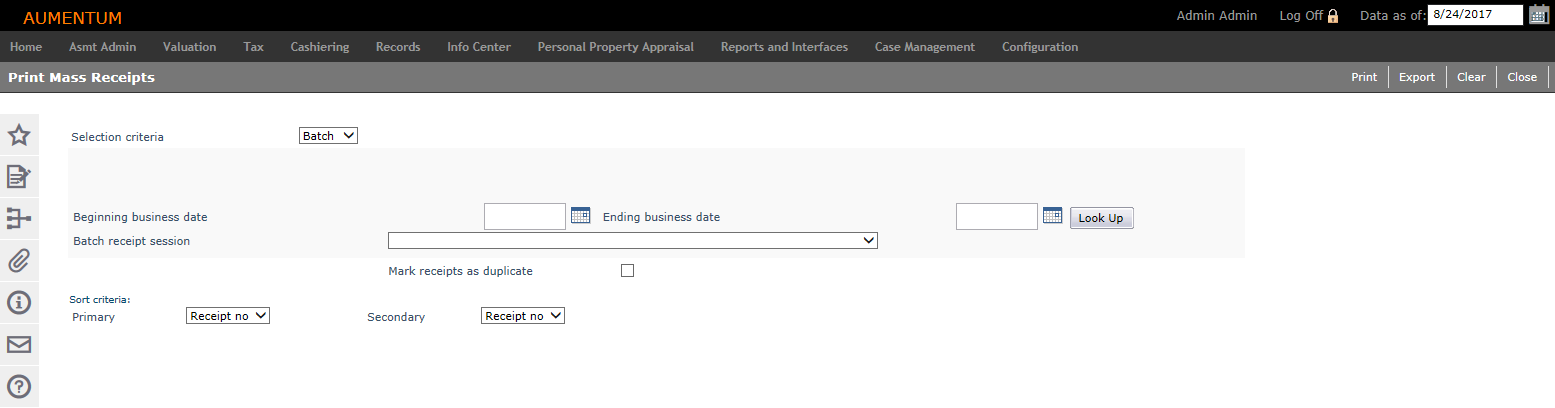
- Batch

-
Select Batch from the Selection criteria drop-down list.
-
Enter or select a beginning business date and an ending business date.
-
Click Look Up to populate the Batch receipt session drop-down list with relevant sessions within the beginning and ending business dates.
-
Make a selection from the Batch receipt session drop-down list.
-
Select the Print single transactions to form receipt checkbox if your jurisdiction is configured to use form receipts. This prints payments to a single tax bill and prints to a form receipt rather than to the default 8-½ x 11 receipt.
-
-
Select the Mark receipts as duplicate checkbox to print 'Duplicate' on the receipt.
-
To specify sort criteria, make a selection from the Primary and Secondary drop-down lists, which sorts the receipts in the PDF file.
-
Click Print in the Command Item bar to begin the batch process.
-
Click Export to generate an XML file.
-
IMPORTANT: Cashiering's Use custom receipt functionality application setting, when set to True, displays a Custom Receipts panel of selectable Report Setup names at the bottom of the Collect Payments screen. This enables selection of a custom receipt report to print for a Bill of Sale, for example. The selected document(s) prints in addition to the receipt. You can also print the receipt via the Collect Payments screen and the Print Mass Receipt screen as well as from the Tax Information screen. A Report Setup tied to a Receipt data service category must be set up using the Reports and Interfaces > Data Services and Correspondence tasks. Contact your Aumentum Support representative if you need assistance setting this up.
Here is a table showing additional selections available, depending on whether you choose List, Range, or Batch.
|
Print By |
Selections Available |
Fields Available |
|
List |
PIN and Year |
PIN |
|
Tax year |
||
|
Bill Number and Year |
Bill Number |
|
|
Tax Year |
||
|
List to Print |
|
|
|
Print Option |
All Receipts for Year |
|
|
Most Current Receipt for Year |
||
|
Mark Receipts as Duplicate |
|
|
|
Sort Criteria |
Primary |
|
|
Secondary |
||
|
Range |
Receipt Number and Year |
Beginning Number |
|
Ending Number |
||
|
Beginning Year |
||
|
Ending Year |
||
|
Mark Receipts as Duplicate |
|
|
|
Sort Criteria |
Primary |
|
|
Secondary |
||
|
Batch |
Beginning Business Date |
|
|
Ending Business Date |
|
|
|
Batch Receipt Session |
|
|
|
Mark Receipts as Duplicate |
|
|
|
Sort Criteria |
Primary |
|
|
Secondary |
NOTES:
-
A Delinquent message is printed on cashiering paid receipts when back taxes remain unpaid. To set this up, go to Configuration > Application Settings, and set the effective date for Print delinquent message on small receipt.
-
Verify that the effective date in the side bar is the correct date. You can change the effective date at any time, even if you have generated/printed receipts. However, the new receipt numbers will re-sequence to the beginning number again.
SETUP: See Cashiering, Cashiering Setup, and Mass Receipts for any applicable prerequisites, dependencies and setup information for this task.
Tips
Proof your list to print. If you made an error, you can click Remove to delete the entry.
A list item that does not match up with a receipt will not be included in the PDF print file.