General
Navigate:  Case Management
> Configuration
> General
Case Management
> Configuration
> General
Description
Use this screen to manage general configuration settings in the Case Management module.
-
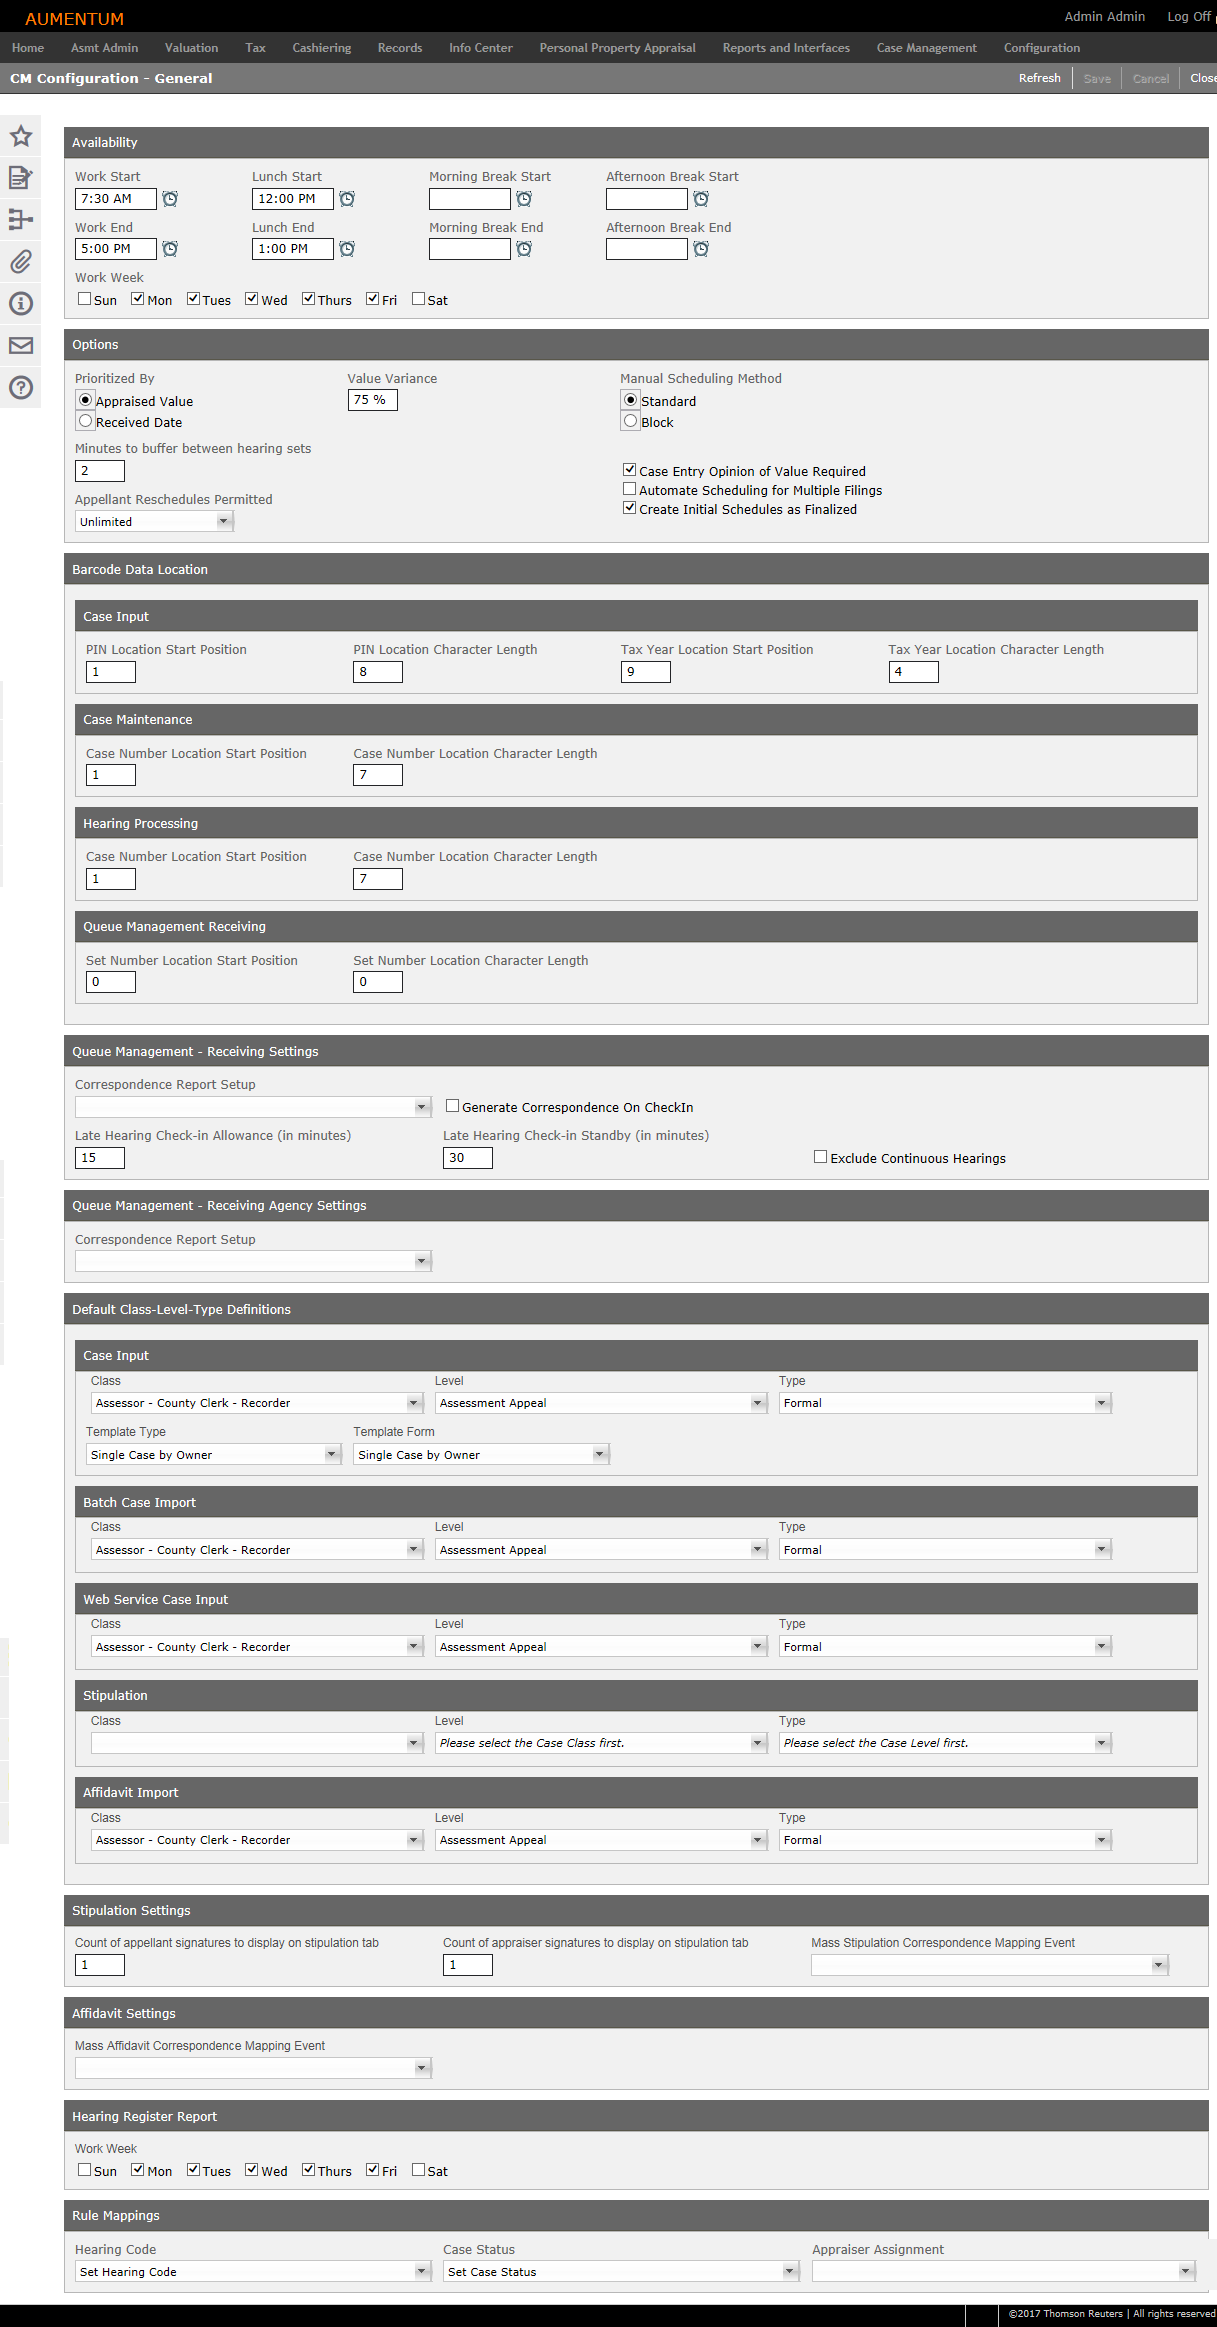
Availability – Configure default availability times for scheduling (e.g., work hours, working days for hearings, lunch, etc.).
-
Options – Configure settings for prioritizing sets of cases based on your business processes (e.g., prioritizing cases by Received Date).
-
Barcode Data Locations – Establish settings for barcode data element locations and character lengths to properly decipher information scanned from a barcode.
- Queue Management - Receiving Agency Settings – Set Queue Management Receiving options.
-
Default Case - Level - Type Definitions – Set default case class, level and type definitions to streamline the process of rapid case entry.
-
Stipulation Settings – Set default options for stipulation fields.
- Affidavit Settings
- Hearing Register
- Rule Mappings
Steps
-
On the CM Configuration - General screen, you can specify default settings for scheduling in the Availability panel. All content in this panel is optional. If no details are provided, the scheduler will not limit scheduling or availability by default values.
-
In the Options panel, select how to you want hearings prioritized.
-
Appraised Value – Appeals are considered for schedule placement based on the highest valued accounts taking top priority. In the event that multiple cases exist meet the scheduling criteria with the same value, priority would follow ranking by Date Received.
Click here for notes and examples.
NOTE: If you select to Appraised Value, you must also define the Value Variance. When a Value Variance is defined, Aumentum will only assign other hearings whose agency/PIN/property is within the established Value Variance percentage of the highest valued property in the group/hearing set. If no other hearing is found within the defined Value Variance, the hearing will be scheduled by itself, as its own set.
In the event that multiple PINs exist within a case, the top valued PIN being considered for scheduling will be used as the benchmark for comparison. All other case considered for inclusion in the set being generated will do a PIN-by-PIN comparison to the benchmark PIN. All subsequent cases must contain a scenario where all PINs within that case meet the identified Value Variance.
EXAMPLE
Agency A includes: PIN 1, valued at $1,000,000; PIN 2 valued at $100,000; and PIN 3 valued at $100,000. Agency B includes: PIN 4 valued at $999,999; PIN 5 valued at $999,900; and PIN 6 valued at $999,800
Grouping by top value with the Value Variance set to 75% would create a set for Agency A only with PIN 1 based on the calculation that PIN 2 ($100,000) divided by PIN 1 ($1,000,000) is less than 75% of the value of PIN 1. This would take scheduling precedence followed by a set for Agency B containing all three PINs. All three PINs will be included in this set because the calculation applied to PIN 5 and PIN 6 pass the Variance "check" when considered against PIN 4 (the highest value of the three PINs).
-
Received Date – Appeals are considered for scheduling placement based on a first received/scheduled basis. In the event that multiple cases meeting the scheduling criteria exist with the same date received, priority would follow ranking by top appraised value.
-
Automate Schedule for Multiple Findings – To accommodate automatic grouping of case schedules:
-
Upon import, the PIN and Tax Year are checked to determine if existing cases exist.
-
The Electronic Case Import creates a case for the PIN/Tax year as well as generates a batch processing exception log of cases with matching PIN/Tax Year including case, appellant, and case status.
-
Web Services creates a case for the PIN/Tax Year and responds to all occurrences of cases with matching PIN/Tax Years.
-
Specify the number of minutes to buffer between hearing sets (this number will be the default).
-
Make a selection from the Appellant Reschedules Permitted drop-down list, which determines how many times an appellant can reschedule his or her case. If Unlimited is selected (default), the setting is not used and the appellant is not restricted to any number of reschedule instances.
- Select the Manual Scheduling Method.
-
Standard – When selected, the application performs standard scheduling functionality.
-
Block – When performing Manual Scheduling, the recommended Participant (as selected) returns a match of availability based on Location.
-
Optionally, select each checkbox as needed.
-
Case Entry Opinion of Value Required – When selected the appellant's opinion of value is a required field during case entry.
-
Automate Scheduling for Multiple Filings – When selected, automated scheduling is enabled upon filing or to existing scheduled events where an open scheduled case exists for the same PIN/Tax Year. See the Tips section at the end of this help topic for more information.
-
Create Initial Schedules as Finalized – When selected, all scheduled cases are created as a Finalized schedule via manual scheduling, the Scheduling Wizard, or Scheduling External - Import; this setting is unselected, by default.
-
In the Barcode Data Location panel, define characteristics of a barcode if it was not generated through Correspondence. Barcode functionality is available for various search tasks in the Case Management module, for example:
-
Case Input – Enter the Start Position and Character Length of the PIN Location and Tax Year Location.
-
Case Maintenance – Enter the start Position and Character Length of the Case Number.
-
Hearing Processing – Enter the start Position and Character Length of the Case Number.
-
Queue Management Receiving – Enter the start Position and Character Length of the case number for check-in (Receiving).
-
In the Queue Management - Receiving Settings panel, make a selection from the Correspondence Report Setup drop-down list.
-
Select the Generate Correspondence on Check-in checkbox, if desired.
- Late Hearing Check-in Allowance – Enter how many minutes late a case can checked-in.
-
Late Hearing Check-in Standby – Enter how many minutes a late a hearing can be checked in, on standby.
-
Exclude Continuous Hearings – When selected, continuously scheduled hearings are excluded from Queue Management Receiving results and from the Batch Status Update process.
-
In the Queue Management - Receiving Agency Settings panel, make a selection from the Correspondence Report Setup drop-down list.
- In the Default Class-Level-Type Definitions panel, make selections from the drop-down lists in each of the sub-panels.
- In the Stipulation Settings panel, specify a number of appellant and appraiser signatures to display, and make a selection from the Mass Stipulation Correspondence Mapping Event drop-down list.
- In the Affidavit Settings panel, make a selection from the Mass Affidavit Correspondence Mapping Event drop-down list.
- In the Hearing Register Report pane, select the checkbox for each day in your work week.
- In the Rule Mappings panel, make a selection from the Hearing Code, Case Status, and Appraiser Assignment drop-down lists. Appraiser Assignment is used to configure the rule that automatically assigns an appraiser to a case.
- Click Configuration > Application Settings.
- On the Maintain Application Settings screen, select Effective Date from the Setting type drop-down list and select Case Management from the Filter by module drop-down list
- Locate Appraiser Assignment Rule Mapping and click Edit.
- Enter the name of the rule in the Setting Value column and click Apply.
- Click Save in the Command Item bar.
-
Click Save in the Command Item bar.
-
Click Refresh to clear all selections and refresh the page.
-
Click Cancel to discard changes since the last Save and retain the current view.
-
Click Close to end the task.
NOTE: Import scheduling is based on this setting, which offers the ability to automate scheduling upon filing or scheduling to existing scheduled events in which an open scheduled case exists for the same PIN/Tax Year.
NOTE: The Start Position is the numeric entry defines the data position within the barcode that begins the PIN. The Character Length refers to the numeric entry that defines the total number of characters to allocate for the PIN.
Click here to learn about the application setting for the Appraiser Assignment drop-down list.
The Appraiser Assignment Rule Mapping application setting supports automatic assignments.
NOTE: Rules are created via Case Management > Configuration > Rules Maintenance.
Tips
Automate Scheduling for Multiple Filings:
When selected, the Automate Scheduling for Multiple Filings checkbox (located in the Options panel of this screen) impacts the following tasks and scenarios:
-
Add Case – When a case is created for a PIN/Tax Year and a non-concluded case already exists for the same PIN/Tax year, with a scheduled date and time of a future date/time from today's date/time, the newly created case receives the same scheduled date, time and set number. This new case receives a status of Tentatively Scheduled.
-
Scheduling as described above will not occur if the PIN/Tax Year which was entered is part of a multi-group case where the existing case is also a multi-group case where all of the PINs do not match. In this case, the application displays an unsuccessful message: PIN ##### has an existing Case C##### scheduled for MM/DD/YY at ##:##. Automating scheduling could not occur due to conflicting PIN grouping.
-
Electronic Case Import – If cases you are importing match the PIN/Tax Year of another non-concluded case for the same PIN/Tax Year that has a hearing scheduled date and time which is in the future (from today's date), the newly created case receives the same scheduled date, time and set number as the existing case.
-
Unscheduled cases where previously scheduled cases exist,
Unscheduled cases where the same PIN/Tax Year is already scheduled, or
Unscheduled cases where previously scheduled cases exist (in continuous scheduling) with previous date to current.
In these scenarios, Aumentum displays a message indicating, This PIN/Tax Year has a scheduled hearing scheduled at the time associated with Case C####. Press Save to include this case with the existing schedule. This scenario could be encountered via:
-
Hearing Calendar - Right click on a case > Reschedule
-
Calendars > Manual Schedule > Manual Scheduling
-
Case Detail > Hearing Detail tab > Schedule icon > Manual Scheduling
The barcode data configured on the CM Configuration - General screen is used for various tasks in the Case Management module.
- Case Input barcode information is captured for the following tasks:
-
Advanced Search (Search by Case)
-
Case Maintenance barcode data is captured on the Case Detail screen, when you select to Edit the case.
-
Hearing Processing barcode data is captured when you select the Hearing Processing task. You are directed to the Advanced Search screen to search for a case; barcode data can be scanned here.
-
Queue Management Receiving barcode data is captured when check property owners/agents in using the Queue Management Receiving task.
Default application settings for the fields found on the CM Configuration - General screen can be managed by navigating to Configuration > Application Settings.
-
Select Effective Date as the Setting type.
-
Filter by the Case Management module.