Case Search
Navigate:  Case
Management > Cases > Case Search
Case
Management > Cases > Case Search
Description
Use the Case Search task to find and view a summary and details about the case.
Steps
-
On the Case Management Search screen, enter your search criteria and click Search.
-
Select the checkbox for one or more items in the Results panel and click Next.
NOTE: The number of records displayed in the search results is based on the Search Result Limit application setting.
Click here to learn how to set this limit.
- Click Configuration > Application Settings.
- On the Maintain Application Settings screen, select Effective Date from the Setting type drop-down list, and select System from the Filter by module drop-down list.
- Locate Search result limit and click Edit.
- Enter the maximum number of records you want to see in search results in the Setting Value column.
- Click Apply, then click Save.
- On the Case Detail screen, you can make a selection from the Case List drop-down list.
-
When the case has a scheduled date and time, the Set Context bar is visible. If any of the hearings in the set is continuous, then "Continuous" appears after "Schedule Date."

-
Click the Group Value hyperlink to see values related to grouped cases (for example, multiple PIN AIN appeal and Business Master related accounts appeal).
On the Grouped Cases Values screen, the related summed values are displayed for the grouped cases. The PIN count in displayed in brackets at the start of each row. Grand totals for each value correlation are shown below the grid.
- If flags are displayed at the top of the header panel, click on a flag to open the Manage Flags tab.
-
Click the arrow for the Create Evidence Packet button and choose Create Evidence Packet or Open Evidence Packet.
-
Click the arrow for the Edit Case button and choose Edit Case.
NOTE: Security can be set for this tab.
-
Make selections from the drop-down lists.
-
In the Maintain Accounts in Case panel, click Add New.
-
Start typing a PIN or AIN and make a selection from the list
- Enter a year.
- Make a selection from the Roll Caste and Value Type drop-down list.
- Make a selection from the Supporting Assessment Event drop-down list to identify what assessment event established the value that exists on a more recent assessment event that is under appeal. See Prerequisites at the end of this topic.
- Click Apply to save changes, or click Cancel Editing to delete the row without saving.
- Select the checkbox for one or more items in the Maintain Accounts in Case panel and click Delete the selected items.
-
Enter or edit applicable information in the Additional Appeals Information panel.
- Scroll to the bottom of the screen and click Save and Close.
-
Click Cancel to close the window without saving changes.
-
Enter or select information in the header area.
- Follow the steps for Edit Case (above).
- Click the Account link to open the Tax Information screen.
- Click Close to return to the Case Detail screen.
- Click the Appellant link to open the Maintain Legal Party screen.
- Click Return to go back to the Case Detail screen.
-
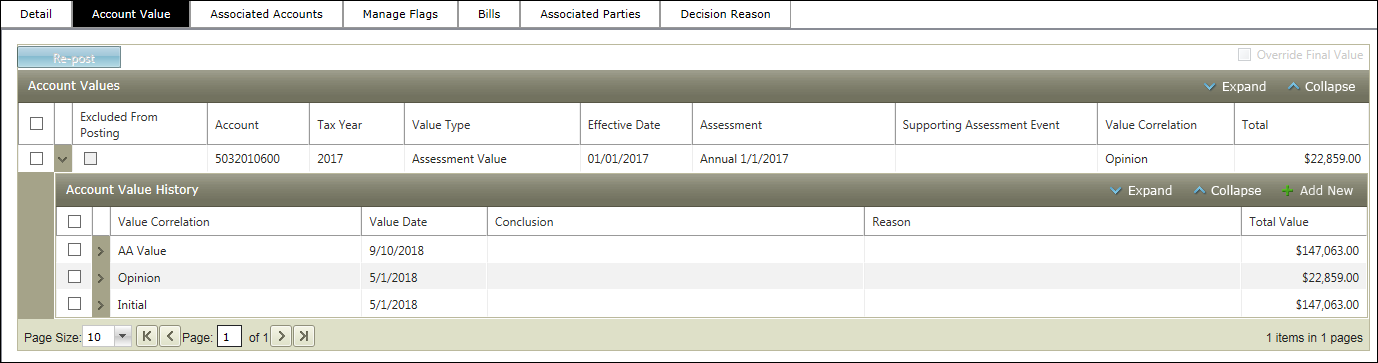
Click the caret in the Account Values panel to expand the Account Value History panel.
- In the Account Value History panel, click Add New.
- Make a selection from the Value Correlation drop-down list and enter or select the rest of the information.
- Click Apply to save changes, or click Cancel Editing to delete the account value without saving.
-
In the Account Values panel, click the chevron to see the Account Value History panel.
NOTE: When an assessment is selected while filing through Public Access, the appropriate Roll Caste is associated to the case automatically. Relevant information is displayed in the Assessment, Value Correlation and Total columns of the Account Values panel.
- Click Configuration > Application Settings.
- On the Maintain Application Settings screen, select Effective Date from the Setting type drop-down list, and select Case Management from the Filter by module drop-down list.
- Locate Personal Property: Use AIN? and Real Property: Use AIN? and click Edit.
- Select the checkbox in the Setting Value column to set it to True and click Apply.
- Click Save.
- Click Add New, or select the checkbox for one or more existing flags in the grid and click Edit.
- In the Flags panel, make a selection from the Attach To drop-down list. You may have other selections depending on what entity the flag is attaching to.
- Make selections or enter data in the other fields.
-
Click Apply save the flag information or click Cancel to close the Flag panel without saving changes.
-
Click in the As Of field to change the date and view a future/past amount due.
-
Click Add Fee to open the Apply or Remove Delinquent Fees screen and manage delinquent fees associated with the PIN.
- Click Close to return to the Case Detail screen.
-
Add, edit or delete information in the Assets panel.
-
Add, edit or delete information in the Bank Information panel.
-
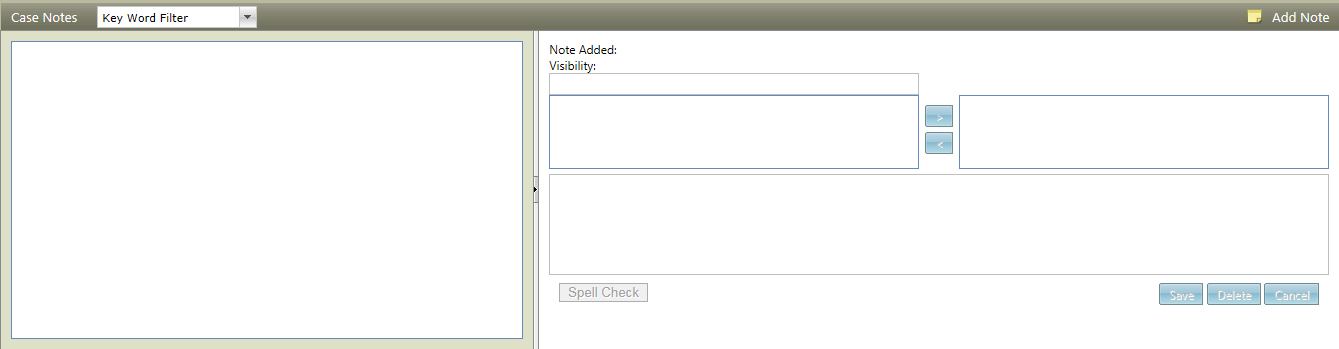
Optionallly, add Case Notes.
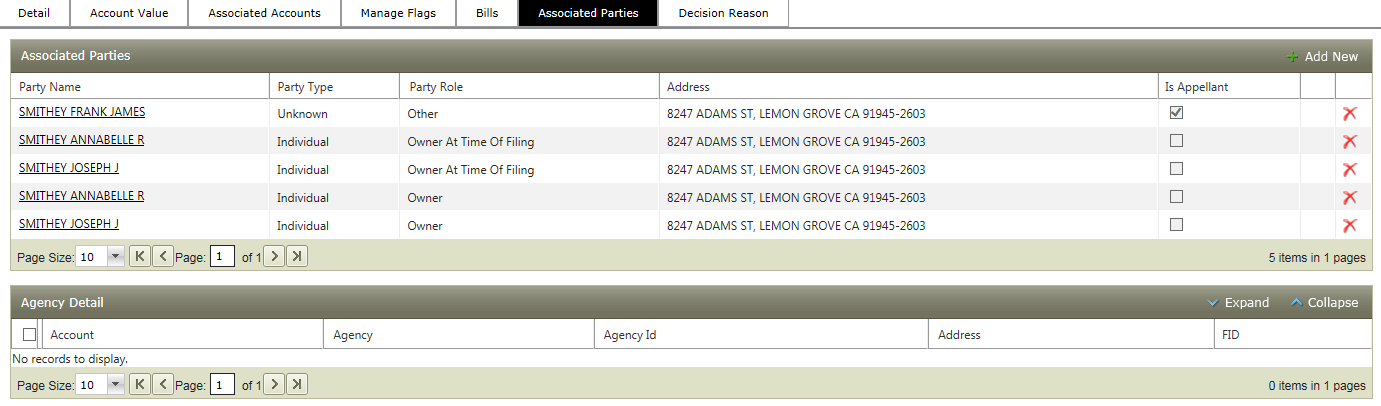
- Click a Party Name link to open the Maintain Legal Party screen.
- Click Return to go back to the Case Detail screen.
- Or click Add New.
- Make a selection from the Party Name and Party Role drop-down lists and click Apply to save the new associated party, or click Cancel to delete the row without saving.
-
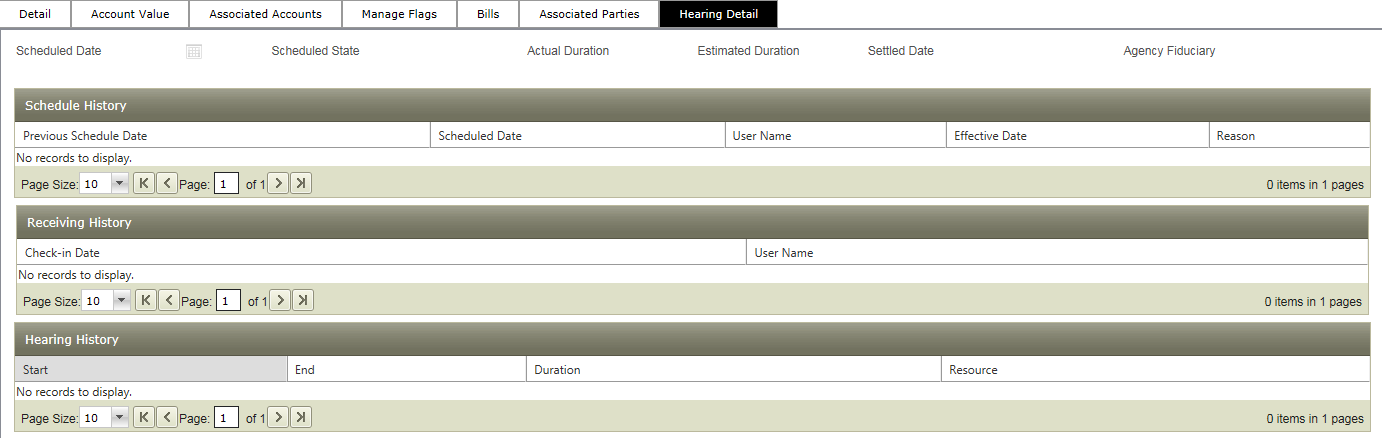
View hearing information, if a hearing has been scheduled.
- Make a selection from the Display drop-down list.
- Make a selection from the Key Word Filter drop-down list to filter existing notes.
- Scroll to select keywords for the note. Click the right arrow to add the keyword. To remove a keyword, click to select it and click the left arrow.
- Type the note content and click Save Note.
- Optionally, click Spell Check to open the spell check dialog.
NOTE: When a case status is changed, a Status Maintained event is triggered, which captures caserecordid and status as artifacts for the event.
Or click the arrow for the Edit Case button and choose Edit Group.
NOTE: Some of these tabs may not be available for the case you are viewing.
Detail – View account detail
and appellant information
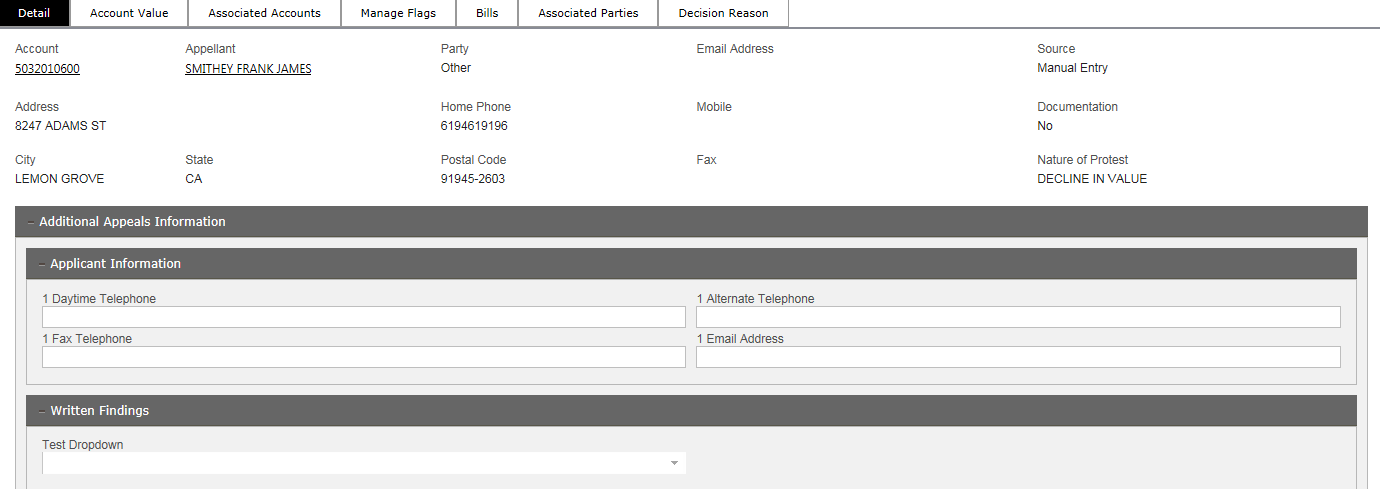
NOTE: The Additional Appeals Information panel is made up of user-definable fields via Case Management > Configuration > Cases.
Account Value – View or manually schedule a hearing
Click here to learn how to set security for this tab.
Associated Accounts
– View all accounts/PINs associated with the case.

NOTE: This information is read-only.
Select one or more accounts and click the caret to expand the account information in the grid.
When a PPA case is the primary view, the Account column displays the AIN. When an RPA case is the primary view, the Account column displays the PIN.
Click here to learn how to use PIN or AIN label.
Manage Flags – Add,
edit or delete flags for the case.
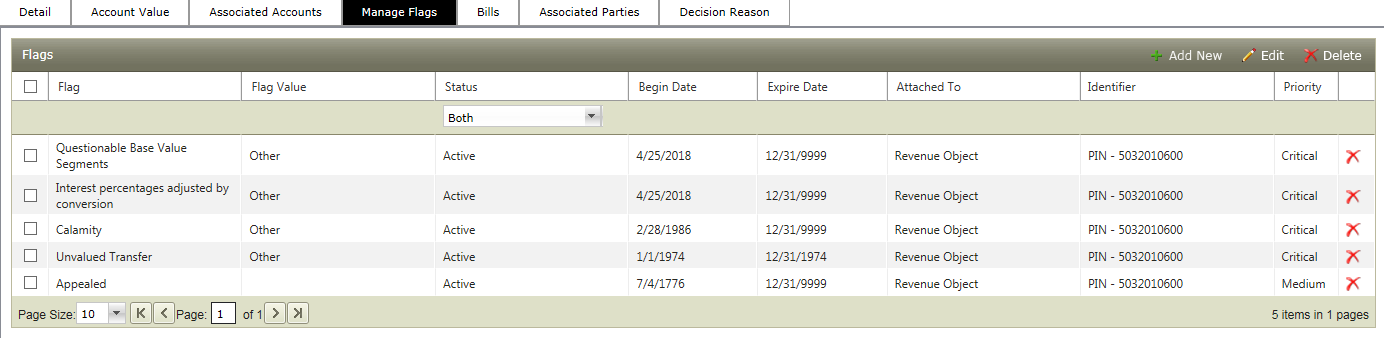
NOTE: Security can be set for this tab.
The Manage Flags tab follows standard flag functionality seen throughout the Aumentum application.
NOTE: If the flag can expire and has a duration, then the expiration is automatically calculated from the start date.
Bills – View tax bills and/or
add delinquent fees.

Seized Assets tab
See what seized assets are complete and available for the enforcement case.
Associated Parties – view and manage associated legal parties.
This tab shows legal parties and those that are not legal parties. Filing type (By Representative or not by Representative) via Add Case determines what types of parities are displayed in this tab. By Owner, By Agency, and By Other still show Legal Parties. By Representative does show the Owner Legal Party (Appellant and Representative are not legal parties).
Hearing Detail tab
OR
Click the Scheduled Date calendar icon to schedule an event.
NOTE: The Include all Appraisal site PINs in Post checkbox is displayed when only one PIN in a multi-PIN appraisal site is appealed. When selected, all PINs are posted with no case inclusion. When the checkbox is not selected, only those PINs included in case Post.
NOTE: The Repost button is available when the Final Value correlation exists and the internal status is Closed. You can repost a case without re-opening and closing a case.
NOTE: The Supporting Assessment Event column is visible when the configuration is established in Case Class Mapping and Supporting Assessment Event is identified during Case Input. If no value is selected during Case Input, the Supporting Assessment Event column is blank in the value grid. See Dependencies, Prerequisites and Setup at the end of this topic.
Decision Reason tab

Case Notes – applies to all tabs in the Case Detail screen
Stipulation tab
NOTE: Security can be set for this tab.
Dependencies, Prerequisites, and Setup
-
A case must exist and have been created using the Add Case task.
-
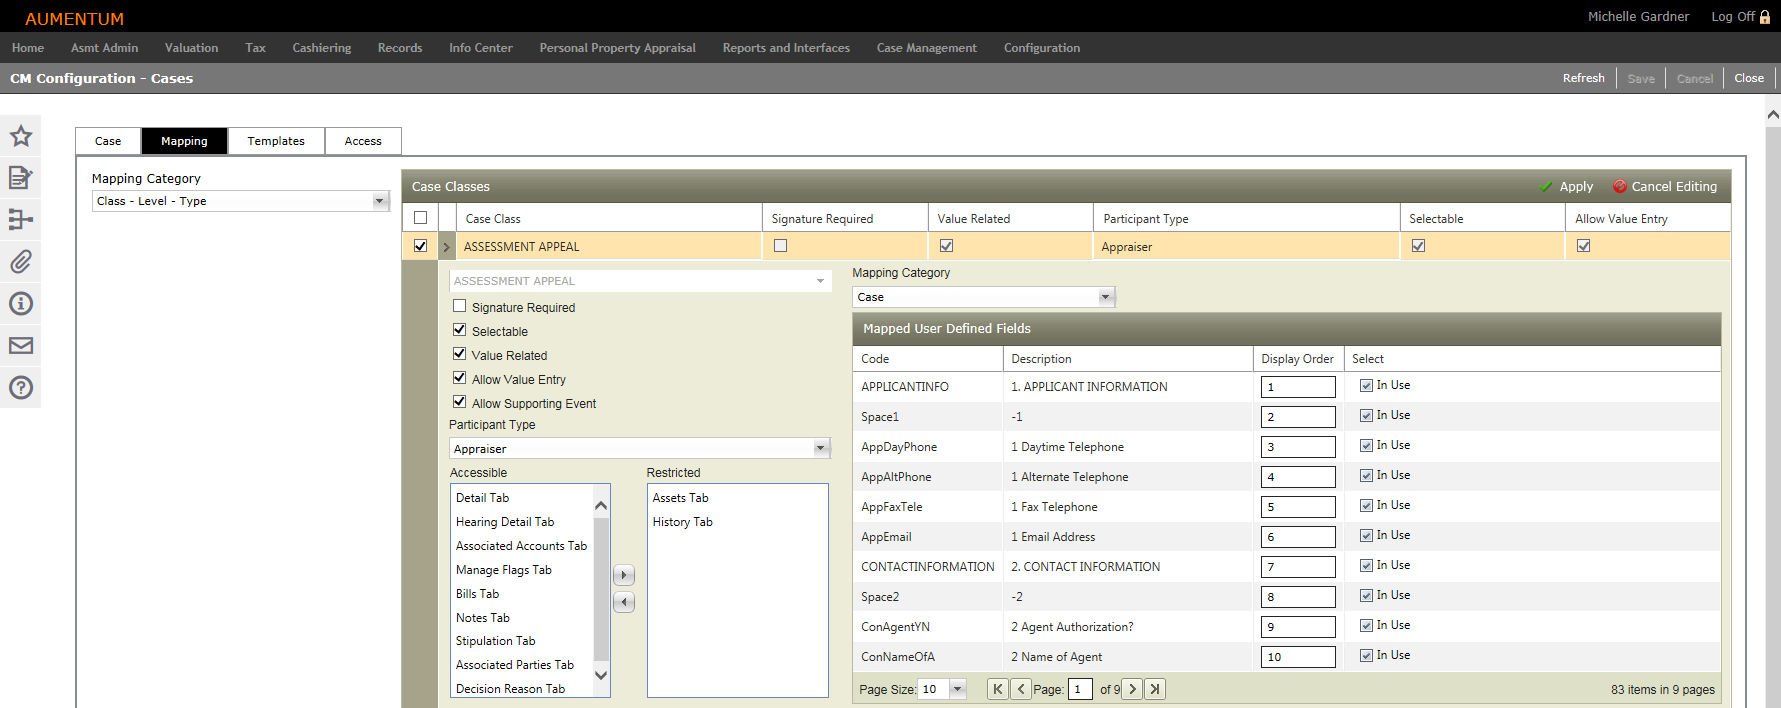
Cases must be configured using the Configuration task.
- Allow Supporting Event must be selected
- Click Case Management > Configuration > Cases.
- On the CM Configuration - Cases screen, click the Mapping tab.
- Select an item in the Case Classes panel and click the Edit icon in the panel's title bar.
- On the left side of the panel, select the Allow Supporting Event checkbox.
- Click Apply in the panel's title bar.
- Click Save in the Command Item bar.
- Click Close to end the task.
Click here for setup details
To enable the Supporting Assessment Event column, it must be selected in CM Configuration - Cases.
Application Settings
Personal Property Use AIN? – If set to True, the Account field in the Case Detail Detail tab displays the appropriate PIN.
Real Property Use AIN? – If set to True, the Account field in the Case Detail Detail tab displays the appropriate AIN.
Prerequisites
To enable the Supporting Assessment Event drop-down list, it must be selected in CM Configuration - Cases.
- Click Case Management > Configuration > Cases.
- On the CM Configuration - Cases screen, click the Mapping tab.
- Select an item in the Case Classes panel and click the Edit icon in the panel's title bar.
- On the left side of the panel, select the Allow Supporting Event checkbox.
- Click Apply in the panel's title bar.
- Click Save in the Command Item bar.
- Click Close to end the task.
Common Actions
Customer Inquiry – Opens the Customer Inquiry screen.
Valuation, Property Characteristics – Opens the RPA Main Page screen.
Application Processing, Search – Opens the Search for Applications screen.
Assessment History – Opens the View Assessment History screen.
Audit Trail – Opens the Audit Trail screen.