Maintain Application Details
Navigate:  Asmt Admin
> Application Processing
> Search for Applications
[New] > Search
for Applicant Legal Party > Maintain Application Details
Asmt Admin
> Application Processing
> Search for Applications
[New] > Search
for Applicant Legal Party > Maintain Application Details
AND
Asmt
Admin > Exclusion/BV
Transfer Maintenance > Exclusion
Search > [New OR select from results + New + certain exclusions]
> Maintain Application Details
AND
Sidebar > Worklist > View My Worklist
> Application Processing
AND
Various other workflows
Description
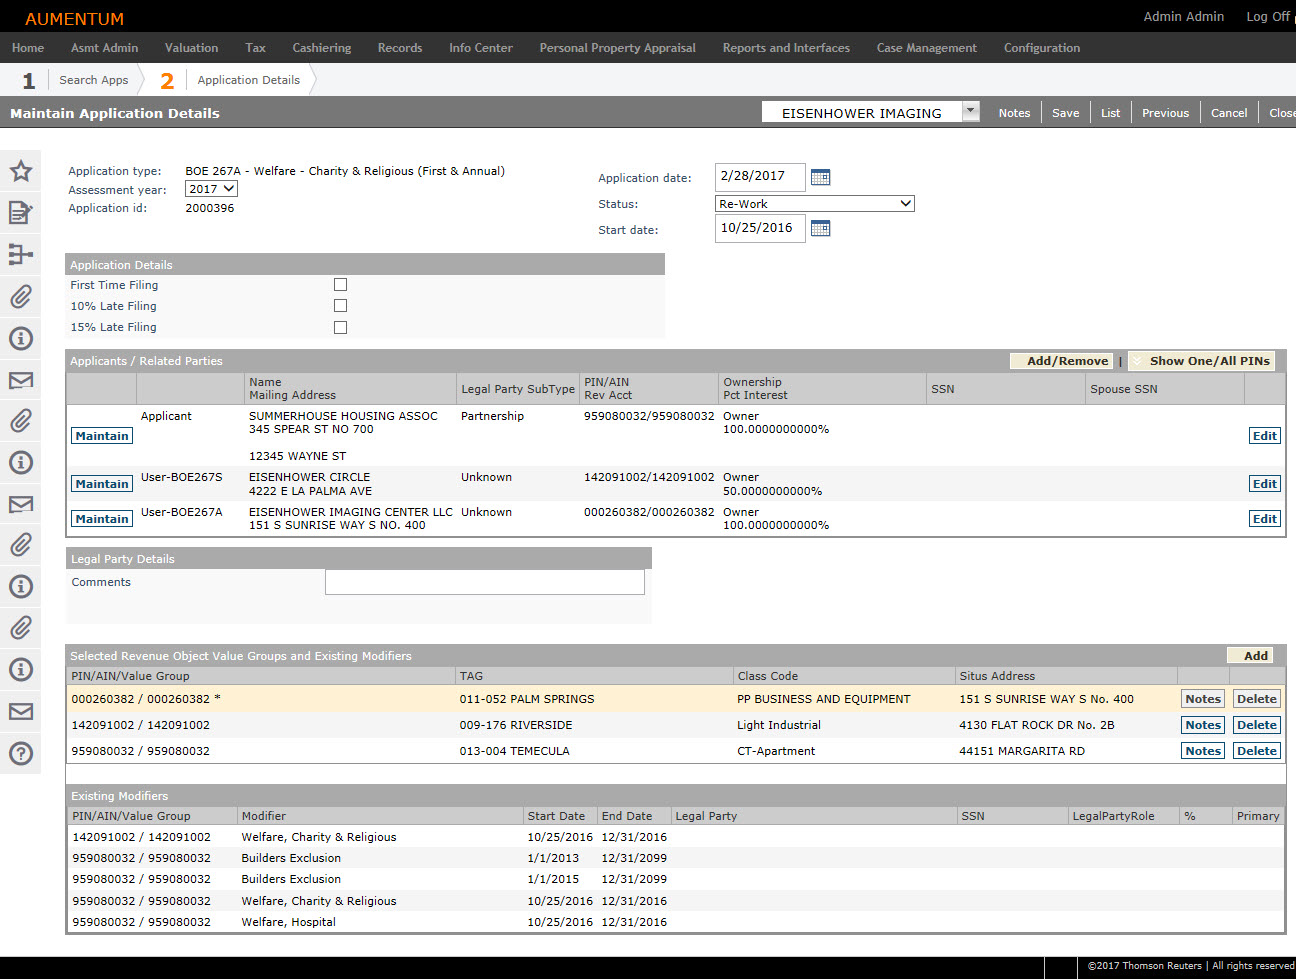
On the Maintain Application Details screen, you can maintain a new or existing value modifier application, including application questions and answers and the revenue object value groups to which the value modifier applies. If you select more than one existing application on the Search for Applications screen, the first one is displayed and the others are available in the work list. The applicants are listed at the top of the screen.
Also process application related workflows.
SETUP: See Application Processing for any applicable prerequisites, dependencies and setup information for this task.
Jurisdiction
Specific Information
California
- Application Type Categories are now Systype Categories, with the associated systypes, Modifier Addition and Tax Estimation. These systypes are used on the Set Up Application Type Questions screen during the Asmt Admin > Setup > Application Types task. A Tax/Payment button on the Maintain Application Details in Asmt Admin > Application Processing when adding an Application Type uses the Tax Estimation Application Category (set up in Asmt Admin > Setup > Application Types). Click the Tax/Payment button to advance to the Tax Map screen. Changes on the Tax Map screen triggers a Map Tax workflow. The Tax > Levy Management > Tax Estimator task creates estimates for Map Tax Estimation Types. A new Application Setting, Map Tax Inflation Factor, has been added for Tax Levy Management. This setting is used to identify the percentage used for calculating the map tax future taxes. The value is stored as a percentage and can be negative with up to 6 decimal places. The default value is '2' (2%). A data service has been added for 'Map Tax Certificate' to use for the Map Tax Clearance Certificate. Click the Correspondence icon in the sidebar to print the certificate. An Aumentum Event is created when this correspondence is printed.
-
SETUP: Go to Configuration > Application Settings > Maintain Application Settings. Select the Tax Levy Management module. Set the ' Map Tax Inflation Factor' setting to the percentage appropriate for your jurisdiction.
-
To create a correspondence setup to use for the Map Tax Clearance Certificate, follow these steps: Upload your report template via Reports and Interfaces > Correspondence > Setup > Report Setups > Manage Report Setups. Click Manage Templates to advance to the Manage Templates screen. Click Upload and navigate to your mail merge file and upload the file. Click Manage Report setups to create a Report Setup. Select the existing Map Tax Clearance Certificate setup or click New to create it. You advance to the Edit Report Setup screen. Enter or edit the Description, select the Map Tax Clearance Certificate data service, select the Engine, and select the Template you uploaded. Click Save.
-
Homeowners Exemption: When a homeowners exemption exists on a transfer for the particular tax year, an additional homeowners exemption cannot be added during processing, either for applications created in the Aumentum Platform or for applications in the workflow that were imported from other systems. Also, if the application is received more than 30 days after the bill date but before the first installment due date, a Late Home Owners Exemption (HOELate) modifier is added to the account.
-
Supplemental Assessments for Homeowners Exemptions: for supplemental assessments, when the Application Type or Homeowners Exemption Claim is selected, the following occurs:
-
For the Annual Assessment for the tax year of the supplemental assessment, the calculation checks to see if there was a valid homeowner exemption on the annual tax roll for the PIN based upon the Assessment year of the application.
-
If there is an active Homeowners Exemption on the annual tax roll for the assessment year chosen, the message Homeowners Exemption exists for PIN displays.
-
If a Homeowners exemption has been terminated through the transfer process, then the new homeowners exemption needs to exist for subsequent year. An Application Denial Letter can then be printed from the Correspondence icon in the sidebar.
-
If the application is received more than 30 days after the bill date but before the first installment due date, the HOX Late modifier is added.
Steps
- On the Maintain Application Details screen, make a selection from the Status drop-down list in the header area.
-
In the Application Details panel, select the checkbox for First Time Filing, if applicable.
- Make a selection from the How to Apply to Supplemental drop-down list.
-
In the Applicants/Related Parties panel, click Add/Remove in the title bar.
- On the Search for Applicant Legal Party screen, enter your search criteria and click Search.
- In the Search Results panel, select the checkbox for one or more items in the grid and click Add Selected in the panel's title bar.
- In the Applicants panel, select the checkbox for one or more items in the grid and click Next.
-
On the Maintain Application Details screen, the selected parties are displayed in the Applicants/Related Parties panel.
- Click Show One/All PINs to toggle between showing all or one PIN.
-
Click Edit for an item in the grid to update SSNs, then click Apply.
- Click Maintain to open the Maintain Legal Party screen. Click Return when finished.
-
In the Legal Party Details panel, details associated with the Applicants/Related Parties are displayed.
- In the Selected Revenue Object Value Groups and Existing Modifiers panel, click Add in the title bar.
- On the Select Revenue Objects screen, enter a PIN or AIN and click Add. Or, click Search.
- On the Records Search for Revenue Object screen, enter your search criteria and click Search.
- On the Records Search Results for Revenue Object screen, select the checkbox for one or more items in the grid and click Return.
- Review the items In the Selected Revenue Objects panel. If necessary, click Remove to delete an item from the grid.
- Click Next to apply the modifiers to these revenue objects.
-
Click Save in the Command Item bar. Or, if working from the worklist, click the applicable workflow button, such as Submit to Approve depending on the point to which the workflow has advanced, your user rights and queue, and your specific jurisdiction, to submit it to the next step in the workflow. An additional Change Reason pop-up may display on Save, depending on the application, when in a workflow.
NOTE: When a modifier is being added, the modifier start date is automatically the same date as the application date.
-
Click List to return to the Search for Applications screen.
-
Click Previous to return to the previous screen.
-
Click Cancel to cancel the changes.
-
Click Close to end the task.
Claim Processing
For claims processing on the Maintain Application Details screen:
-
The Legal Party is populated from the application.
-
Multiple modifiers are allowed per application.
-
Modifier dates are flexible and can be maintained.
Workflows
Certain workflow tasks include navigation to the Maintain Application Details screen. If so, this screen may also include Submit to Approve and Accept/Reject buttons, depending on your jurisdiction setup and your user security rights and role. See View My Worklist for detailed information about workflow processing.
IMPORTANT: This task becomes part of the workflow, depending on your jurisdiction setup, when creating a new application as well as for various other workflow processes, such as the Decrease in Value Claim (DIV Claim) or when making changes from the Tax Map screen. When accessed from the My Worklist screen from the sidebar workflow icon on any screen, a Submit to Approve , Accept/Reject, and Approve buttons may also be available at the top of the screen, depending on where the item has advanced to in the workflow and depending on your user security rights and role.
After the first time this is submitted for approval, the Application Type is no longer available for selection, but other selections are available for maintenance. For certain workflows, when clicking Finish the second time through the worklist, the task is complete.
NOTE: When you set up application type questions for the Questions panel on this screen, and you select the Application Category of Modifier Addition on the Set Up Application Type Questions screen, you advance to the Maintain Application Details screen. When saving the application, or if in a workflow, you are the approver and you select the Approve button, a Change Reason pop-up displays for the purpose of selecting the modifier change reason.
NOTE: When a modifier is being added, the modifier start date is automatically the same date as the application date.
Tips
You cannot save an application in a status other than pending if no revenue object value group has been selected.
Use the work list tab on the sidebar to select another application to maintain.
Click Show One/All Pins to toggle the applicants list to display all revenue objects owned by the legal party or just one.
The application ID is automatically assigned.
Permission to modify an application that has been approved can be controlled through security role maintenance.
Common Actions
Revenue Object Modifier Maintenance – Opens the Maintain Revenue Object Modifier screen.
Related Revenue Objects – Opens the Select Related Revenue Objects screen.
Tax Detail – (Available only when the application is in the Review status) Opens the Tax Information screen.
View Document History – Opens the Document History of Revenue Object screen.
View Ownership History – Opens the Ownership History Information screen.
Corrections Maintain Interest – Opens the Search for Official Documents to Correct screen.
Transfer Detail Correction – Opens the Search for Transfer screen.
Assessment History – Opens the View Assessment History screen.
BVS History – Opens the View Base Value Segment History screen.
Maintain Revenue Accounts – Opens the Maintain Revenue Accounts screen.