Assessment Event Maintenance
Navigate:  Asmt Admin > Assessment Event Maintenance
Description
Assessment events apply to jurisdictions that use event-based assessment and tax roll processing. This task is used to create and maintain assessment events on an account, e.g., annual assessment, property transfer, new construction, etc.
A user-driven task can be used through Records and Valuation to create events as well as an event imported into the application through document ingestion and GIS functionality.
Annual Assessment Event Types
IMPORTANT: The national standard Aumentum applies is that only one annual assessment event may exist for a revenue object for a given year.
If the type of event is Annual, and you attempt to add a second Annual assessment event type for the same year, the original annual assessment will be voided.
The assessment event date for a single annual assessment event on a revenue object should be equal to the first of the Assessment Year as determined by the particular functional calendar. This does not apply to non-annual events; you can create multiple non-annual events on a revenue object.
Events, Base Values (BV), and Base Value Segments (BVS)
California only: A Base Value Segment (BVS) is the value of an interest in a property, or a physical portion of a property subject to Proposition 13 assessment limitations. Events in Aumentum Tax trigger the creation and termination of Base Value (BV) records and appraisal of properties. The total value of a property is the sum of each of its Base Value Segments.
Creation or change of a BVS is typically triggered by an assessment event, for example, a change in value, new construction, even a disaster. A BVS is uniquely identified by:
-
A base year
-
Beneficial interest
-
Valuation component type (set by the event that creates the base value segment).
A BVS is characterized by its assessment method as either:
-
Restricted
-
Unrestricted
Events that Trigger BV Recalculation
Triggers for BV recalculation include events such as:
-
100% transfer of real property (non-excluded, non-restricted) to a single beneficial interest.
-
Fractional transfer of real property (non-excluded, non-restricted).
-
Completed new construction (non-excluded) determined to constitute a reassessable event.
-
Calamity and demolition.
-
Restoration from calamity.
-
Transfer of base value from another property (Proposition 60, 90, 110, 3).
-
Excluded property transfers (Propositions 58/193).
Institutional Exemptions
Most exemptions apply to an overall assessment value rather than to a specific sub-component or component. However, instances exist in which an exemption is tracked at the sub-component or component level. This is especially critical in cases of partial institutional exemptions in which a portion of a property qualifies for an exemption that must be renewed and the value reappraised on an annual basis. Sub-component base levels might include, for example:
-
Improvement value for a gift shop in a museum, which is taxed while the museum itself is tax exempt.
-
Land value for a parking lot of a church that is used for farmer’s markets during the week.
When there is real property that qualifies for the Institutional Exemption and that real property has personal property that also qualifies for the exemption, the Institutional Exemption is applied to both the real and personal property.
Institutional Exemption Field Check Process Workflow
Depending on your jurisdiction and setup, an event and Application Status Changed workflow are created when you select Field Check from the Status drop-down list on the Maintain Application Details screen (Assessment Administration > Application Processing) for an institutional exemption application. The workflow is placed in the Appraiser queue.
Depending on your user rights and the queue to which you have access (defined via Configuration > System > Workflow Configuration), you can select the workflow item for processing as follows:
-
On the View My Worklist screen, click on the Application Status Changed workflow.
- On the Maintain Application Details screen, make any necessary changes and click Finish.
-
When accessed via the workflow, the status of Approved, Deleted, and Denied are not available on the Maintain Application Details screen, and the screen includes an additional task bar Reviewed button.
-
Once reviewed and after clicking Save, you can then change the Status.
-
If you change the Status to something other than Reviewed, the application saves normally.
-
If you select the Status of Reviewed, and click Save, a message displays indicating this will advance (end) the workflow.
-
Click OK to close the task and end the workflow.
The AEM Working Set
Assessment Event Maintenance displays a record of events ordered by events date. You can search for events related to a specific PIN, event state, event type, change reason or event workflow queue. The Assessment Event Maintenance screen shows a history of events that have taken place for the search criteria entered.
-
On the Search for Assessment Events screen, enter your search criteria and click Search.
- In the Search Results panel, select the checkbox for one or more items in the grid and click Next.
-
On the Maintain Assessment Working Set screen, there are several tabs:
- Assessment No. hyperlink opens the Review Assessment screen.
- Decline button – Appears in line with assessments that are not in a Void or No Change status. Click Decline to override the proposed assessment event values with the original assessment event values on the Corrections tab.
- Reject Event – Reject the last assessment transaction and revert the assessment back to the last value.
-
An indicator pointer before an item identifies the currently selected item.
-
Any items that require review or for which there is missing, insufficient, or unprocessed data are indicated with an exclamation point to the far right of the line. Hover over the explanation point to view the informational message.
Riverside, CA
The following types of assessments are automatically accepted and do not require user review in order to be reviewed:
- Original annual assessments
- Original supplemental assessments
The following types of assessments will create an Assessor Review work item and require manual review and acceptance by a user in order to be enrolled:
- Corrections to certified supplemental assessments
- Original and corrected escapes
- Voided supplemental, escape, and annual assessments
-
Click View BVS to open the Base Value Segment Information pop-up on which you can view all base value segments for the event.
OR
Click BVS in the Command Item bar to open the Maintain Base Value Segment screen on which you can maintain and add base value segments. -
Click Close to close the pop-up.
-
Click Assessment to open the Review Assessment screen.
-
Click Previous to return to this screen.
-
Click the Override tab.
NOTE: Certain event overrides are not reflected in the BVS interface. If there are value updates that must be made to an event, it should be processed through Valuation or Records.
- In the Value Overrides panel, click Add.
-
In the Override Details panel, make a selection from the Value Type drop-down. Additional drop-down list and fields vary depending on your selection. Click Add.
-
Click Cancel to cancel the addition.
-
Click Save in the Command Item bar.
- In the Value Overrides panel, click on an existing item to display the details in the Override Details panel.
-
The Value Type field is read-only. Make selections from the other drop-down lists and/or edit the fields and click Update.
-
Click Save in the Command Item bar.
- Click Configuration > User-Defined Fields.
- On the Search for User-Defined Fields screen, select Roll Processing from the Module drop-down list.
- Optionally, enter a code and label, then click Search.
- Click on a UDF to open the Maintain User-Defined Fields screen.
- Click Save.
- Click List to return to the Search for User-Defined Fields screen.
- Click Close to end the task.
-
Click the UDFs tab.
-
Enter data as applicable.
-
Click Cancel to remove data from the UDF fields.
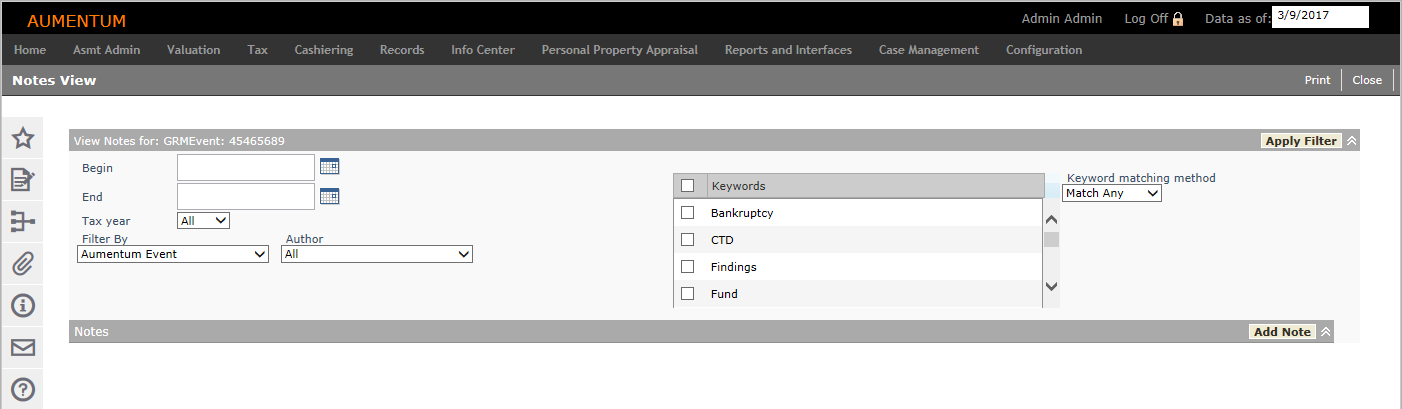
- In the Command Item bar, click Notes.
- On the Notes View screen, select parameters and click Apply Filter in the View Notes for header, if necessary.
- In the Notes panel, click Add Note.
- On the Add Notes screen, specify a tax year, where to attach the note, keywords and privacy. Provide relevant information in the Note text field.
- Click Save, then click Close in the Command Item bar.
- On the Assessment Event Override Main View screen, click Edit in the Command Item bar.
- In the Change Reason Statutory References pop-up, make a selection from the Change Reason drop-down list and set a Statutory Reference related to the override. Add notes to help other users understand why this override took place. Click OK.
- Value types that are available for override are grouped by sub-component or valuation object.
- Enter a new value in an editable field.
- Green rows are calculated total values and cannot be overridden.
- Click Save at the top of panel. Overridden values are highlighted in yellow.
- Click Cancel to discard your changes.
- Click Previous in the Command item bar to return to the Maintain Assessment Working Set screen.
- Click Close to end the task.
- Beneficial Interest – A party associated with a particular BVS. Typically, a beneficial interest is a property owner or long term lessee. A beneficial interest may be a single individual or a collective entity that holds an interest in a property and is associated with a particular BVS.
- Base Value Segment Event – Make a selection from the drop-down list to select a base value segment event for the Beneficial Interest. Only concluded values or values that were added on the Valuation Conclusions tab are displayed in the drop-down list.
- Ownership Event – Event Name and Date
- DocNumber – Documentum or Doc Received Test
- % Interest Gained – this will only populate for transfers - % of ownership gained from event
- BI % - % of the BVS the owner has - Component – A BVS is composed of components that record individual base values for land, improvements, living improvements, mineral rights, and machinery and fixtures.
- Component
- Sub-component – A physical portion of a property with a particular appraisal value as of a particular date that is linked to one or more BV components. Typically, a sub-component is a designated portion of land, a particular structure such as a building or an addition to a building; a single planting of trees and vines (living improvements); particular machinery and fixtures; individual mineral rights, and any other separately appraised portion of a property that contributes to its value or features.
- Base Value
- Base Year - The year used to calculate a BVS Factored Base Value (FBV) for assessment calculations. Typically, the base year is set by business rules triggered by an assessment event and is determined by the date of that event.
- FBYV (Year) – Factored Base Year Value (Trended to the year) - The sum of BVS values at a particular point in time calculated by applying a compounded CCPI (California Consumer Price Index) from each BVS' base year to a particular event date among all active base value segments.
- Click Add.
- On the Add Beneficial Interest screen, make a selection from the Ownership Event drop-down list.
- Enter or select the document date.
- Make a selection from the Beneficial Interest drop-down list.
- Enter the Beneficial Interest Percent.
- Add – add a new base value event
- Re-Calculate change – if an event is added, this will calculate the values based on the changes made
- Save changes – only enabled when changes have been made - if a new event is added, the user will need to save for them to be reflected in the application
- Cancel changes – only enabled when changes have been made - removes changes without affecting post values
- Delete all overrides – only enabled when changes have been made, only available for new events
- Click Save.
- Click Re-Calculate Changes.
- Click Save Changes.
- Click Add.
- In the Add Base Value Segment screen, make a selection from the Base Value Segment Event drop-down list.
- Enter or select a base value segment date and a base year.
- Enter a value to distribute.
- Select one or more sub-components to include.
- Click Save.
- Click Re-Calculate Changes.
- Click Save Changes.
Working Set tab
Click the Working Set tab at the bottom-right of the screen to open it.
The Assessments tab and the Working Set tab are both displayed.
NOTE: Corrections to the assessment working set forces individual assessments into a Need Review assessment state, even in the event that the correction made no changes to any values.
Locked Assessment Working Sets
If an item is locked by another user, a message is displayed at the top of the screen. Click the Unlock button to maintain data.
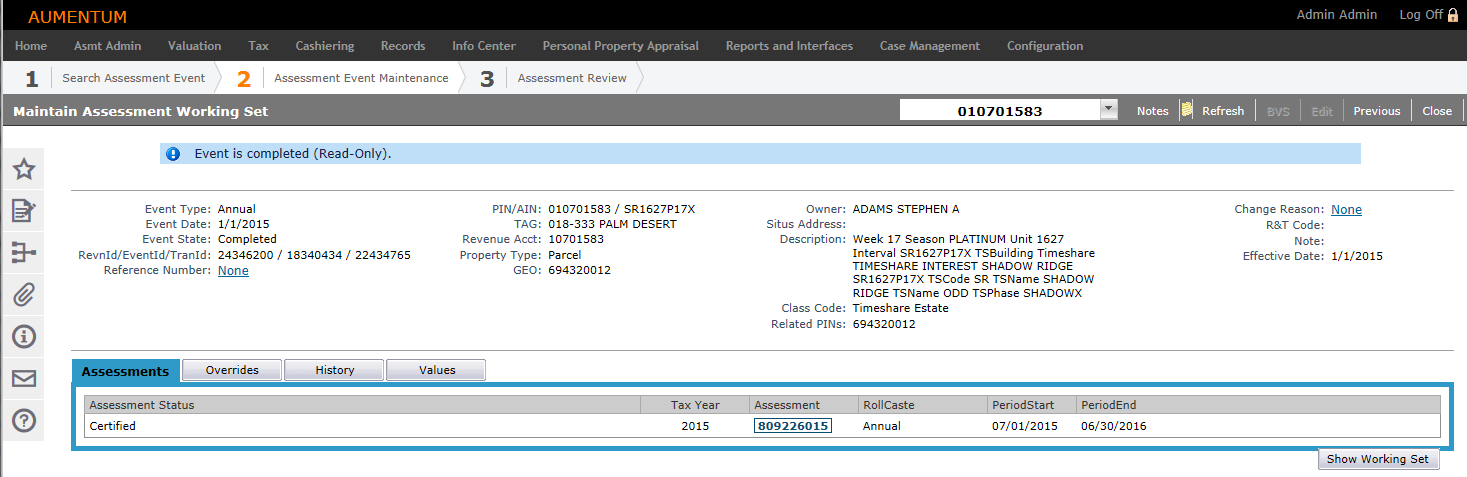
View a Completed (Read-Only) Assessment Working Set
When an assessment is complete and certified, the screen shows the event as read only. An Assessments tab displays rather than the Working Set tab when the assessment is not complete.
Edit a Completed (Read-Only) Assessment Working Set
Even though an assessment is complete and in a read-only state, you can click Edit in the Command Item bar to open the Create New Assessment Event Transaction screen on which you can select a Change Reason and, depending on your configuration, an R&T code.
Depending on the selections you define on the Create New Assessment Event Transaction screen, you may need to perform a recalculation. You automatically return to the Maintain Assessment Working Set screen and the Recalculate All button is displayed and active, and the assessment no longer shows as in the read-only status.
View an Active Assessment Working Set
Assessment status is active (not read-only status) when not yet processed or certified.
NOTE: The application setting Working Set Allow Override of Auto-Recalc must be set to True to make the Decline button available.
NOTES:

View Base Value Segments (CA only: Prop. 13 only applied to California)
NOTE: The View BVS button is available only for Prop 13 parcels. Otherwise, it is not displayed.
Review the Assessment
Aumentum assigns every assessment an event ID number automatically. When an assessment is complete and in the read-only state, an Assessment ID number button is displayed in the Assessment column.
Corrections tab
This tab shows previous and corrected values and differences, and you can mass approve corrections that affect multiple years. The Corrections tab also works with workflow assessor reviews.
Click the plus sign next to each event to review changes. Click Accept All Changes in the Correction Details panel header.
Overrides tab
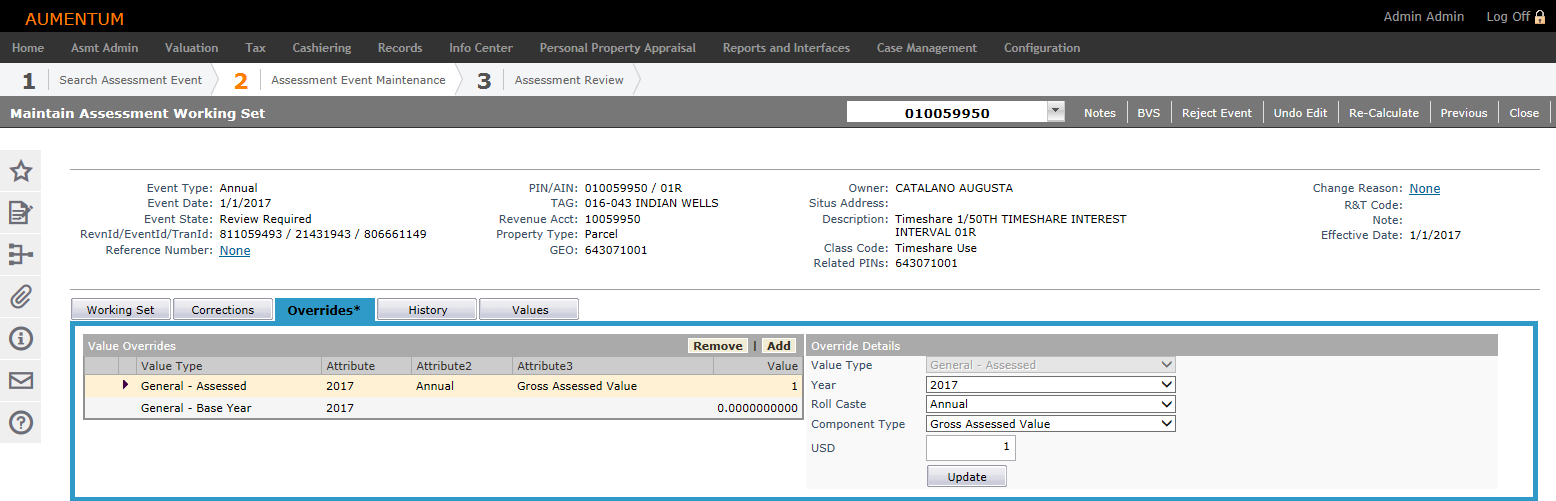
Add Override
Edit Override
History tab
The History tab displays transaction number for each event, change reason, state, created date and time, and user name of the individual who performed the action.
Values tab
View the values for each Class type related to this PIN.
User Defined Fields
NOTE: A UDF tab displays only if user-defined fields have been defined.
Click here to learn how to define UDFs
OR
Click New to create and define details for a new UDF.
Menu Options
Notes
Override
NOTE: Overrides editing is controlled by permissions. If you have permissions for Assessment Event Maintenance, then you can override values.
Overrides can be viewed on the Assessment History screen, and in the Maintain Assessment Working Set interface.
BVS (Base Value Segment)
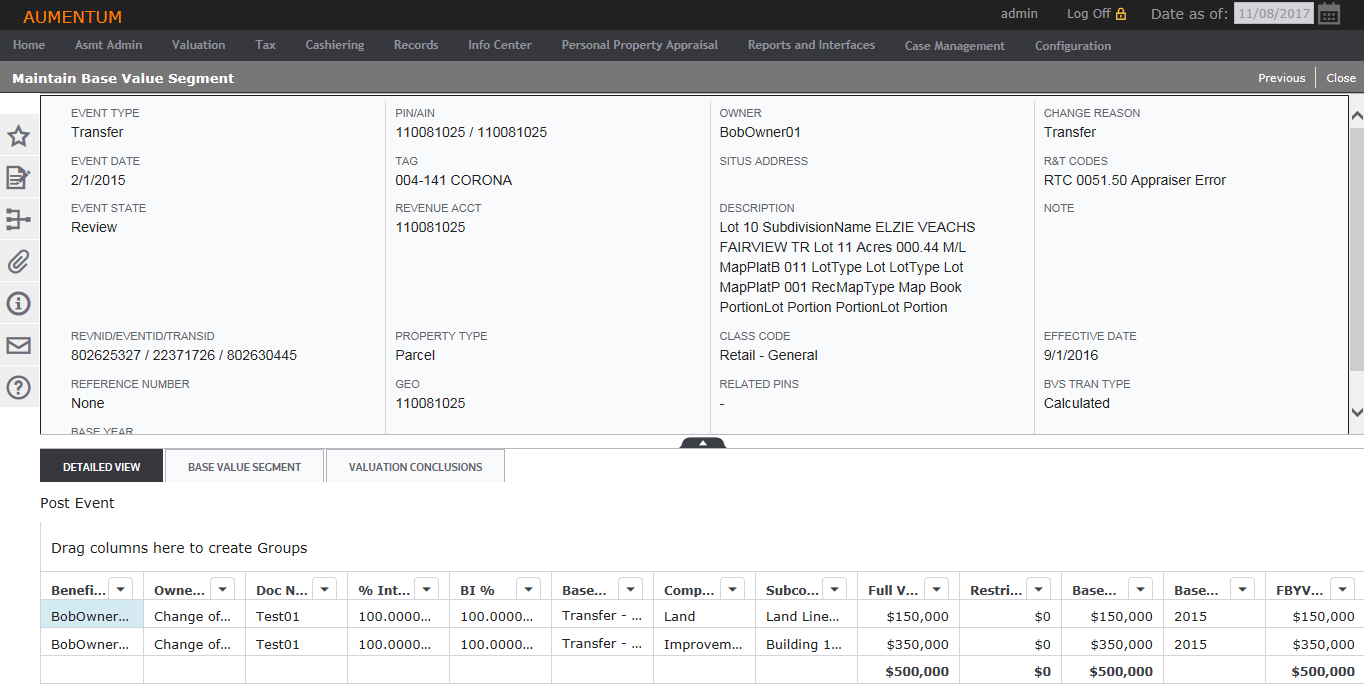
In the Command Item bar, click BVS. On the Maintain Base Value Segment screen, the header area displays read-only information about the selected PIN. Click the arrow at the bottom of the header area to show and hide this information.
Detailed View tab
This tab is read-only. You can drag up to four column headers to the header area in order to group the grid information. Click the arrow in the column header to filter the column data.
NOTE: Grouping is not retained when you switch tabs or leave this screen.
Base Value Events tab
This tab shows the ownership event for the beneficial interest, and is where you can add and remove base value segments. Click the chevron on the left to show the related base value segment events.
NOTE: You must be in edit mode from Assessment Event Maintenance for edit actions to be available.
To add a beneficial interest:
Click here for descriptions of each column.
Expand/Collapse All – Displays more information about the event.
Actions – When in edit mode, edit tools are available in this column
Beneficial Interest – Owner; pre-populated with the Beneficial interests from existing transfers. You cannot create a new Beneficial Interest but can only select from the existing Beneficial Interests pre-populated in the drop-down list from the existing transfers.
Ownership Event – Event that created the Base Value Segments
Doc # - From documentum (specific to Riverside); other counties may have a different document scanning/input system or doc received test (internal import process)
% Int. Gained – Populated on a transfer, % of ownership gained from event
BI % - Percent of ownership per owner; pre-populated from the existing transfer doc, and you can type in the field and change the amount.
Restricted Value FBYV (year) – Factored Base Year Value (Trended to the year)
Valuation Conclusions tab
This tab shows transactions that created the base value, before beneficial interest is applied.
To add a base value segment:
Notify
In the Command Item bar, click Notify. In the Send Notification for Review pop-up, make a selection from the To drop-down list. Enter notification information and click Send.
Edit/Undo Edit
In the Command Item bar, click Undo Edit to undo the last change you made.
OR
Click Edit to open the Create New Assessment Event Transaction screen. Enter or select the criteria and references, then click Correct. You automatically return to the Maintain Assessment Working Set screen.
Re-calculate
In the Command Item bar, click Re-Calculate to update the working set with changes you made.
Previous
In the Command Item bar, click Previous to return to the Search for Assessment Events screen.
Close
In the Command Item bar, click Close to end this task.
Creating an Assessment Event Transaction
- On the Search for Assessment Events screen, click New in the Command Item bar.
- On the Create New Assessment Event screen, enter the relevant criteria and click Add.
- The Maintain Assessment Working Set screen opens automatically.
Common Actions
Approved Applications – Opens the Search for Applications screen.
Assessment History – Opens the View Assessment History screen.
BVS Allocation – Opens the BVS Allocation screen.
BVS Export – Opens the Data Service Viewer screen.
BVS Import – Opens the BVS Allocation screen.
BVS Report – Opens the Base Value Segments report.
Revenue Object Modifier Maintenance – Opens the Maintain Revenue Object Modifier screen.
View Ownership History – Opens the Ownership History Information screen.
Notices: Aumentum can be configured to generate supplemental and escape notices, which can be run as part of a batch process or printed individually from Assessment Event Maintenance.
Dependencies, Prerequisites, and Setup
IMPORTANT: Security is available for the New button on the Search for Assessment Events screen so that users can create new assessment events or are prevented from doing so, depending on your jurisdiction. The jurisdiction administrator defines these rights.
-
Click Configuration > Security and User Maintenance > Roles > Maintain a Role.
-
Locate the role and click Edit.
- On the Edit Role Details screen, click Non-Menu Items.
- On the Edit Non-Menu Item Role Details screen.
-
Select to Modify security for Roll.
-
Set rights for NewAsmtEvent for the Role as applicable.
Application Settings
Assessment Roll (Secured/Unsecured) Closed Through Year
California only
By default, this value is 0, which means that the roll is not closed. This is not an automatic setting; it must be updated with each closed year. When a year is added to the application settings, any new annual assessments created for that year and earlier will be created with a $0 value and all value will be added to an escape assessment.
- Click Configuration > Application Settings.
- On the Maintain Application Settings screen, select Effective Date from the Setting type drop-down list, and select Assessment Administration from the Filter by module drop-down list.
- Locate Assessment Roll (Secured) Closed Through Year or Assessment Roll (Unsecured) Closed Through Year and click Edit.
- In the Setting Value column, enter a year and click Apply.
- Click Save in the Command Item bar.
Net Taxable Value Display
Whether to display the assessment value as net taxable on the Working Set tab of the Maintain Assessment Working Set screen is determined by the Assessment Administration effective date systype application setting Working Set Net Taxable Value Type. Set this via Configuration > Application Settings > Maintain Application Settings.
IMPORTANT: Set this to Net Taxable for California jurisdictions.
Additional Setup
See also the following topics for configuration, prerequisite and setup information:
-
Assessment Administration
-
Assessment Processing
-
Assessment Administration Setup
-
Assessment Roll Processing